 and
and  are shown, see the following screenshot:
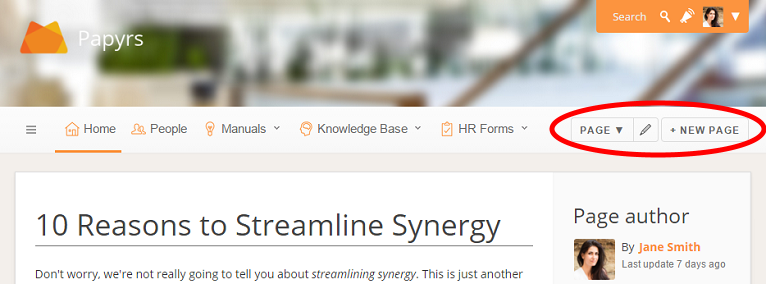
 (this button is only available if you
have permissions to create a new page). You will see the following form:
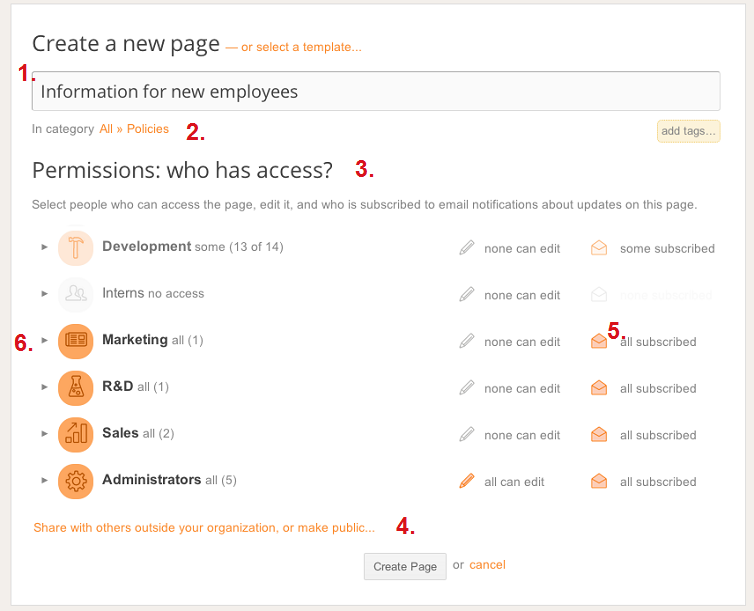
The title of your page.
Which folder do you want to file this page in (optional)?
Which people in your intranet site should be able to access the page?
You can also invite people outside of your Papyrs team to share the page with.
Click on Share with others outside your organization to reveal these options.
Just fill in their email address, and specify their access level.
They will receive an email on how they can access the page.
There's also an option to make the page Public. A publicly available page is visible to anyone on the internet, and might also show up in search engines like Google. Therefore, only use this option if your page does not contain sensitive information.
A highlighted notification icon (envelope icon) means that person will receive email notifications for updates on this page.
See Notifications for more information on notifications.If you click on a group, all people currently in that group will get access. To change page permissions of individual users in the group, click on the triangle in front of the group's name to show all people in the group.
 , and select Edit Properties. Here you will be able to
change the page's name, file it in a folder, or assign tags. To change the permissions of an existing page,
click
  , and select Permissions & Subscribers. Change the options and click Save Page.
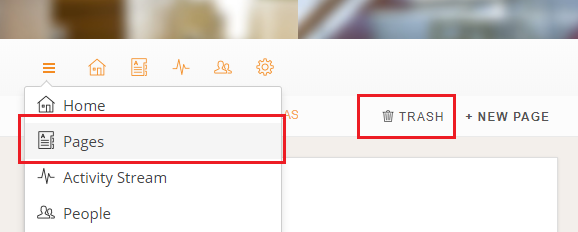
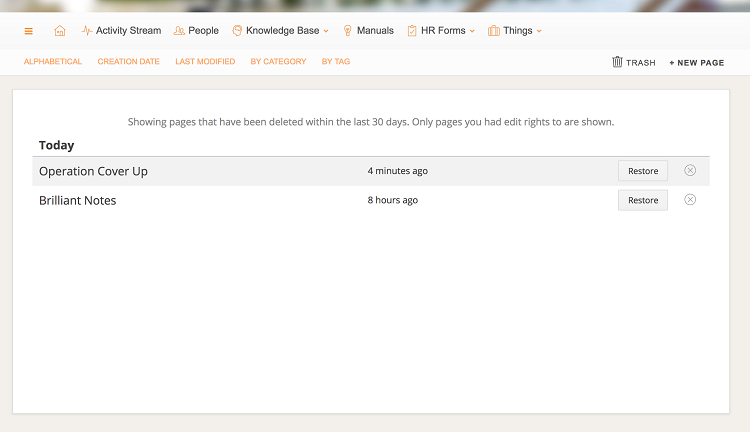
Click  , and select Move to Trash.
If this option is not available, go the the Page Settings screen (In the menubar of the page, click  , and select Page Settings).
Then, at the bottom of the page, click the
  button.
Notes:
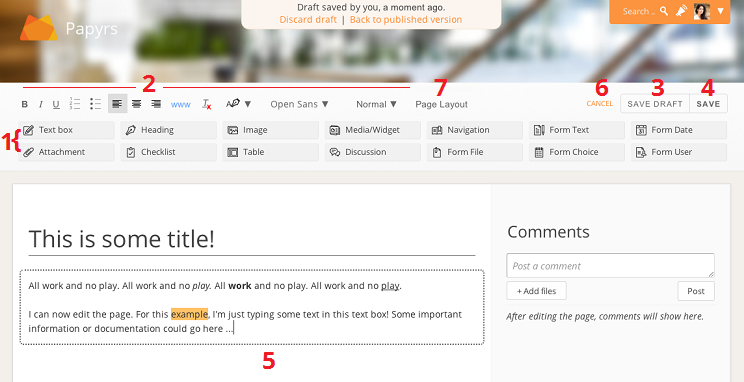
 , and click Edit page.
(Note: this option is only available if you have Edit permissions for this page). As a shortcut, you can also click the pen icon next to the page button.

Go to the page you would like to copy, click  , and select Copy Page.
You will then see a screen similar to the "New page" screen, where you can set the page options for the new copy.
This feature is especially useful if you often need to create similar pages. You can create a page with a certain layout, call it something like "My template page"; then, everytime you need a page based on this template, go the the "My template page", and use the Copy Page-option.
A page can also be marked as a Template. A template page is a page like any other, but will be available in the Create Page dialog, under the Select template link:

When selecting a Template in the New Page dialog, the new page will start with the same permissions, layout and content as the template (just like the Copy Page option). Note: people can only select a Template page they have access to.
To make a page available as Template, click  , then Edit Properties, and select Make this page available as a template.
 , followed by Page Versions.
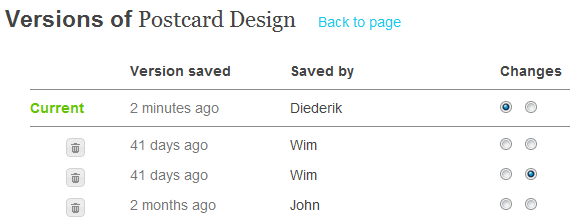
You will see a list of previous page versions, including the date the version was created, and by whom. Click on the date
to access that version of the page. Click the trash icon in front of a page version to permanently delete the old version.
Notes:
 , followed by Page Versions.
 , and then Restore this version.
 in the menubar of a page, the people with whom the page
is currently shared is shown under "Who has access" (see the following section).
 in the
menubar of the page. The available options depend on the permissions you have to access this page. For example,
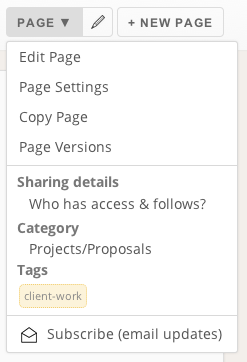
Edit Page is only available if you have Edit permissions, and so on. The page menu looks like this:
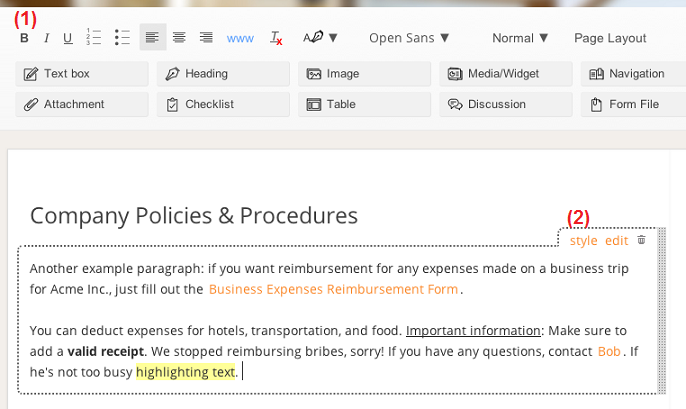
With the text box you can add rich text to your page, to write a quick note or an important document for example. Adding text works much like you're used to from a normal word processor.
You can add formatting, insert links to other websites or Papyrs pages, and highlight text. To read more about all the available formatting options and inserting hyperlinks to other pages, see Pages > How do I edit a page?
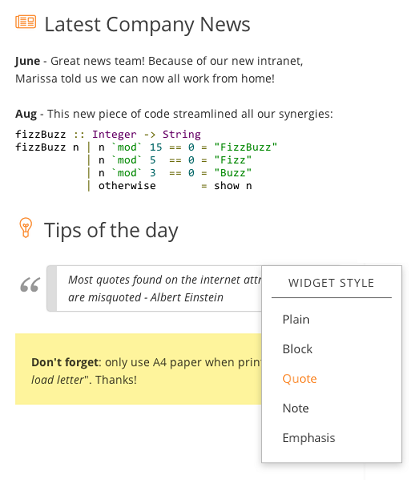
Next to the formatting options in the editor toolbar (1), the text box also comes with a number of styling options. Click the style link (2) to show the available styles (see the picture below).
Add headings to your page to divide your page document in different sections. You can choose the style
of the heading from the dropdown menu in the toolbar, see the screenshot below:
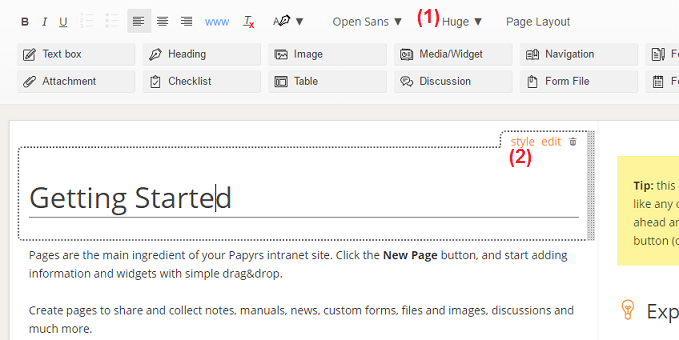
Using the size dropdown menu (1), you can choose between Huge, Large, Medium and Small headings. The size of a Heading also determines its hierarchy in a table of contents. To add a table of contents, see the Navigation widget.
You can add additional styling to the Heading using the style menu (2):
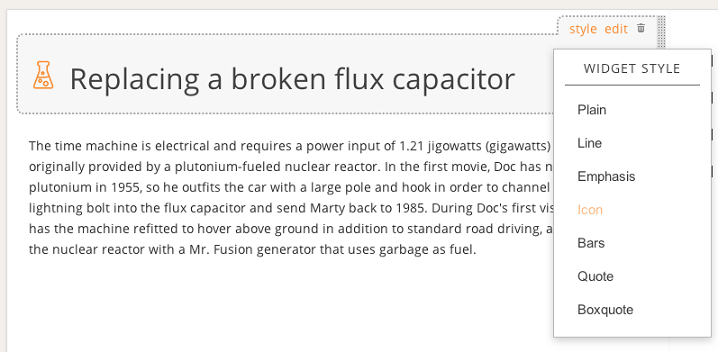
Styles can be used to add an icon next to your heading (click on the icon to change it), add lines, display the text as a quote, and so on.
With the attachment widget you can add all kind of files to your pages, and easily share the files with your team.
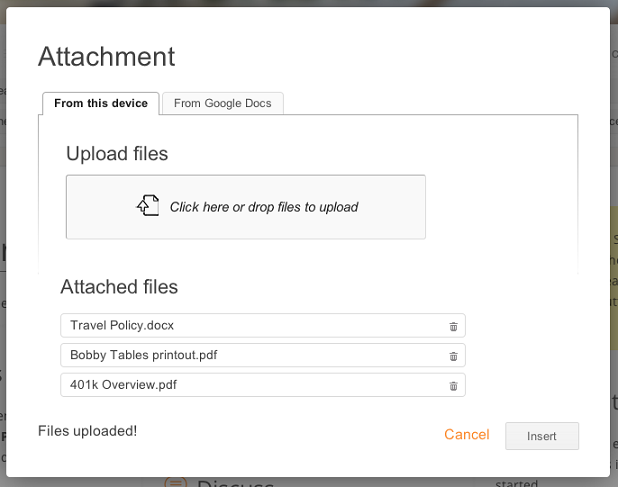
Adding attachments is very easy. Drag an Attachment widget to your page, and the Attachment dialog will pop up (see below). Simply choose the files you wish to upload, or directly drag files from your computer (e.g. Explorer in Windows or Finder on the Mac) to the "Drop files here to upload" area. You can upload multiple files at the same time.
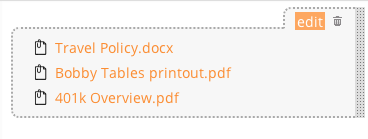
After you added attachments to your page, when you edit the page you can modify (add and remove files) the attachment widget by clicking Edit as shown in the following screenshot:
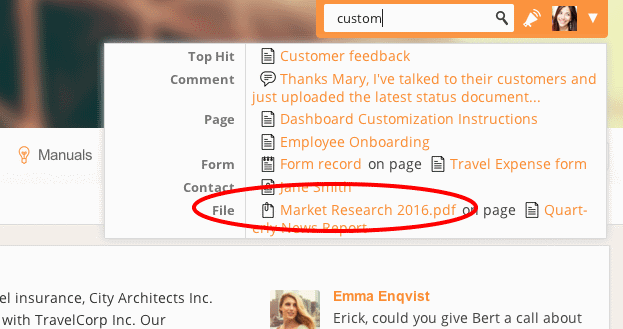
Papyrs makes it easy to find your pages, files and other content back. The built-in search will even search through text in PDFs, Office and other text files.
If your Papyrs is linked to G Suite (Google Apps), you can add attachments directly from Google Drive (select the From G Suite tab in the Attachment dialog).

Checklists are an easy way to create a list of items you and your team members can check off or complete. Think about tasklists (like a list of to-do's for a project), people attending a meeting, or steps you need to complete before takeoff.
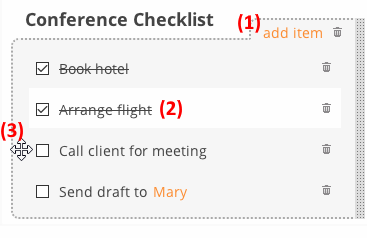
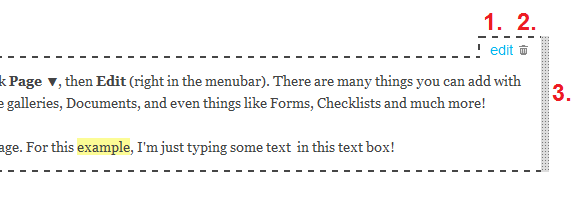
When editing a checklist, you can use all the usual formatting options, like changing the font or including links. Add items using the link shown under (1), click on an existing item to edit it (2) (when editing the page), and click anywhere on the sides of an item to drag it around (3).

With the Image(s) widget you can add an image, photo gallery with thumbnails or slider/carousel to your intranet pages. Get started by opening the page editor, and dragging an Image(s) widget to your page.
 Example of slider with a link to another page
Papyrs automatically creates thumbnails of your pictures (and tries to automatically detect the orientation of photos), and you can select the size of thumbnails you wish to display on your page. You can also set the alignment (left, right, or center), and change the order of the images by dragging them around. To remove an image from the gallery, in the edit dialog, double click on the image.
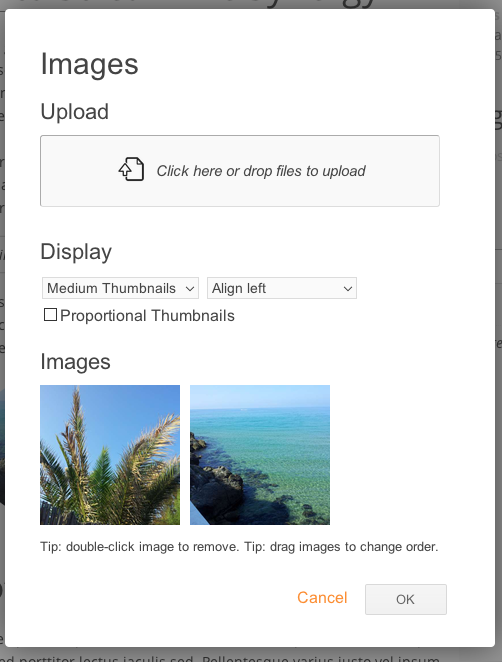
After you have added the image gallery, you can edit (add, remove and re-arrange images) the image widget by clicking edit at the top-right corner of the widget (see the picture below).
Gallery styles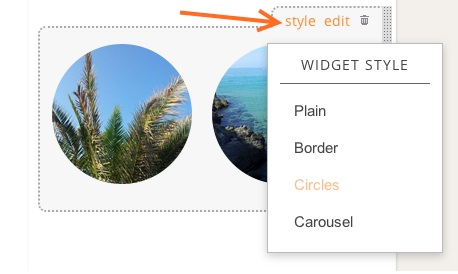
The image gallery supports several styles, which you can select from the style link on the top-right corner of the widget. Images can be given a border frame with the Border style, shown as circular images with the Circles style, and as an interactive image slider with Carousel.
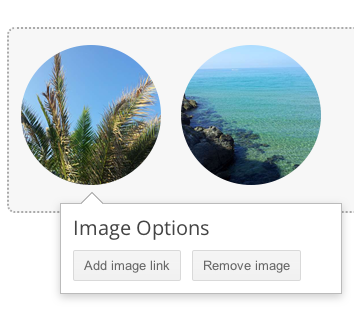
Image linksAdding links to the images is possible, too. This way you can add navigation to other pages using images, great for dashboard pages, for example. When editing a page, click on the picture you want to add a link to, and a popup will appear. Click Add image link in the popup and a dialog with options is shown, for both linking to other pages or to external links. When the image gallery has the Carousel style, the label is shown as a transparent text label on top of the picture.


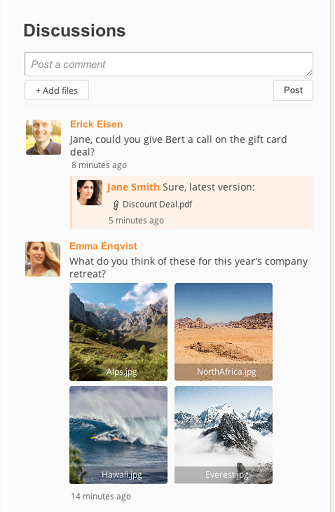
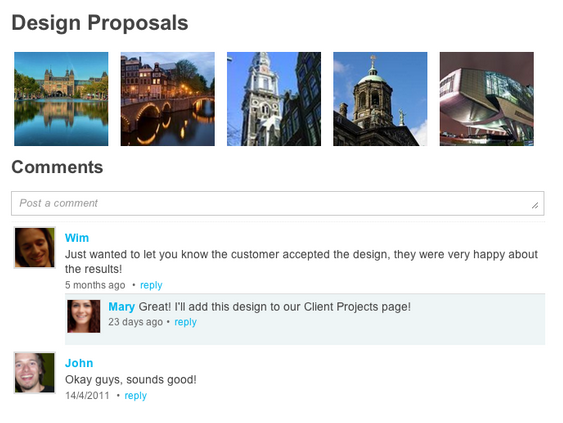
Add the Discussion widget anywhere on your page to add a comment area and allow discussions about the page.
People with access to the page can post comments, add photos and attach files. Click on a picture and a slideshow will be shown. As always, you can use the search to find back any comments or related attachments.
The discussion widget in Papyrs is live, meaning you will be shown when new posts arrive. This way you can use the Discussion widgets for a simple comments area, as well as for Q&A sessions, for example.
Like other widgets, the discussion area will automatically fill the available space of the page section you add the widget to. For example, if you want to use the page as a forum topic, just drag the widget to the large area of the page to make the discussion the central element.
Using the reply link it's also possible to reply to a parent comment and create a separate thread.
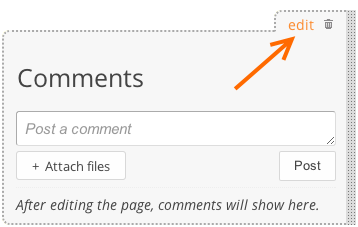
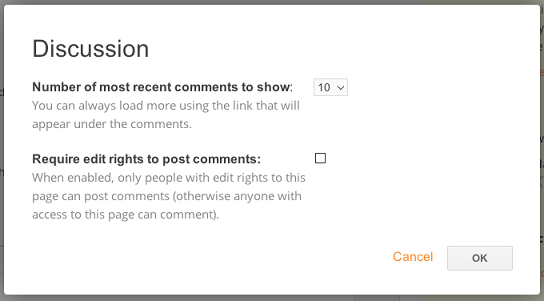
The discussion widget can be further customized by editing the page, and clicking the edit link on the widget. In the following Discussion properties dialog you can set who is allowed to post comments, and how many comments should be displayed. For example, if only the ten most recent comments are shown, older comments will only be visible when clicking a Load more comments.. link.

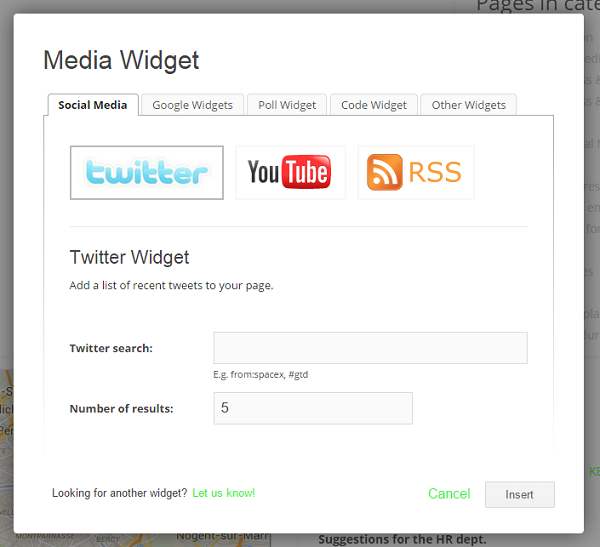
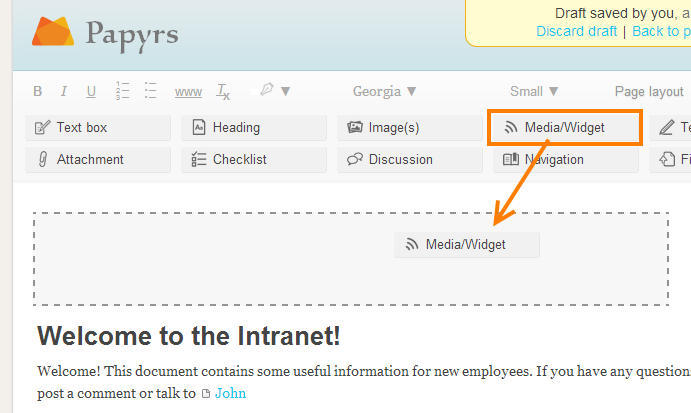
Under the Media/Widget you can find all kinds of other handy widgets and other (social) media integration which you can add to your page. For example, you could show the latest mentions and buzz about your company on Twitter directly on a page.
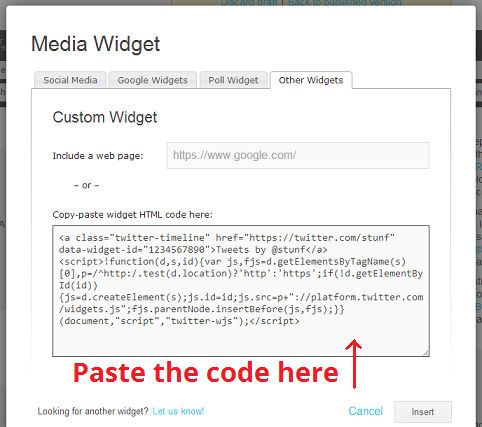
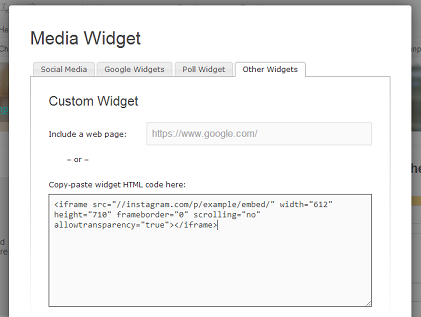
After adding a Media/Widget, in the dialog (see screenshot below), select the type of media you want to add to your page. You can add Tweets, YouTube videos, RSS news, Code Snippets (with syntax highlighting), embed documents from Google Docs (Drive), Google Maps, a Google Calendar and much more to your pages. If you need some other or custom widget, click the "Other widgets" tab and copy-paste the HTML embed code for this widget there.
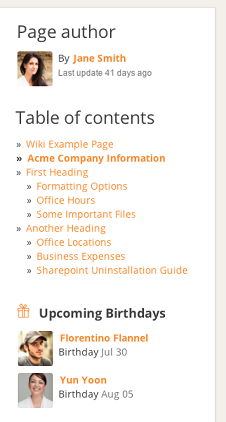
Using the Menu Bar editor, Administrators can add and edit the global navigation menu bar in Papyrs. Of course there are also plenty of options to add navigation elements directly onto your pages using the Navigation widget.
The widget supports adding navigation to sections within the page (Table of Contents), showing links to other pages related to activity (e.g. Most recent updates), links to other users (birthdays, page authors), folder tree navigation controls, and so on.
Simply place this widget anywhere on your page (edit the page, and drag&drop the Navigation widget), for example in the sidebar. Or you could add different types of navigation widgets, to create a dashboard page about recently commented and changed pages, for example.
Note: if you're looking for adding links to other pages in a Text box, see Pages > How do I edit a page?
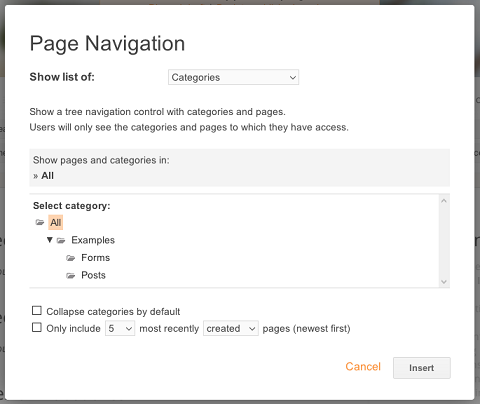
In the Page navigation widget dialog (see screenshot below), you can choose the type of navigation you wish to add. Note: in all cases, only pages which a user can access will be shown. You can choose between:
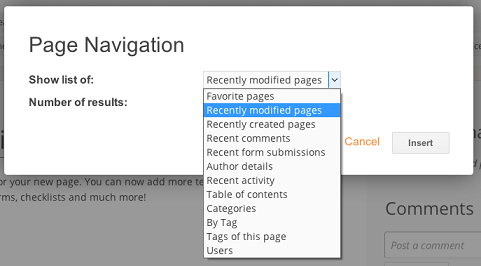
Recently modified pages
Show a list of pages which were recently changed.
Recently created pages
Show a list of pages which were recently created. These pages can also be filtered by
folder, see the Folders option below.
Recent comments
A list of pages to which new comments were recently posted
Recent form submissions
A list of pages with a form that was recently submitted
Author details
Show who created or last updated this page, and at what time, with a link to the user's profile.
Table of contents
Generate a table of contents, based on the Headings on this page.
The size of a Heading determines its hierarchy in a table of contents (see Heading widget). If you add or remove a Heading, the Table of Contents is updated automatically.
Folders
Show a tree with (sub)folders and pages.
This option can also be used to show only the most recently created/updated pages within a certain folder (and/or subfolders). For example, say you would like to show the ten most recently created pages in a folder called Blog Posts. Select Folders, select the Blog Posts folder, and check the Only include 10 most recently created pages option.
By Tag
Show a list of pages with a certain tag.
Tags of this page
Show all tags of this page, with each tag linking to all pages with that same tag.
Users
Show a list of individual users, or all users in a Group. Clicking on a user
will take you directly to their profile page. You can also list users by upcoming
birthdays.
With Papyrs you can easily embed timelines or a Twitter search on your company's intranet pages. Integrating Twitter on your intranet by adding a feed or timeline to your intranet pages is a greay way to share social media mentions with your team or clients, and to get an overview of the buzz on your company and products.
There are two ways you can add a Twitter widget to your page: using the Twitter search widget, or by embedding Twitter's official timeline widget.
Using the Twitter search widget in Papyrs, you can show tweets for a certain search query directly on your pages. Here are the steps to add a twitter search widget:
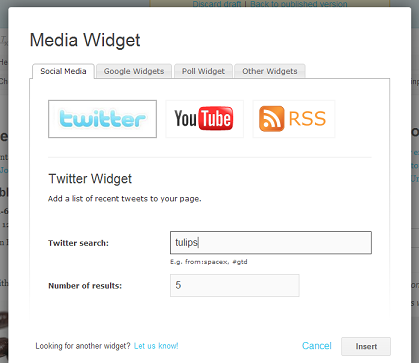
Note: the widget uses the official Twitter search function which only returns the most relevant and recent tweets.
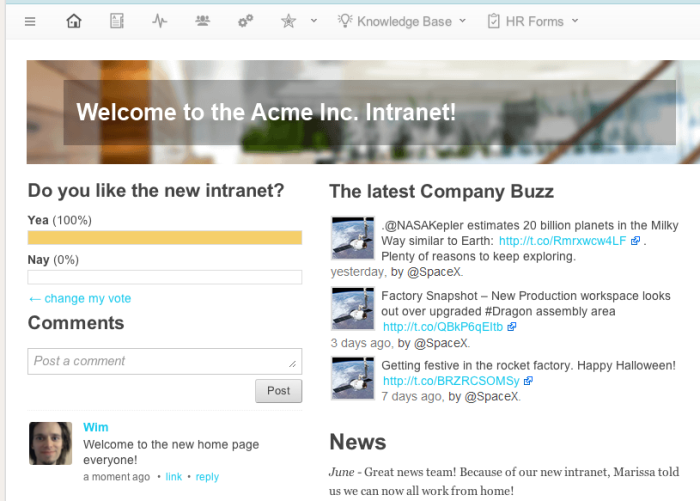
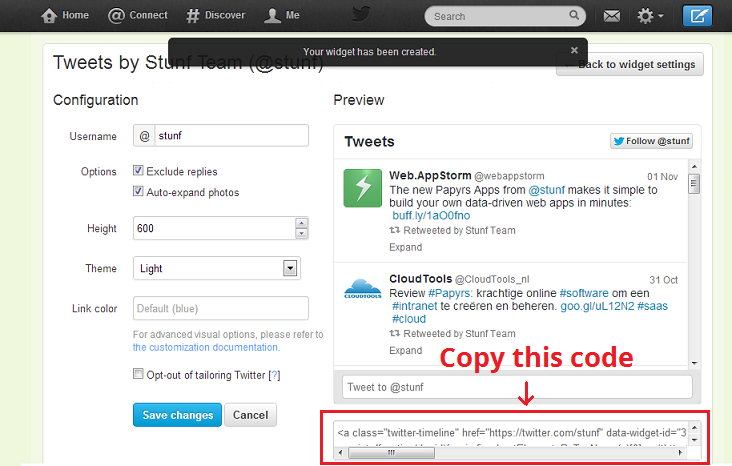
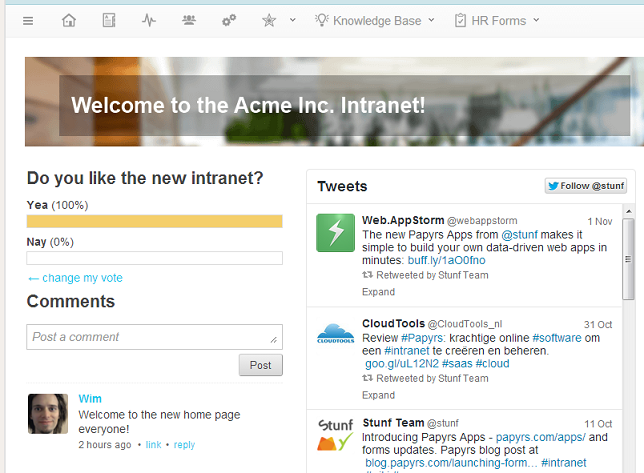
Next to searches, it's also possible to embed a timeline directly on your pages, using Twitter's widget.

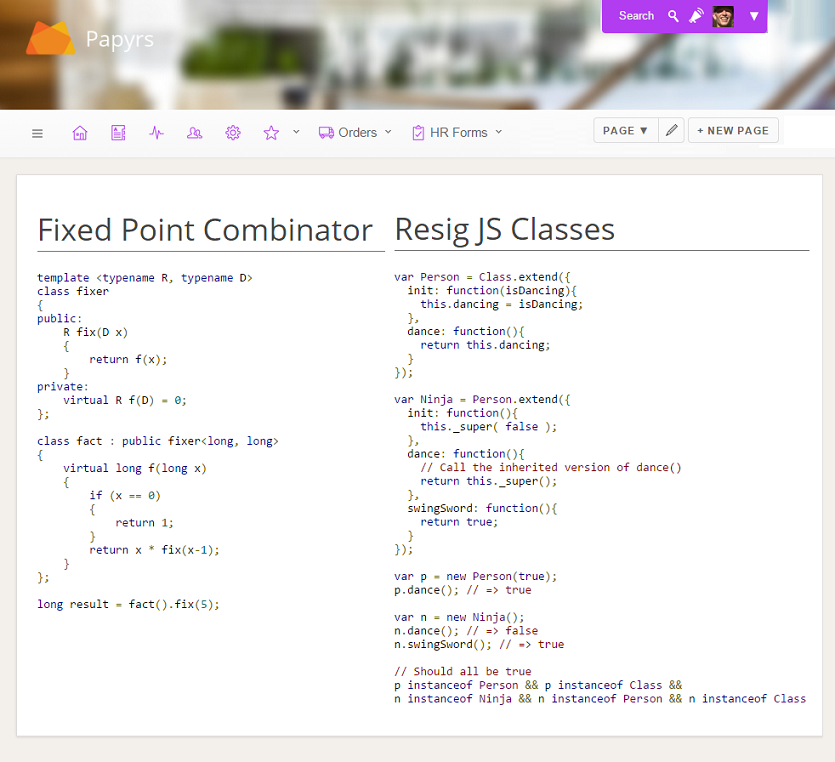
Using the Code Snippet widget in Papyrs, you can share code fragments with your coworkers for easy reference. A great tool for sharing technical documentation. Adding code snippets to a Papyrs page is super easy:
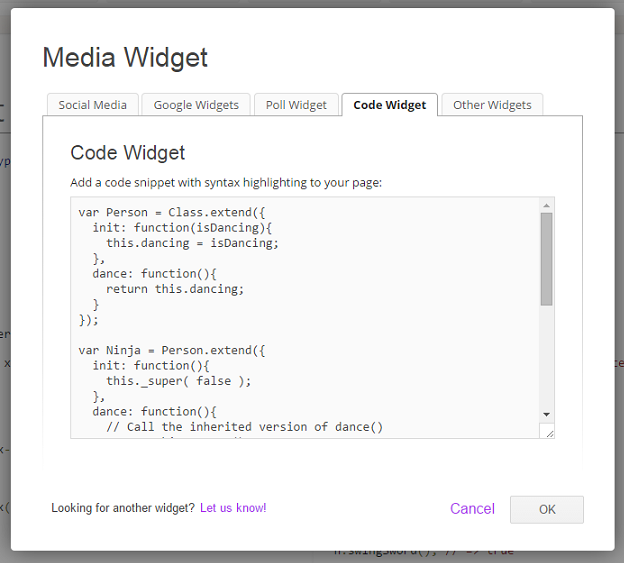 Papyrs will automatically detect the programming language used and apply syntax highlighting accordingly. The following languages are supported: C (and friends), Java, Python, Bash, SQL, HTML, XML, CSS, Javascript, Makefiles, and Rust.
You can easily embed Facebook pages, likes and other widgets on your company's intranet pages. Integrating Facebook on your intranet is a great way to share latest updates, comments and likes from your company page.
Adding a Facebook widget to a page is easy; don't worry, no technical skills required, just drag&drop! Just follow the steps below:
Select the Facebook widget you want to embed on your intranet. You can find them in the list of available Facebook plugins.
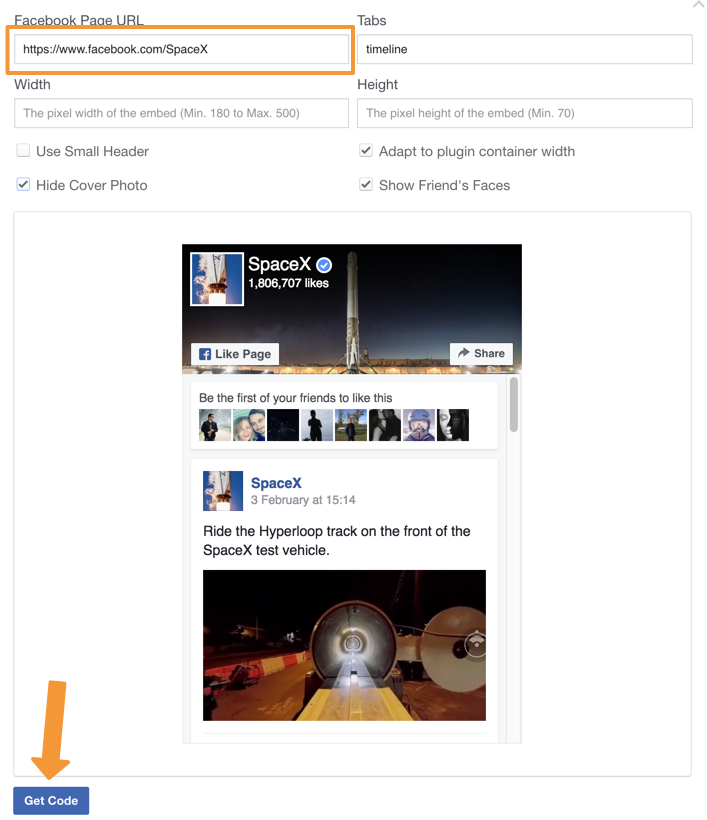
Select the widget/plugin you want to embed. As an example, let's use the
Page Plugin,
which contains a Like button and an optional feed of posts. Change the preferences of the widget,
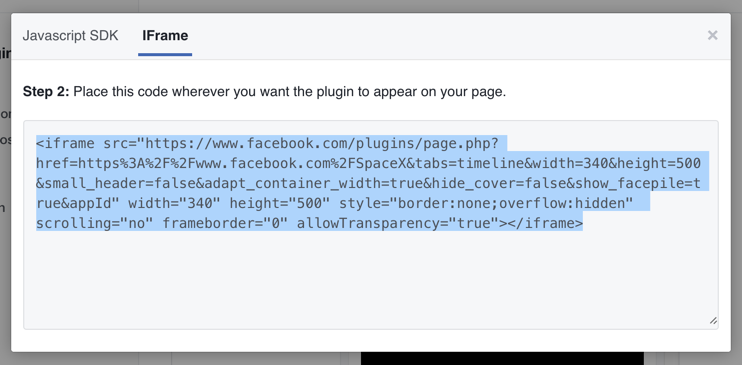
like filling in the Facebook page under Facebook Page URL. When it looks good, click Get code.

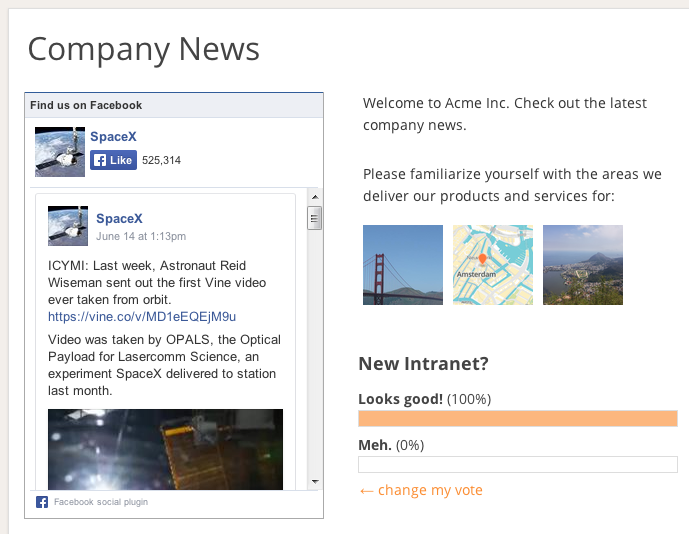
Papyrs provides many integrations with G Suite (formerly called Google Apps).
Whether or not your Papyrs site is linked to a G Suite domain, using the Publish function in Google Docs and Sheets, you can embed these documents directly on your Papyrs pages.
If you're looking to simply add a link to the documents from your (G Suite) Drive to a Papyrs page, use the Attachment widget instead.
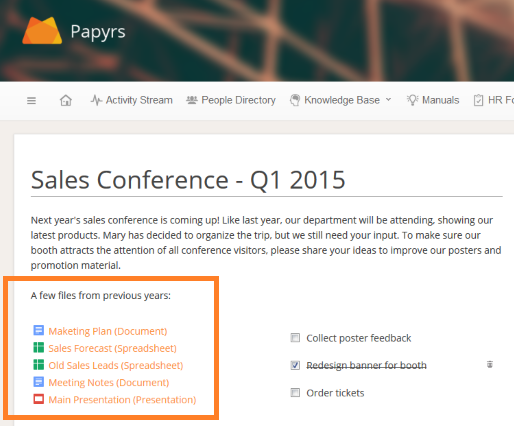
In Google Drive, double click on your document, sheet or presentation.
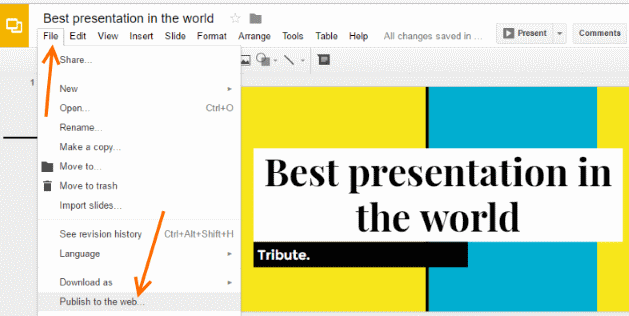
From the File menu, select Publish to the web...
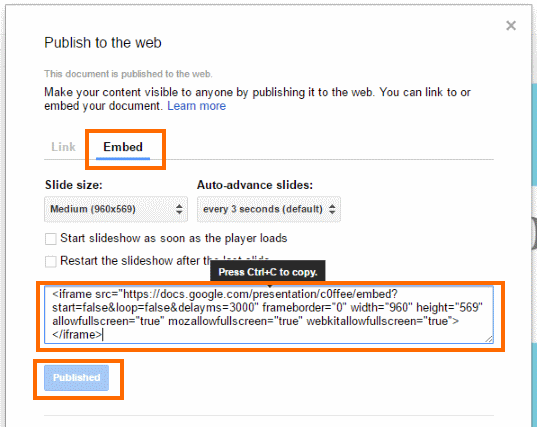
From the Embed tab, click the Publish button and copy the embed code. Depending on the type of document, you can specify some additional settings like the size or document.
Go back to the page in Papyrs you want to embed the document on. Edit the page, and drag a Media/Widget to your page. Select the Other widgets tab, and paste the code you copied under the previous step.
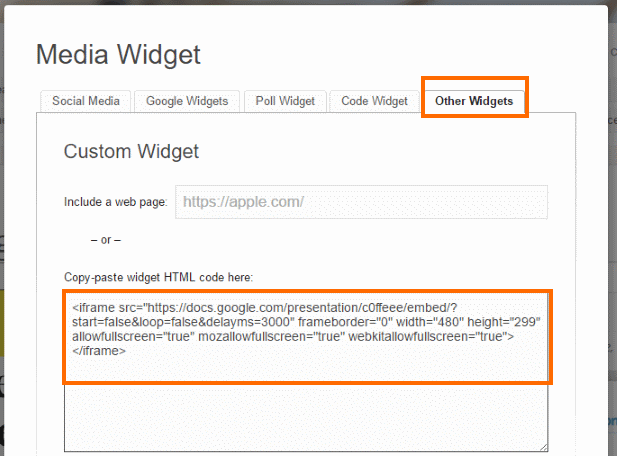
Voila, your document is now embedded on your Papyrs page.
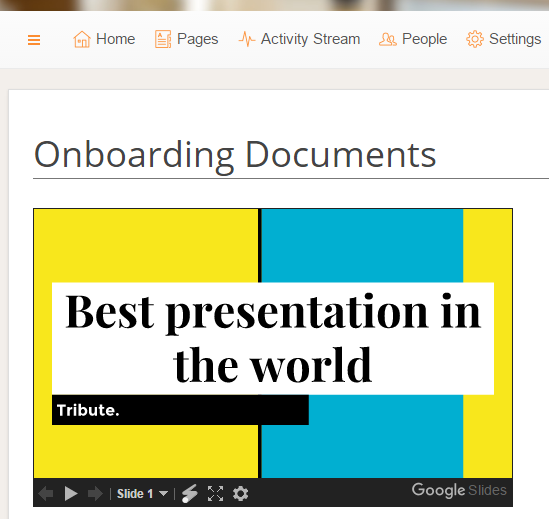
Another example is embedding an interactive chart from a Google Sheet. Like the steps described in the section above, we get the HTML embed code from Google Sheets, and paste it into a Media/Widget in a Papyrs page. We can find the code by opening the Google Sheet, selecting the Chart, and selecting Publish Chart..., see the screenshot below:
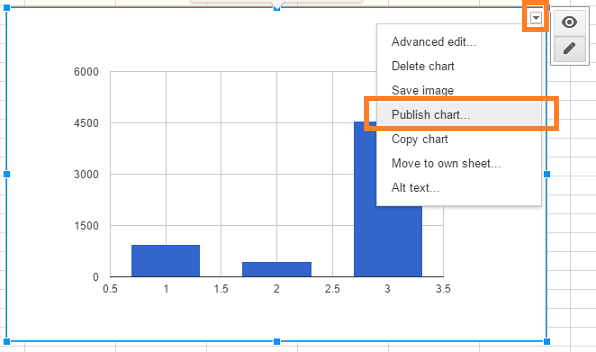
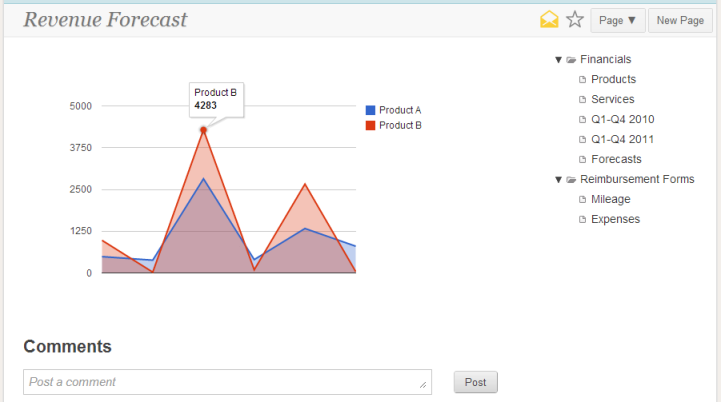
Now add a Media/Widget to your page, paste the code under Other widgets, and the chart will be available on your page:
Go to your Google Drive and Double-click on the file you wish to embed
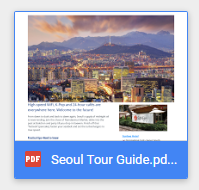
From the more actions (three dots) menu, select Open in new window.
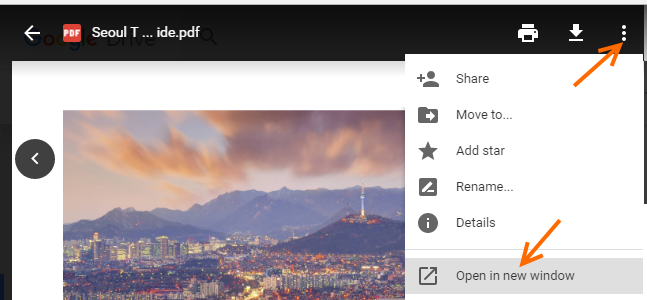
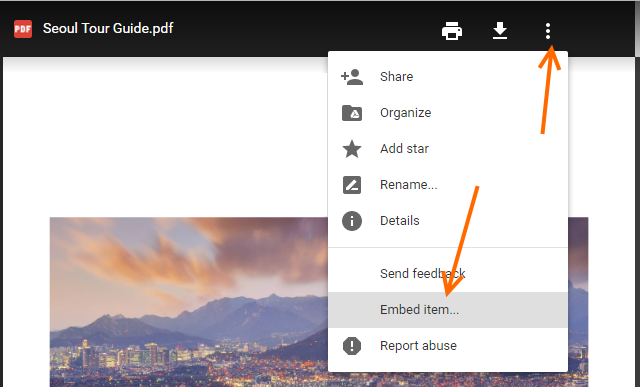
In the new window, select the more actions (three dots) menu again, and now select Embed item...
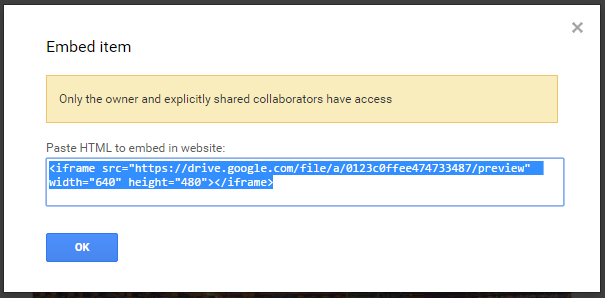
Copy the HTML embed code
Go back to the page in Papyrs you want to embed the document on. Edit the page, and drag a Media/Widget to your page. Select the Other widgets tab, and paste the code you copied under the previous step.
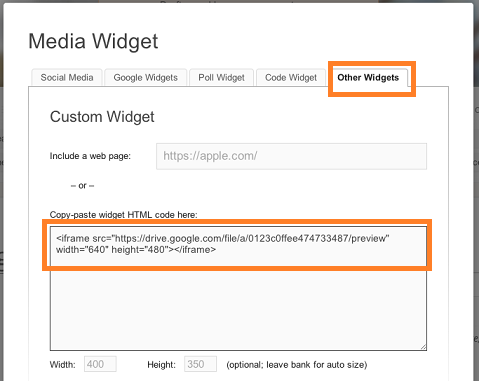
Voila, your document is now embedded on your Papyrs page.
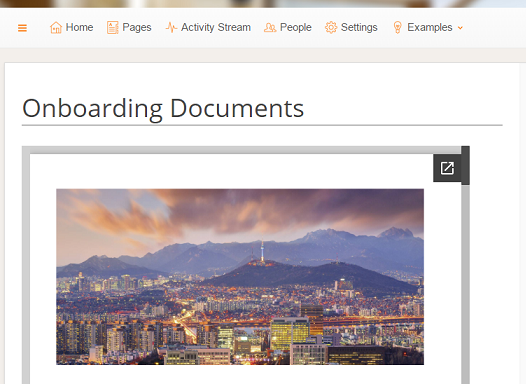
First of all, you can drag and move your Media/Widget to a larger section of the page. For example, if you want to embed a wide document but drag your Media/Widget to a narrow sidebar of the page, there might not be enough space to show the document.
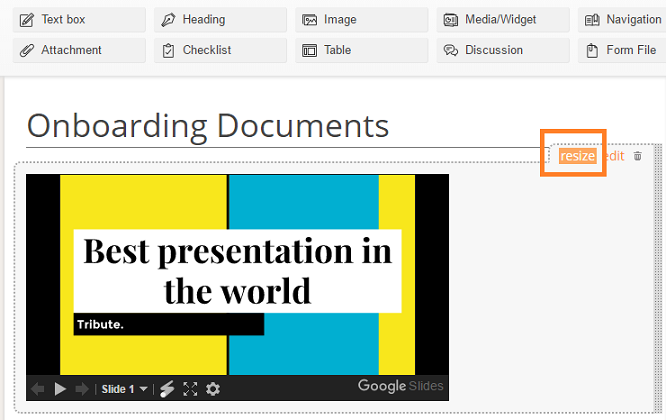
Resize the Media/Widget. The Media/Widget can be resized using the resize link in edit mode, see the screenshot below:
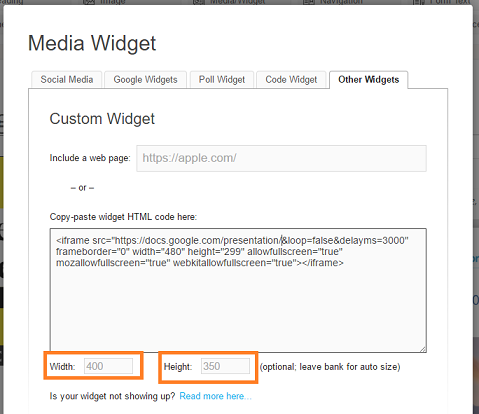
You can also set a specific size. Open the Media/Widget properties dialog (click edit on an existing widget), and go to the Other widgets tab. Fill in the Width and Height fields (in pixels). Make sure to leave these fields empty if you want the size to be adjusted automatically.
To add a Google Calendar, edit the Papyrs page and drag a Media/Widget to your page. From the Media/Widget dialog, select Google Widgets, and then Calendar. You'll see the options below:
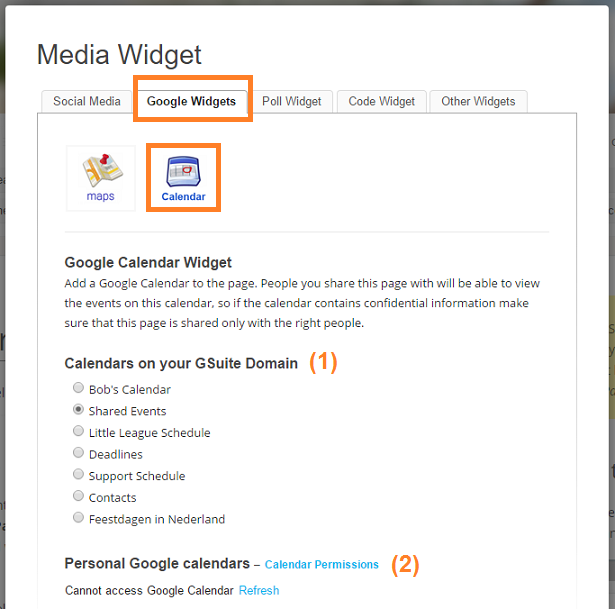
If the calendar widget is placed in a small column a list of upcoming calendar events will be shown. If the calendar widget is placed in a wide column a full calendar will be displayed with views per month, per week and a daily agenda.
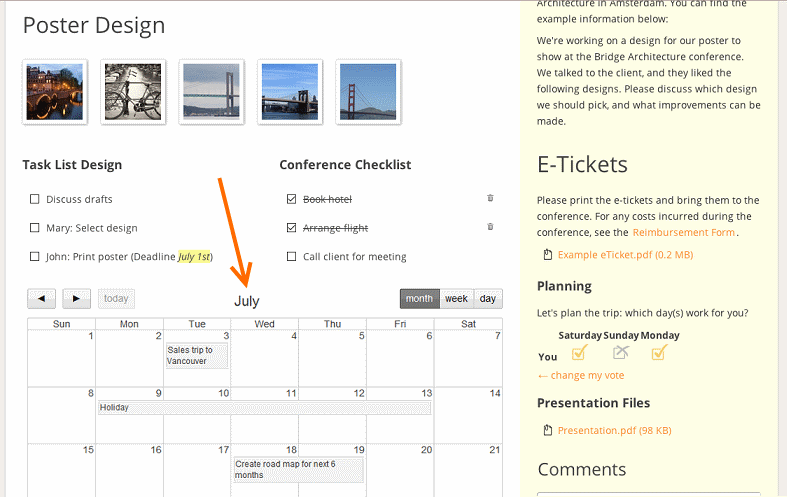
There are two ways to add a calendar to your Papyrs intranet site:
The first option is to embed a Google Calendar on your page(s). You can add multiple calendars, either from a personal Google account, or from G Suite (Google Apps), if your organization already uses that. To add a Google Calendar to a page, use the Media/Widget > Google Calendar option.

Another option is to create a custom calendar using Papyrs' forms. The form fields you add can be used to create new items displayed on a calendar. Using the form fields you can add additional information for each calendar item, such as a description, responsible person or related file(s). The fields can also be used to filter and find items on your calendar.
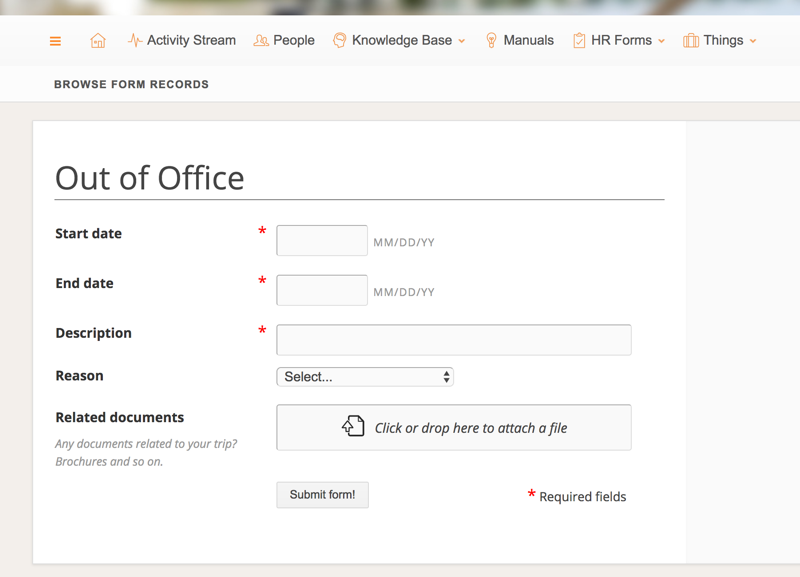
As an example, let's build a calendar form where people submit their out of office status. Let's start with a new empty page and edit it:
Start & End date
Each item needs a date of course, so we drag a Form Date widget to the page. Let's add one which we label Start date, and add another one which we'll label End date.
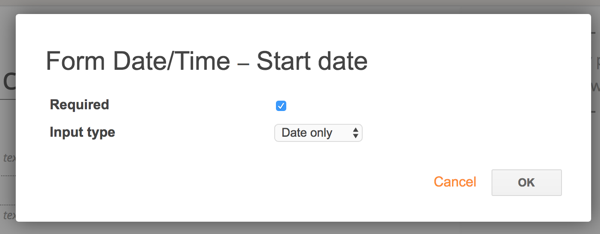
In this example we only use full days, so we decide to remove the time part. We do this by clicking edit on the date field we've just added, and selecting Date only under Input type. We also make sure the user fills in this field by marking it Required.

Description
Next to the dates, we'd also like people to fill in a description. Let's add a Form Text widget, and label it Description.
Additional details
To demonstrate we can add all kinds of additional information, let's add two more fields:
Permissions
By clicking Edit on the Submit form button, we can change form settings, like who can see the calendar records. For this example we set up the permissions such that everyone can see all calendar items.

Let's save the page. Our form for creating new Out Of Office calendar records is now ready:
Viewing & Filters
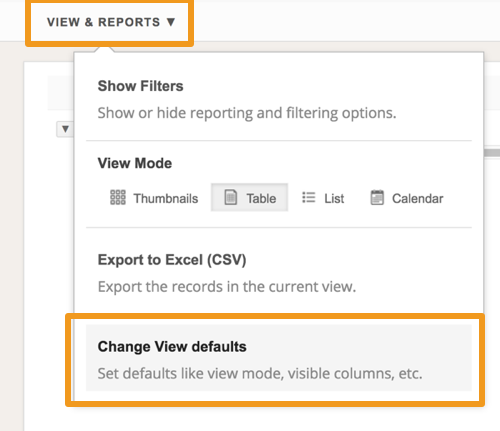
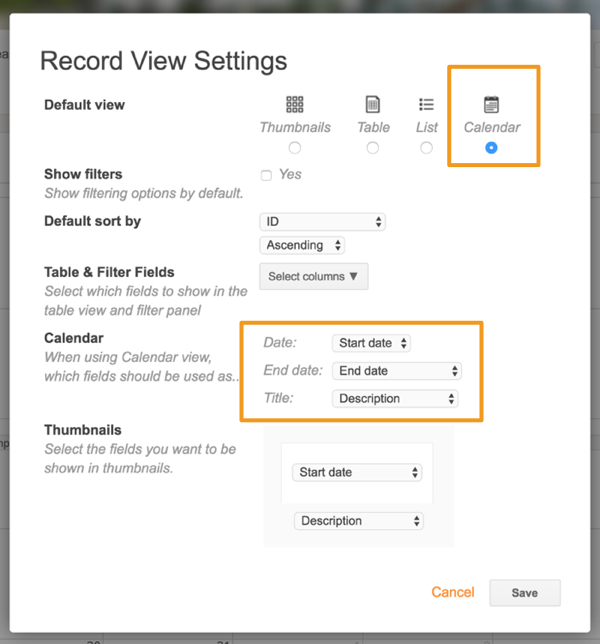
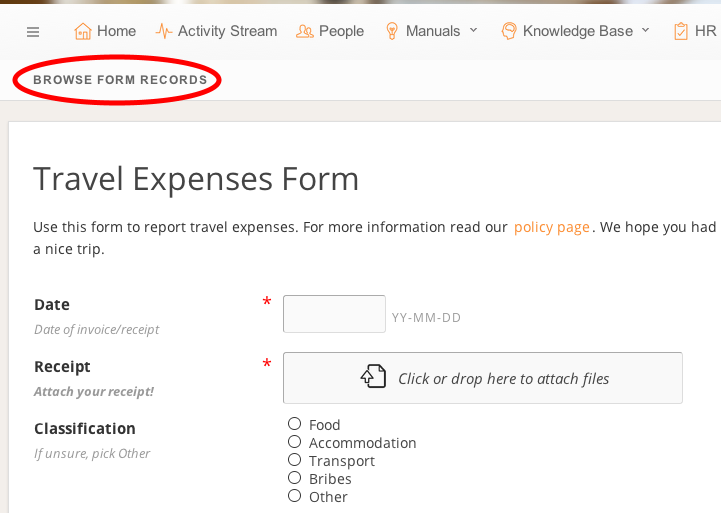
We can view all records people submit by clicking Browse form records. By default, these records are shown as a list, but we want to show them as a calendar items. To do this, we click Browse form records, then select View & Reports, and then Change View defaults:
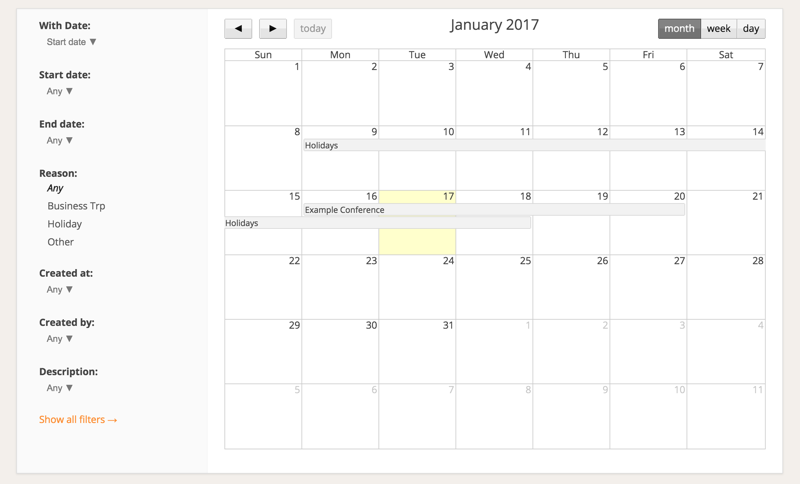
We now have a custom calendar, with custom fields for additional details and filters:
To get started with a custom calendar, you can install the ready-made Events app.
It's a general version of the custom calendar above, with App mode enabled (meaning each calendar item will get its own page which can be customized further to add more information).
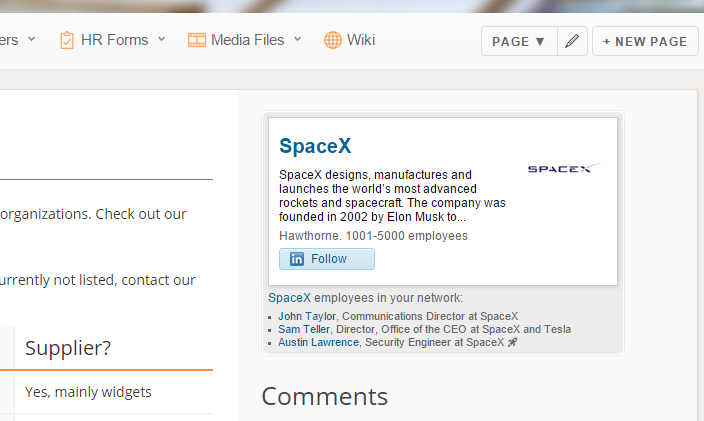
You can easily embed a LinkedIn profile, company card, or other widgets on your company's intranet pages. Integrating LinkedIn on your intranet is a great way to view details on related companies right on a dashboard page, or view LinkedIn details from people on their profile pages, for example.
You can add a LinkedIn widget to any page in Papyrs, just using drag&drop or copy-paste. Just follow the steps below:


Easily embed photos from your Instagram photo stream on your company's intranet. Integrating Instagram on your intranet by adding a photos to your intranet pages is a great way to share social media like photos related to company events and products with your team or clients.
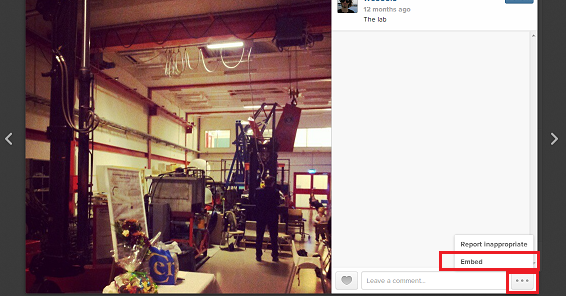
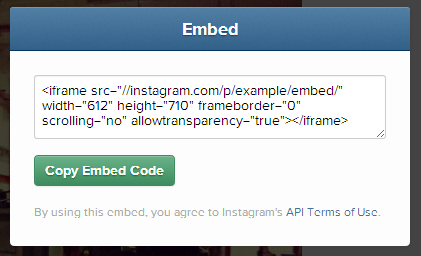
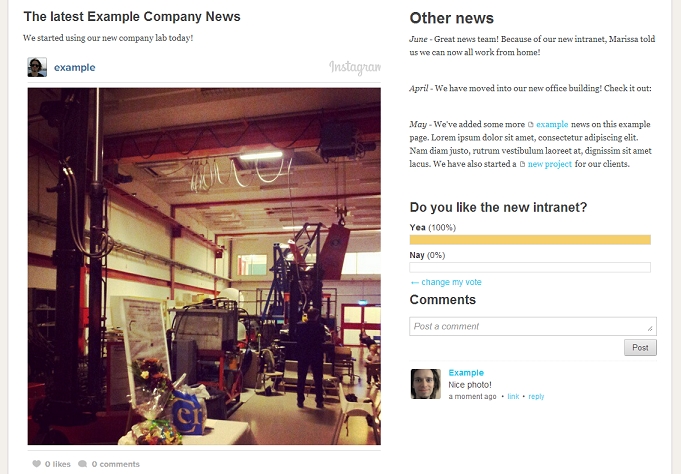
Adding Instagram to a page is just a matter of drag & drop, no technical magic involved! Just follow the steps below, to add an instagram web embed to your page:


With Papyrs it's easy to add polls to your intranet pages. Poll widgets are great for running quick surveys among your co-workers or clients. There's also a more advanced preference table poll, which is useful to find which options work best within a group of people (like scheduling a date for a meeting for example, kind of like doodle for your intranet).
To embed a poll on your intranet page, just edit the page you want to add the poll to, and drag a Media/Widget to your page. Select the Poll Widget tab, and type in the options for your Poll. You can switch between the Simple Poll mode, or the Preference Table.
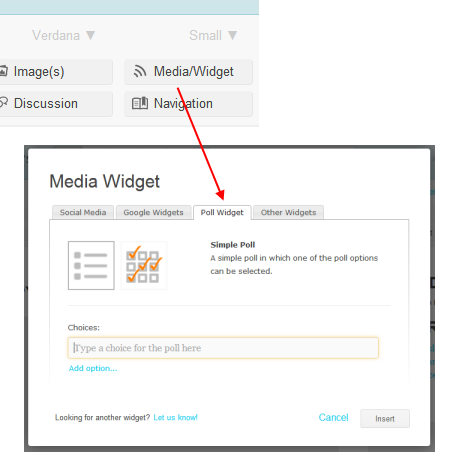
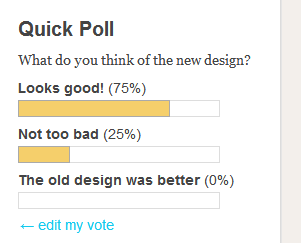
The Simple poll will show a list of options, and a percentage of people voting for each option. Tip: if you hover
over the percentage, a hint showing you the number of total votes for that option will pop up.
The preference table will show each option against each person who voted (and people can vote for multiple alternatives).
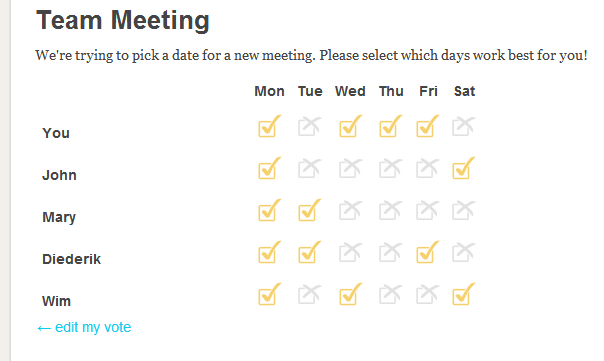
Users with View & Submit permissions (or higher) can vote in the poll, but everyone with access to a page can see the results.

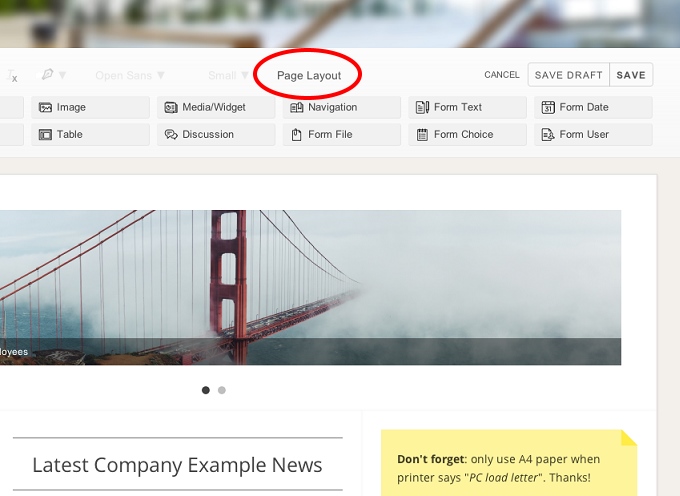
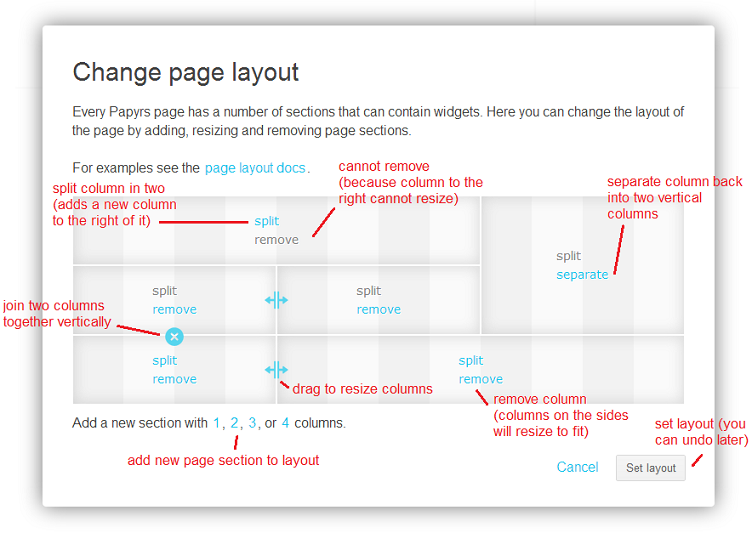
First start editing the page you're on (see: Editing a page). Then click on Page Layout to open the layout editor. See the following screenshot:
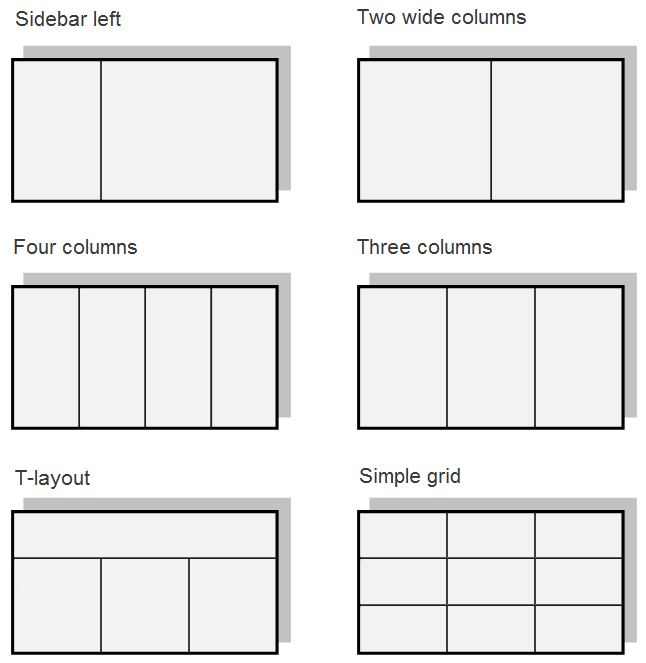
The layout editor will pop up.
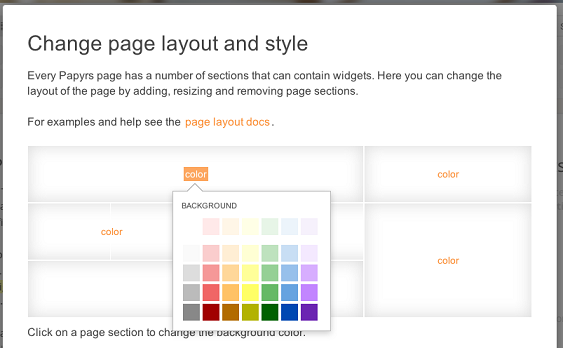
Different sections of the layout can be given different background colors. Changing colors of a layout section is easy: each section shows a color link. Click it, and a color picker is shown to change the background color of this section.
When working on your intranet you may want to add content from a different website or a widget inside a Papyrs page. This is what the IFrame widget can be used for. However, there is a catch. Because all Papyrs pages are delivered over a secure (encrypted) connection the web browser you use takes extra security precautions. One of these precautions is that it won't allow unencrypted content and encrypted content to appear side by side on the same page. So your 3rd party widget with a calendar, some news, or a photo gallery may simply not show up at all!
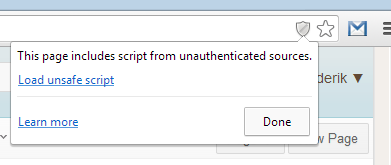
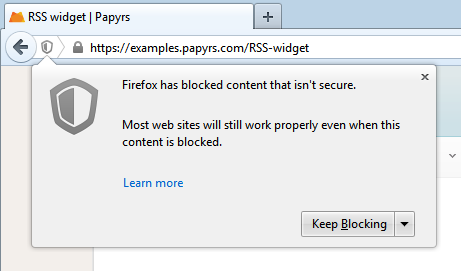
This is known as a mixed content warning. This is what a Mixed Content Warning looks like in different web browsers:

The best solution is to load the https:// version of a widget. If your widget code looks something like this:
<iframe src="http://player.vimeo.com/video/76440793?badge=0& color=c9ff23" width="500" height="213" frameborder="0" webkitallowfullscreen mozallowfullscreen allowfullscreen></iframe>And replace the http:// part with https://. Like this:
<iframe src="https://player.vimeo.com/video/76440793?badge=0& color=c9ff23" width="500" height="213" frameborder="0" webkitallowfullscreen mozallowfullscreen allowfullscreen></iframe>In most cases this will get rid of the mixed content warning and will make your widgets show up like before. If this does not work, let us know at team@papyrs.com and we'll see if we can figure out a good solution.
Finally, some websites block other sites from embedding their pages altogether, even when on a secure connection (by using a so-called X-Frame-Option header). In that case, when the widget is still not showing up — even when using the secure https version — the only option is to contact the support of that particular site, or to embed an alternative site.
 , see the following screenshot:
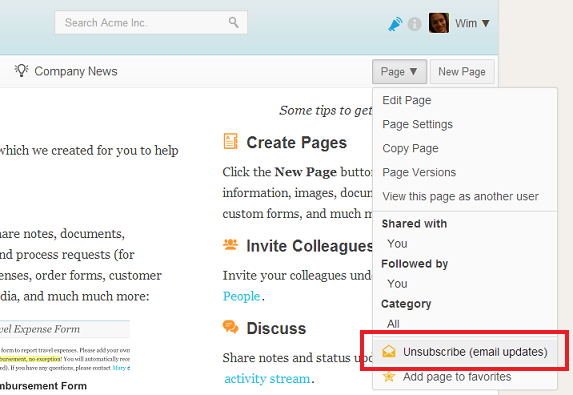
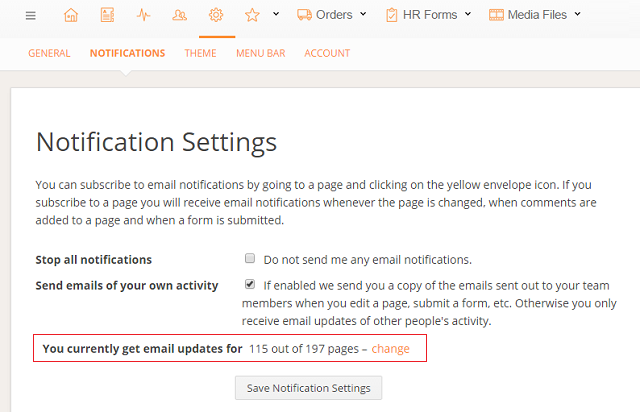
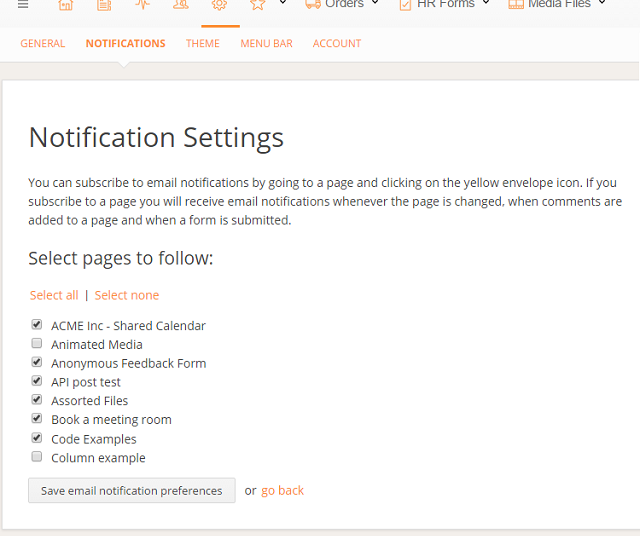
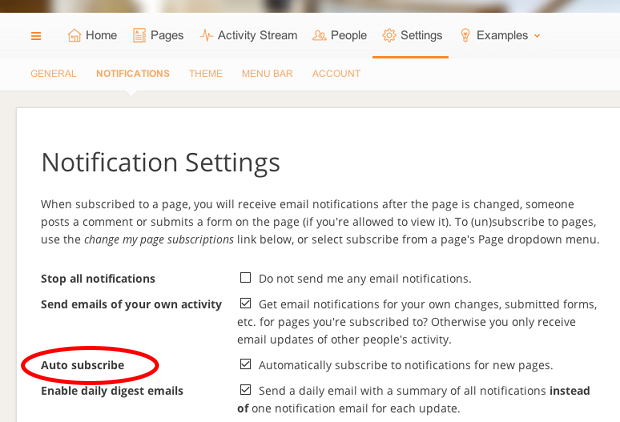
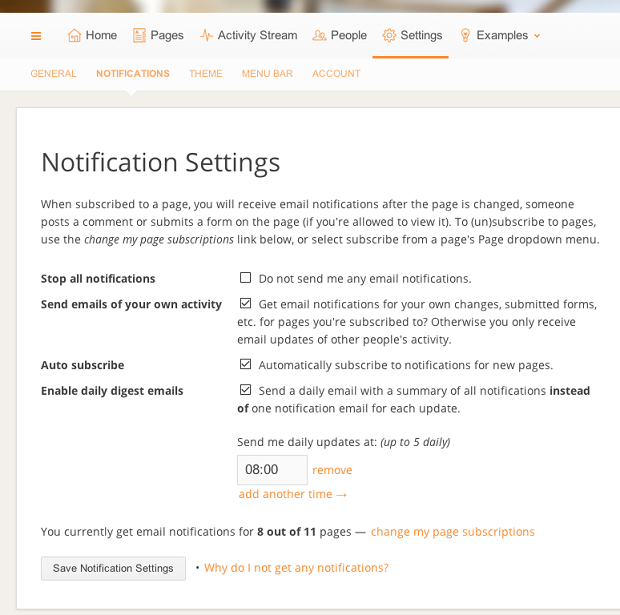
Email notifications are an easy way to be notified of acitivty in your intranet. If you're following many pages though, the volume of email notfications could become overwhelming. If you're receiving too many emails, you can turn on the email digests feature.
When enabled, Papyrs will send you a daily summary of all notifications, rather than a single email for each notification. Like before, you can simply subscribe to the pages you wish to receive notifications for, and they will be included in the digest email.
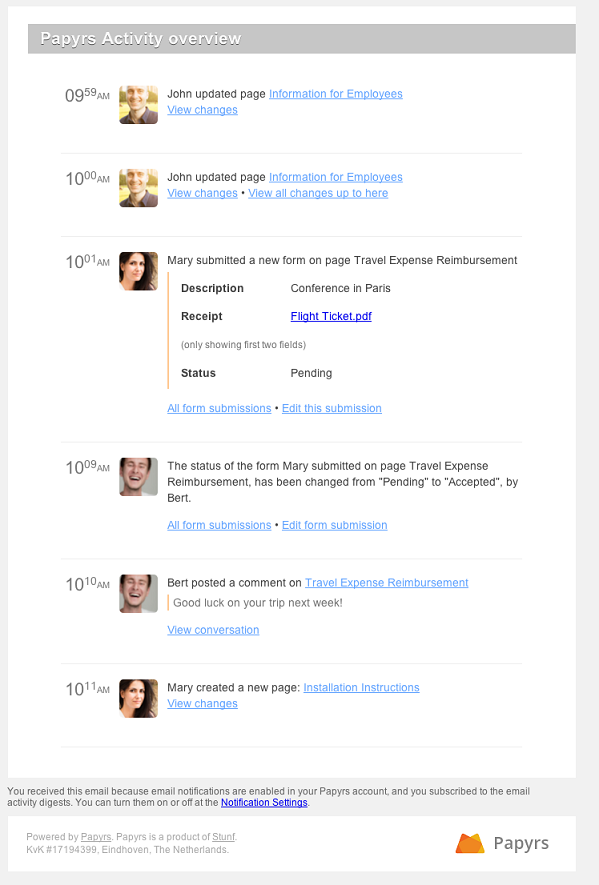
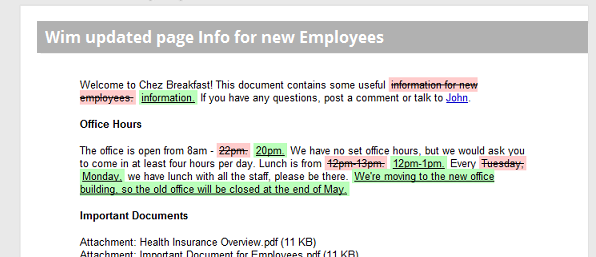
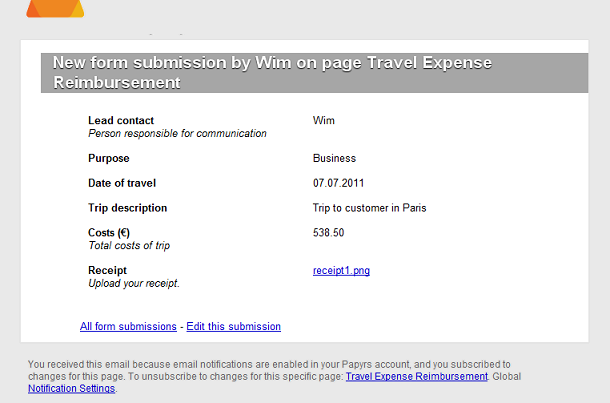
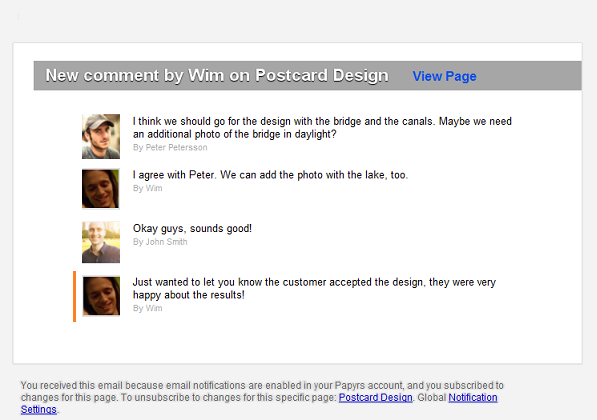
To turn on email digests, go to the notification settings (My Preferences > Notifications), and check the Enable daily digest emails option. The screenshot below shows you an example of what a digest email looks like:
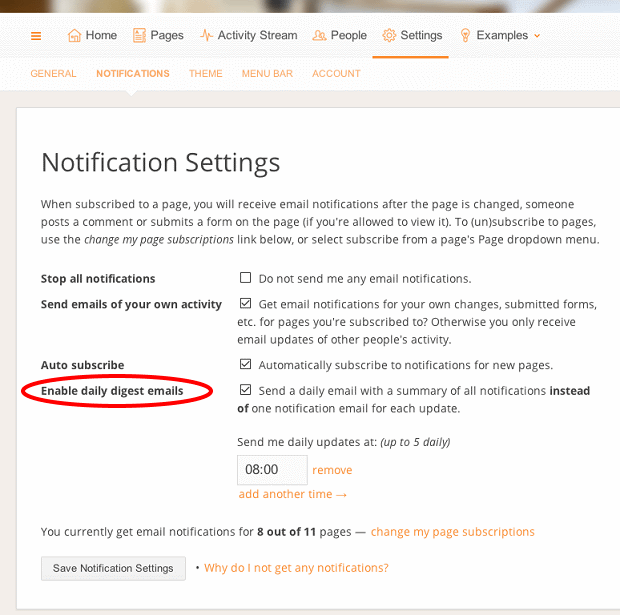
You can specify up to 5 times at which Papyrs will send an overview each day of the notifications (since the previous overview). For example, in the screenshot below, a digest email is sent out each day at 8am, 1pm and 5pm. If no new activity has occured, no digest email is sent.
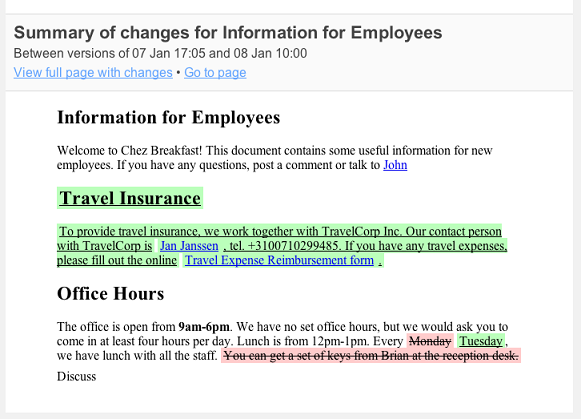
In order to summarize the changes in the digest email, the full details of page updates are not shown. You can quickly access the full details of each update though by clicking on the direct View changes link in the email. If multiple updates have happened to a single page, you can view each update individually, or click on the View all changes up to there link to view multiple changes together ("unified diff").



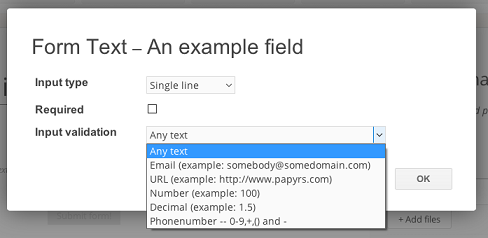
 With the text input you can collect things a user can simply type in. For example, you
can collect normal text, but also phone numbers, email addresses, and so on.
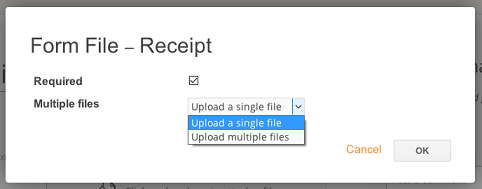
 By adding a file input to your page, you can allow users to upload files to your form. For example,
you can ask the user to upload a receipt for travel reimbursements, a screenshot for a bug report, a CV to apply for a vacancy, and so on.
Like the other widget inputs, you can specify if this field is required, i.e. if the user is
required to upload a file before submitting the form. It's also possible to allow the user to attach multiple files to their form submission.
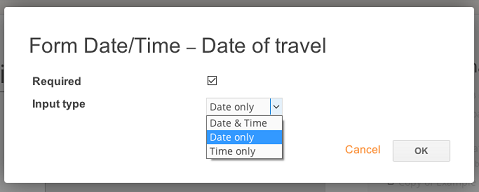
 Add a Date Input to your page to ask a user for a date and/or time on your form. The user can
type a date or select one from a small calendar.
In the edit dialog for this widget, you can set the following options:
 When you want to ask a Yes/No question on your form, it can be useful to add a checkbox input to your form.
You can do this by adding a Form Choice widget to your page, editing it, and selecting Checkboxes
as the input type. As available choices, you can fill in "Yes", for example. As with other widgets, you can specify
if this field is required in the edit dialog for this widget. If the field is required,
the user must tick the checkbox (i.e. the answer must be Yes).
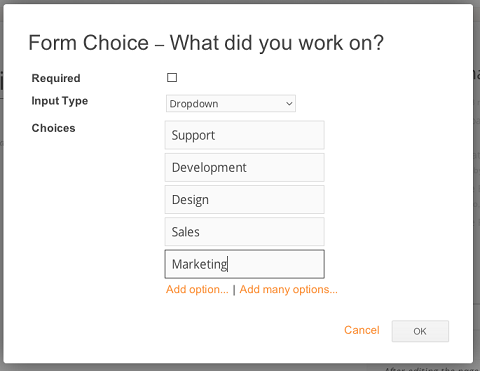
 Add the choice input to your page to allow a user to select an option using dropdowns, checkboxes or radio buttons.
For example, you can ask people to rate your service in survey, or allow colleagues to specify a project they worked on, etc.
 Add the User input widget to your page when you want to ask the user to select a member from the team
on your form. For example, on a form to collect receipts, you can select which team member paid for
the expense. Just like the other widgets, you can specify if this field is required in the
edit dialog for this widget. If the field is required, the user must select
someone from the list.

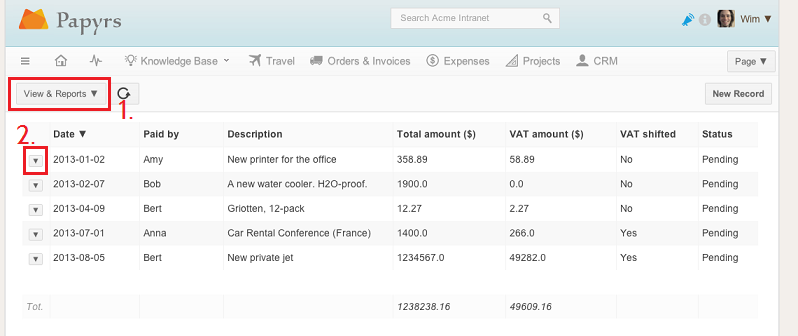
To change the view, and show/hide navigation options, click the View & Reports button (1). Click on the arrow in front of a record (2) to edit or delete the record (available depending on permissions, see Permissions).
The View & Reports menu looks as follows: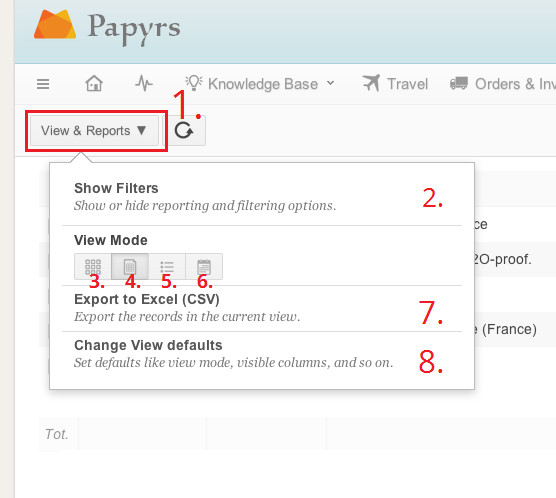
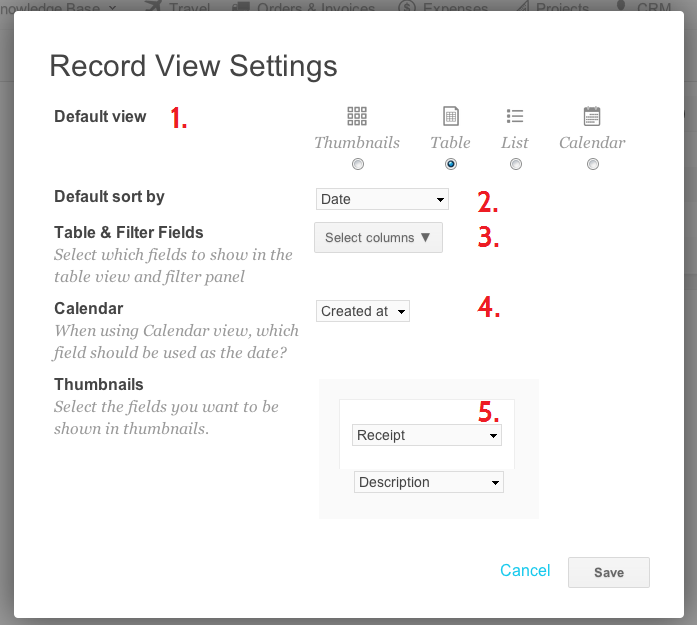
When you create a new form page and view its data, Papyrs will show the data in a table by default. Depending on the type of form you create, you sometimes want to show the results visually as thumbnails, or on a calendar instead. It might also not always be very useful to show all the columns in the table. Using the View Settings you can customize the way data for your form is displayed by default.
To open the View Settings dialog, click View & Reports > Change View defaults (see the section above, under 8).
The dialog will look something like this:
To a report, go the form data view. If the filters are hidden, click View & Reports > Show Filters. You'll now see the filters on the left, like in the screenshot below:
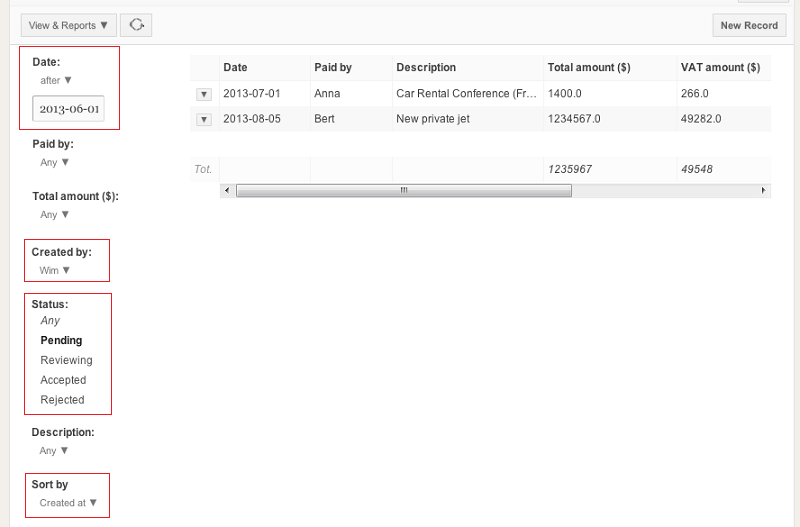
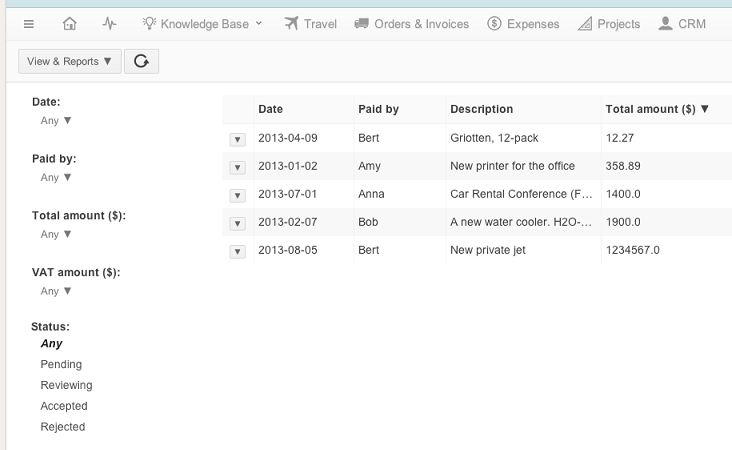 In the filters panel, you will see a list of fields in your form. By default you will only see the fiels for which the columns are visible in the table, but you can show all fields by clicking "Show all filters". For each field, you can set a filter. For example,
you can add a filter on the date: "Date after April 4th, 2011".


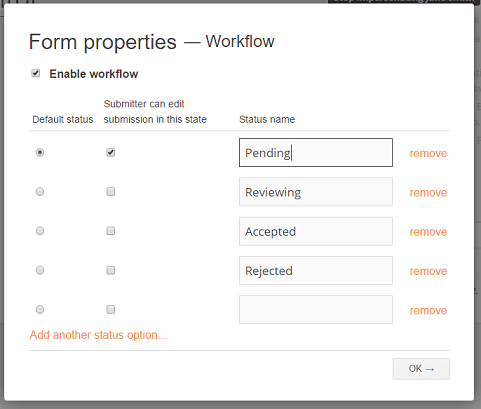
With Form Workflows we try to strike a balance between flexibility on the one hand, and simplicity on the other. By keeping the interface simple we allow workflows to be created by anyone, without the need for any codes or technical knowledge. Although we don't support using any codes to program custom business rules for this reason, we think handling most common workflows should be possible.
In some cases, workflows can become a bit more complex. For example when a request needs to be approved in multiple steps or by multiple people. In this case we suggest the following simple solution:
Let's say a request needs to be approved by a "supervisor" first, and then by another person in HR. To handle this workflow, we simply expand the number of possible statuses to express the various stages in the approval process. We can set the following statuses, for example:
Pending Supervisor Approval (as default status)
Denied
Supervisor Approved, Pending HR Approval
Approved by Supervisor & HR
Whenever a new request is submitted, or when its status changes, form managers are automatically notified (if they are subscribed to email notifications for the form). Depending on the status, they can see which records they need to take action for. It's also easy to view all records and filter them by status (see Form Reports), so each form manager can quickly get a list of records with the status of the step they are responsible for approving. In this example, the "supervisor" would change the status from Pending Supervisor Approval to either Denied or Supervisor Approved, Pending HR Approval. In that state, the HR person can then change the status to either Denied or Approved by Supervisor & HR.
We could use the same technique if the workflow doesn't involve multiple people, but rather multiple steps. Let's say an order request first needs to be approved, and then needs to be paid. We could then use:
Pending Approval (as default status)
Denied
Approved, Pending Payment
Approved & Paid
An App in Papyrs is a small custom form-based web application, which can be used to organize and collect structured information in your Papyrs intranet. It's an extension of forms: next to simply storing records in an online database, each record can be opened on its own separate page, based on a template page. This turns a simple online form into a more complete web application, with pages automatically created for each record in the app. Both the template page and online form (and its database) are built using the same drag & drop editor, so no technical knowledge is required to build your own apps.
Apps are based on form pages, so to build an app, simply create a new page and start building a form using the drag & drop page builder.
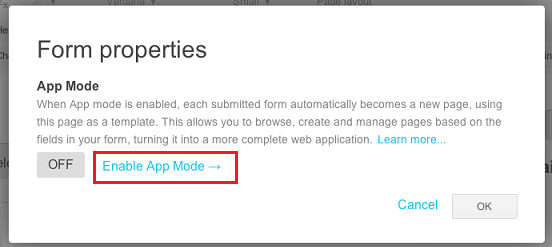
2. Enable App modeTo create an App from your form, just edit the form properties and enable App mode.
(Click edit on the submit button, and then Enable App Mode in the Form properties dialog).
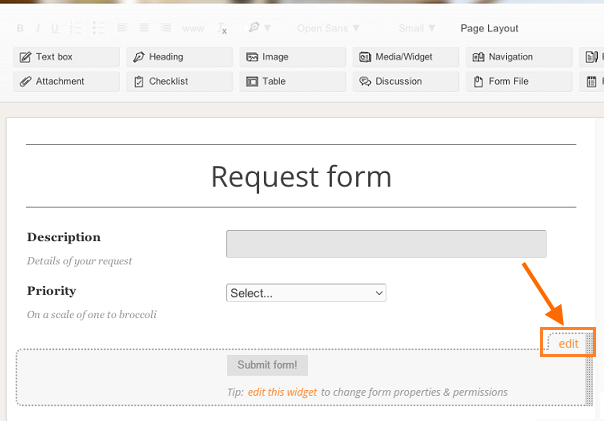
You can also set some settings for your App here, see App Settings
Note: you can only enable App mode for forms on new, normal pages, e.g. not on profile pages, pages inside another app, or form pages with existing records.
3. Design your template When a user creates a new record in your app by submitting the form, a page for that record is automatically created based on the form page, which also acts as a template page. Once App mode is enabled, additional template options become available for each widget on the page. You can change the layout, add additional widgets, and change template options to design your template for record pages in your app. Read more about Templates.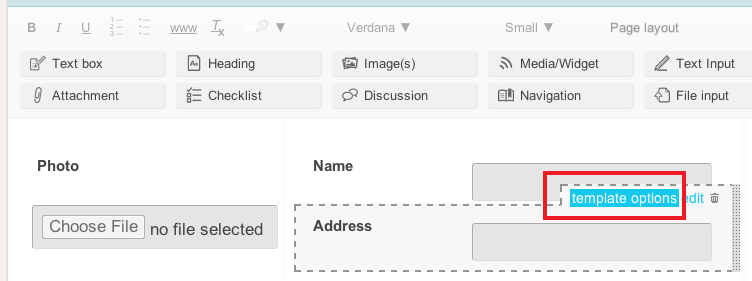 That's it!
Save the page and your App is ready. A database, and a page to navigate items in your app are automatically created based on your form. Click the New button in your app to start adding items! Whenever you submit a form, a new record is added to the database, and a new page is created based on your template.
To modify an app, just open go back to the editor to add/remove form fields, update the template or change the app's settings.
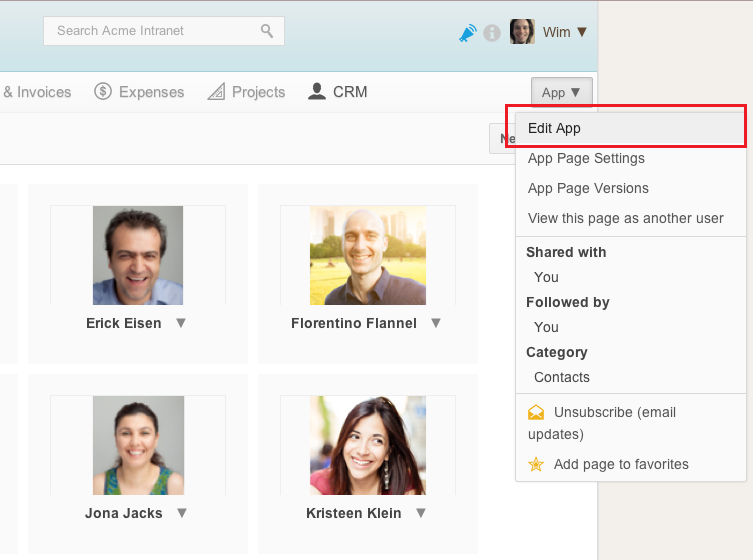
You can navigate the items in the App just like viewing the records of a normal form in Papyrs. See Form Reports for more about viewing and filtering records.
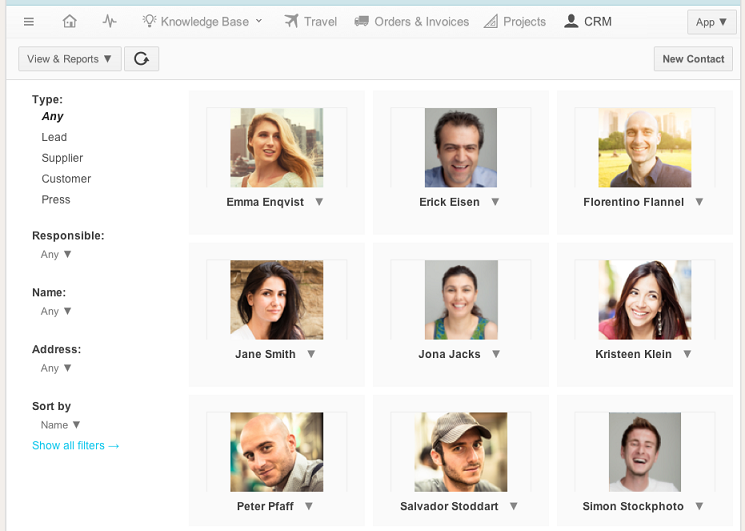
It's also possible to add Apps to the global menu bar, see Menu Bar for more information on how to add menu items.
To quickly switch between apps, all Apps are also added to the More menu:
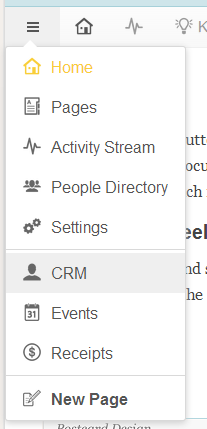
Access to record pages in an app work similarly to records in a form. Because a page is created for each record though, permissions can also be changed for these individual record pages.
See Permissions - App Permissions for more details.

To edit an App's settings, go the editor of the form/template page, edit the form properties, and click App Mode Settings in the dialog. Here you view and change the following settings:
| Name for a record in this app | The name of an individual record in an app. For example, "Contact" in a Contacts app. |
| Icon | An icon for items in this app. This icon is used to display thumbnails when no other preview image is available, and when adding an App to the menu bar. |
| Record titles | Which title to use for an individual record in this app. For example, when creating an App for contacts, we probably want the titles of pages in this app to be set to the value of the Name field of the form. |
| Default Folder | When a new record page is created, under which Folder should it be stored by default? |
When you create a new record in your app (by submitting your form), Papyrs automatically creates a page for that record. What those pages should look like is defined by the template settings in your app. The page containing your app's form, also acts as the template page. When a new record page is created, Papyrs first creates a new page using the same layout as the template/form page. Then it looks at all the widgets on the template/form page, and displays them on the new page according to their template settings. When you update the template/form page, all record pages in the app are automatically updated accordingly.

To change the template settings for an individual widget on your template/form page, open the editor and click Template Options for that widget (note: this option is only available once you've enabled App Mode). You'll now see a dialog where you can set how the widget should be displayed on record pages in your app, under Show As. The options available depend on the type of widget:
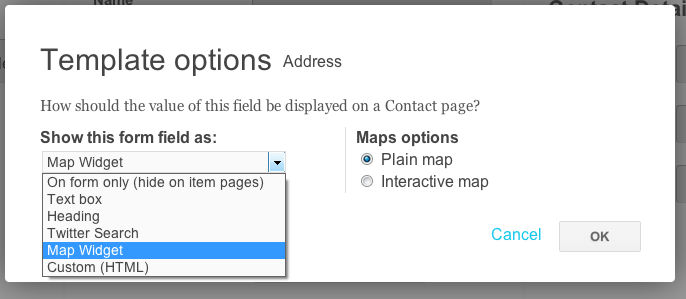
| Show as | Description |
|---|---|
| On form only (hide on record pages) | This widget will be visible on the form, but not on the pages for invidiual items in your app. This can be useful when you want to add some additional instructions on your form for example. For our Contacts app example, you could add a Text box to the form saying "Please fill in the form below to create a new contact", which shouldn't be visible on pages for the contacts themselves. |
On record pages only (hide on form) | This widget will be visible on record pages in your app, but not on the form page. This allows you to automatically add widgets to the record pages in your app, without showing them on the form unnecessarily. For our Contact apps example, you might want to a Discuss widget to each contact page, but it shouldn't be visible on the form itself. |
| Show normally | This widget is visible both on the form, as well as record pages in this app. |
|
Text box Heading Attachment Image Gallery Twitter Search Map Widget Custom (HTML) |
These options are available for form widgets (depending on the type of widget). They tell Papyrs how it should display the value of this field, i.e. what the user filled in when submitting the form, on a record page in the app. In our Contacts app example, there is a Text Input form widget where the user can fill in an address. If we select Map Widget in the template options for this field, a map is displayed on each Contact page, showing the address the user filled in when submitting or updating the contact form. |
To demonstrate the flexibility of Apps, let's look at an example. Say you might want to store pages on contacts in Papyrs. You can of course just create a normal page for each contact, but each contact is likely to share the same fields, such as: a name, a photo, an address, telephone number and so on. Ideally we would like to define the fields for a contact once, and then have Papyrs automatically create pages whenever someone creates a new contact.
To create and store new contacts, we can therefore use a form and add exactly the fields we need. This gives us a database with a list of contact records, based on our form fields. Not all information for a contact fits in a simple list of records, though. For example, we might want to save and view some additional information with each contact such as a discussion, documents, or add some widgets like a related search on twitter. For this we need a more complete web app, where the details of a contact are stored in a database, but each contact can be opened on a separate page, with all the additional widgets we need. By enabling App Mode for the contact form, a page is automatically for each new contact, using the page with the form as a template. With the template options we can tell Papyrs how it should display the contact information on a page. For example, we might want to display the address field as an interactive map. We can also add additional widgets to the template, like a discussion widget, which is then automatically added to each contact page.
| Functionality | App Mode enabled (app) | App mode disabled (normal form) |
|---|---|---|
| Record pages | Each record in the app gets its own page. | None, only a record is stored. |
| Main page | When opening an App, an overview with all items in the app is shown. | Clicking a form page shows the form. The form data can be viewed by clicking "View filled-out forms". |
| Permissions | Each record in the app has its own permissions. | Record access depends on form permission settings. |
It's only possible to enable App Mode for new form pages. When your form already contains existing records, please delete them first, or contact us to convert it.
Disabling App mode for an existing app is only possible when it contains no more record pages. If pages for records in the app still exist, you need to delete those records first. If this is not possible, contact us and we'll manually disable it for you (all record pages in the app will be deleted).
Next to adding Navigation Widgets to individual pages, Papyrs also allows you to easily add global navigation links and menus to your intranet. The global navigation is shown in the Menu Bar, just under the header and at the top of the page.

The menu bar can be fully customized to add just the navigation you need. You can add links to frequently used Papyrs features, important pages, folders, favorite pages, interesting external links or add custom dropdown menus with more links. The menu bar is shown on top of every page, and is visible to everyone in the team. Guests users and visitors to public pages will not see the menu bar. Links to pages and folders the current user has no access to are automatically hidden.
By default, icons to access standard Papyrs options (Settings, Activity Stream, and so on) are shown in the menu bar, but they can easily be removed if you don't need them.
Because the menu bar is fully customizable, you can remove all navigation links to standard Papyrs functionality that you don't need very often. To make sure you'll always be able to access all functionality, the first button in the menu bar is always the More Button,  . Clicking this button will bring up the More Menu, which contains links to standard functionality such as the Settings page, or the Activity Stream. Note that users only see links to options that are available to them. For example, if a user has no permission to access the People Directory, this link won't be shown in the More menu.
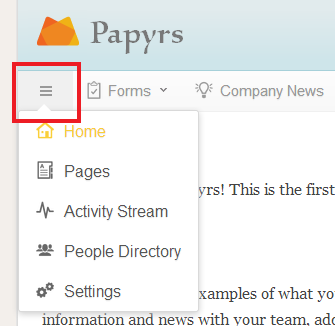
Papyrs comes with a special Menu editor which allows you to easily add navigation links and menus, without requiring any technical knowledge or markup codes. Note that only Administrators in your team can edit the menu bar. To edit the menu bar, open the More Menu ( ), select Settings, and then Menu.
Once you open the Menu Editor in Site Settings > Menu, you'll see a screen like this:
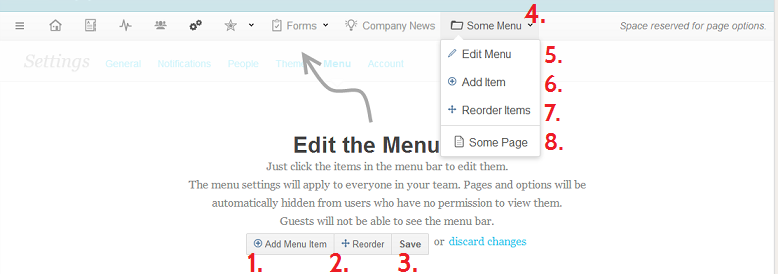
1. Click Add Menu Item to add a new item to the menu bar.
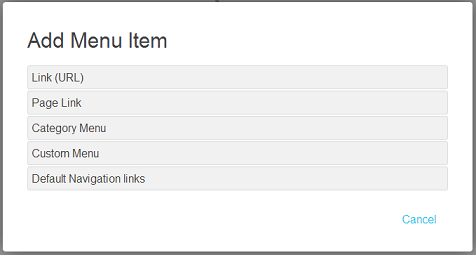
In the next dialog you can select what kind of menu item you want to add. You can add the following items:
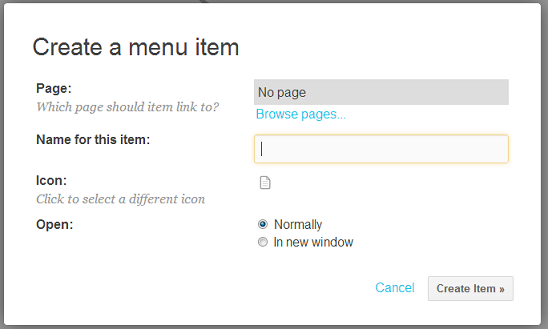
Depending on the type of item you add to the menu bar, you'll get a dialog with options for that item. Below is the dialog for creating (or editing) a Page Link. Each menu item can have a name and/or an icon. Leave the Name for this item field blank if you want to display an icon only. In the case of Folder Menu's and Page Links, you can either use the name of the Page/Folder itself, or set a custom name. If you keep the name of the Page/Folder, the menu item is automatically renamed when you rename the Page or Folder itself.
2. Click the Reorder button to re-order the items on the menu bar.
3. Click Save to apply and save the changes. Everyone in the team will now see the new menu bar settings.
4. To edit or remove an existing menu item on the menu bar, just click on it. An edit dialog will appear.
5. Click Edit Menu to edit the settings (name, icon, and so on) of an existing sub menu on the menu bar.
6. Click Add Item in a sub menu to add a new menu item to the sub menu.
7. Click Reorder Items in a sub menu to reorder the items in that sub menu.
8. To edit or remove an existing menu item in a sub menu, just click on it. An edit dialog will appear.
Papyrs has a User Profile Menu and a User Options Menu. On this page we'll go through the functionality of both.
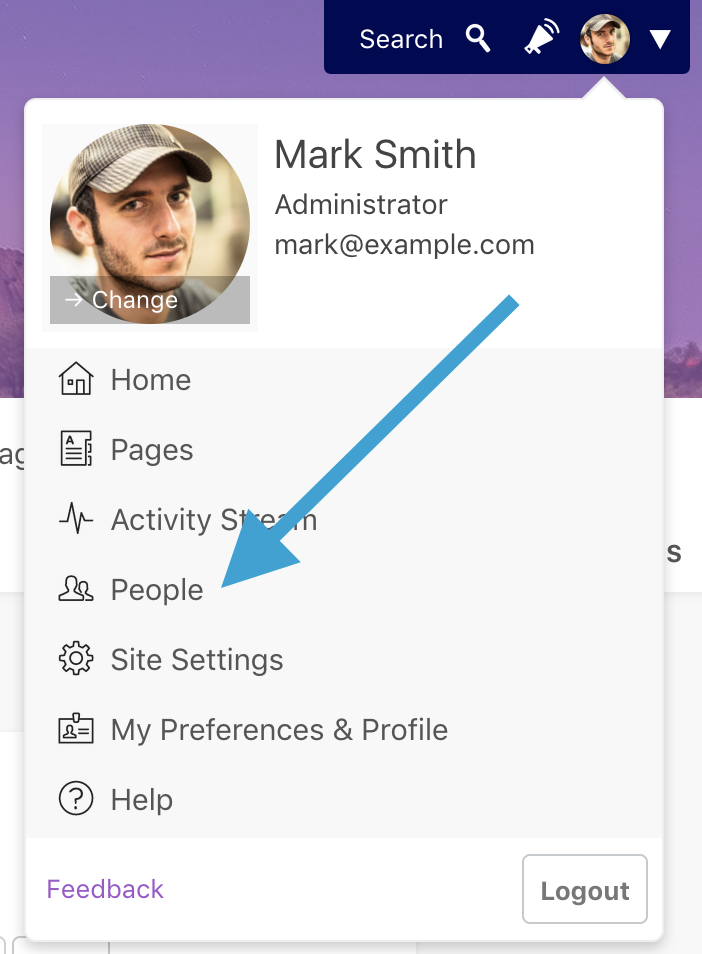
This is the menu you get when you click on your profile picture in the Upper right corner:
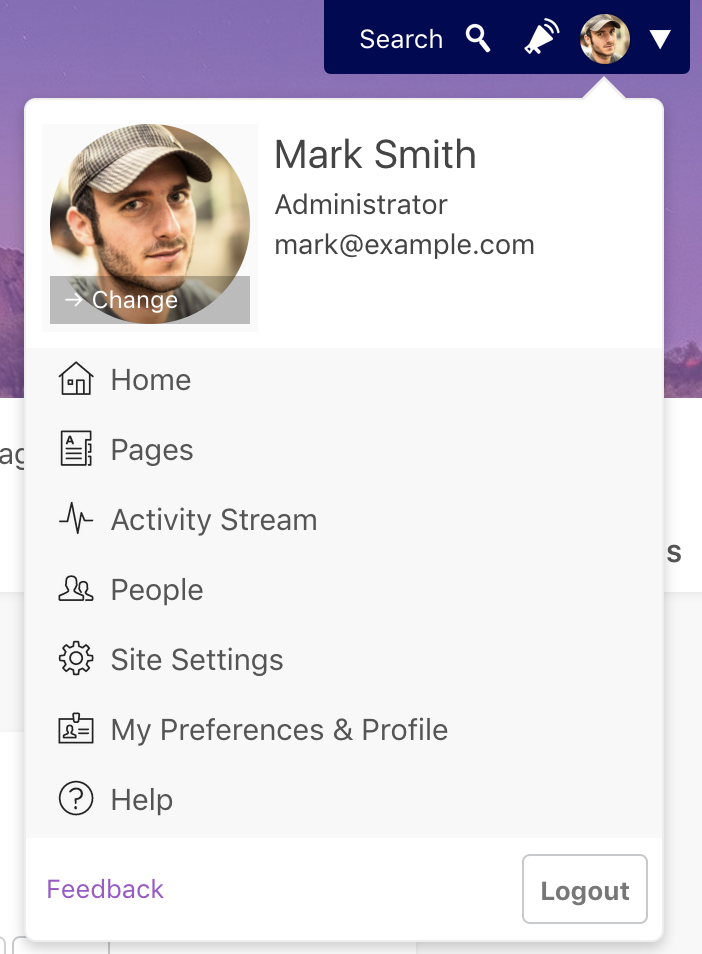
From this menu you can quickly access various features in Papyrs.
This menu is part of the Admin Console and allows Administrators to change the preferences of other Papyrs users. If you click on a user's profile picture you get the User Options Menu. This menu can be reached wherever you see profile pictures in Papyrs: the User Directory, the Discussion Stream and the comment section of a page.
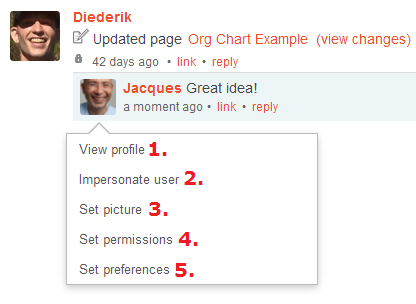
 ,
then Edit Properties, and select Make this page the Papyrs homepage (this option is only available
if you are an Administrator). Read Pages for more about page settings.
With Papyrs you can easily add navigation sections to pages, or add global navigation to the menu bar (like favorite links, important pages or event custom dropdown menus). You can read more about customizing the menu bar at Menu Bar.
Folders (or categories, as they were called in earlier versions of Papyrs) can be used to organize your pages hierarchically - much like folders on a PC or Mac - and each page in Papyrs can be stored in a folder.
Only folders containing pages are shown, so a folder is automatically hidden for a user when it no longer contains any pages they can access.
When creating a page, you can set the folder of the page by clicking the select a folder link in the dialog:
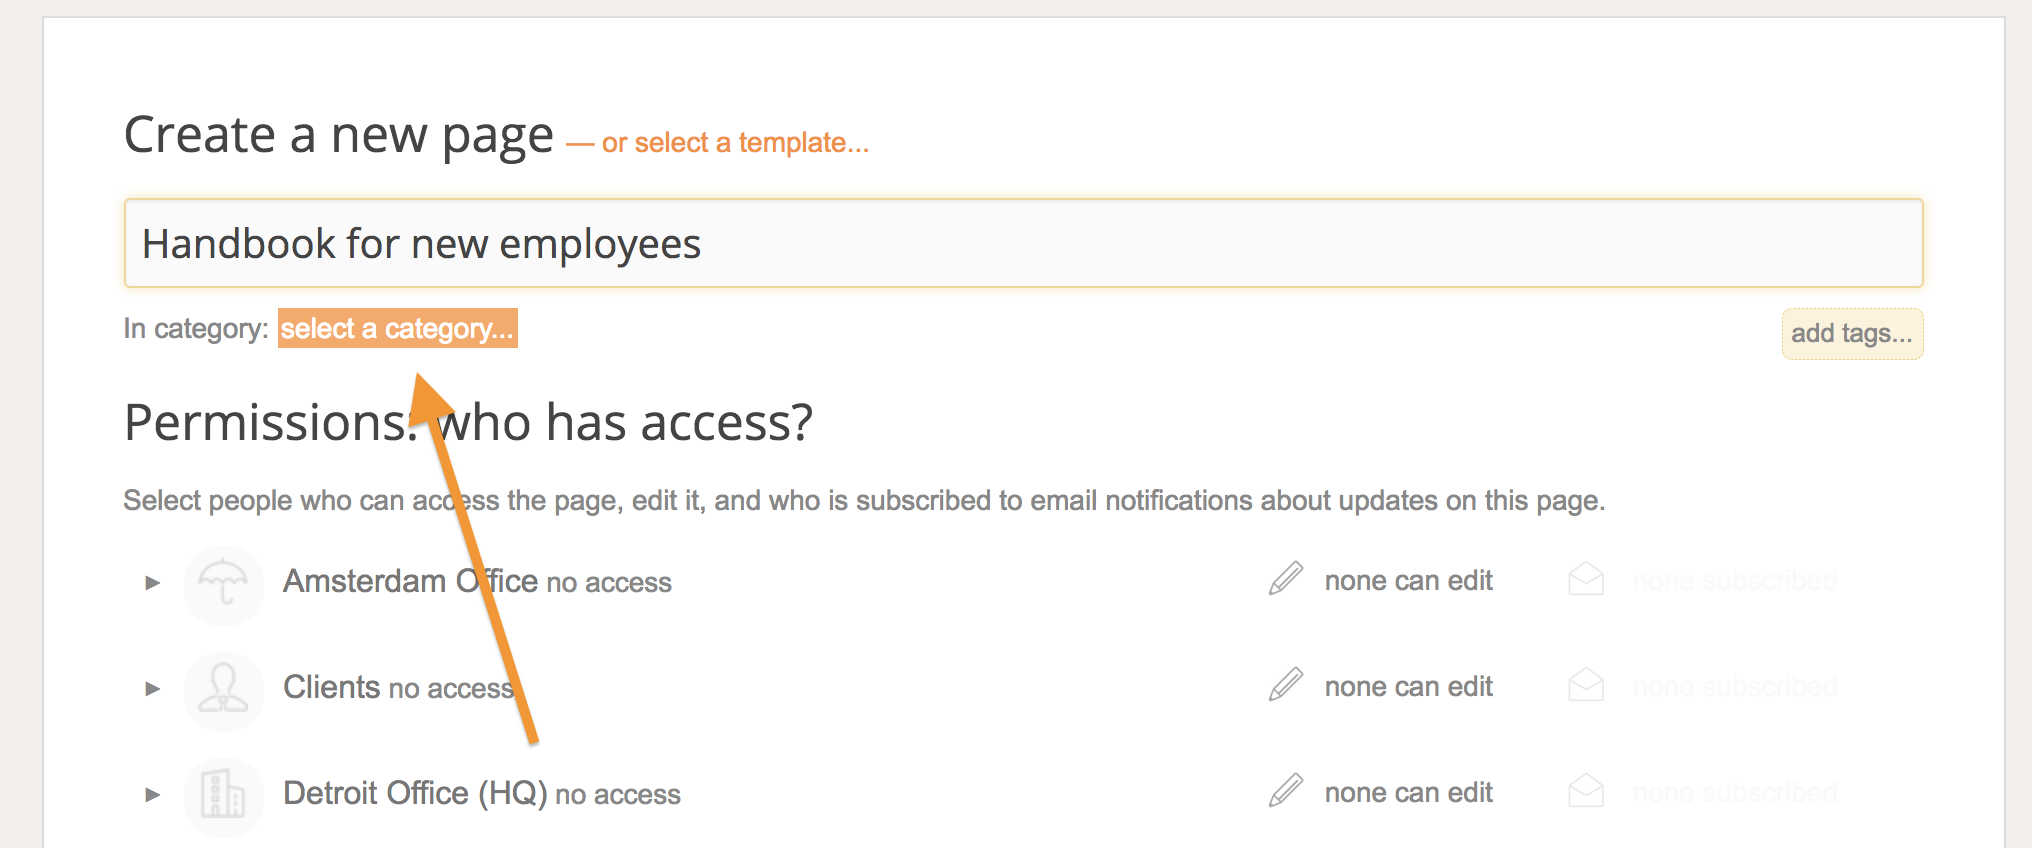
You can assign the page to an existing folder, or click the New folder link to create a new one.
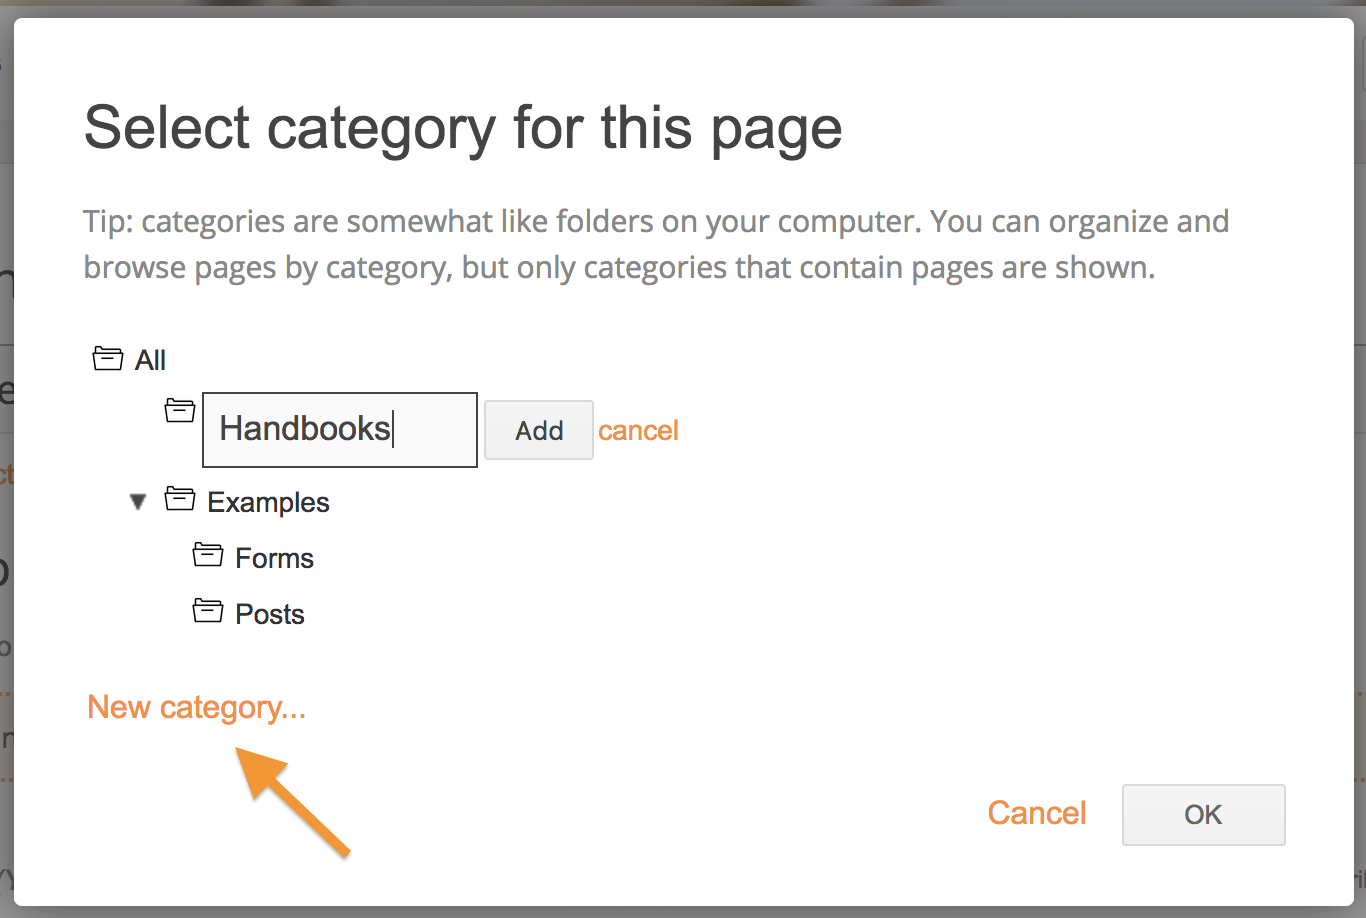
To change the folder of an existing page, click  , then Edit Properties, and
click on the currently selected folder to reopen the Select folder dialog shown above.
Using drag&drop to quickly move pages to another folder is also possible from the Pages overview: drag the page by its handle on the right and drop it in another folder on the left.
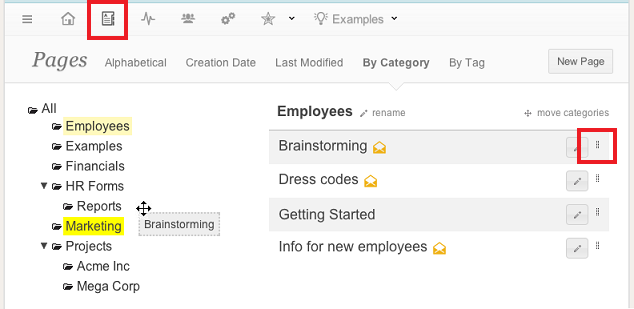
Administrators can also quickly reorganize folders by renaming or moving them. To rename an existing folder, go to the Pages overview and click rename (1).

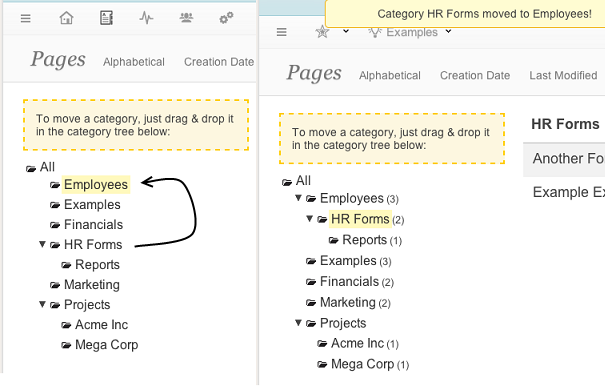
To move a folder, go to the Pages overview and click on move folder (2 in the screenshot above). You can now drag a folder in the folder tree, and drop it onto another folder. For example, we can move the "HR Forms" folder to the "Employees" folder: all pages and subfolders of HR Forms are now moved to Employees.
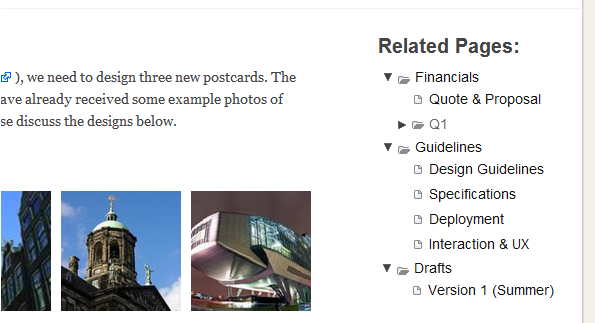
To quickly navigate to related pages and information, you can also display a folder tree directly on a page, by
adding a Navigation - Folders widget.
It's also possible to add a folder to the menu bar. When a user clicks on the folder, a sub-menu is shown with all accessible pages in that folder. See Menu Bar for more information.
Folders allow you to hierarchically structure your information. Sometimes however, you might want to group, browse and search pages by additional keywords. This is where tags come in. You can assign multiple tags to each page. This way you can browse and find pages by all kinds of keywords. For example, you could add tags to describe some status, responsibility, client, department, type of document, and so on.
Similarly to setting the folder, you can add and edit a page's tags when creating a page, or on the page's Edit Properties.
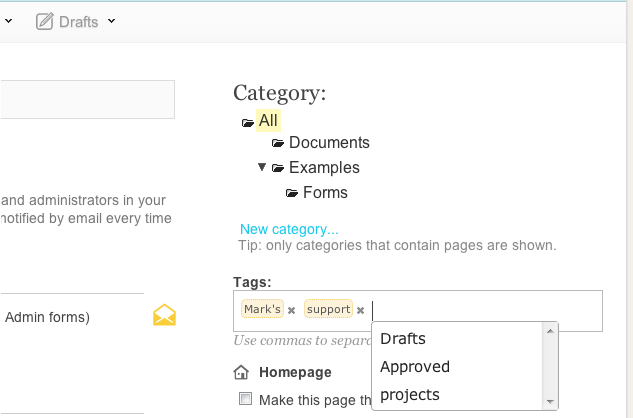
There you can click the add tags link:
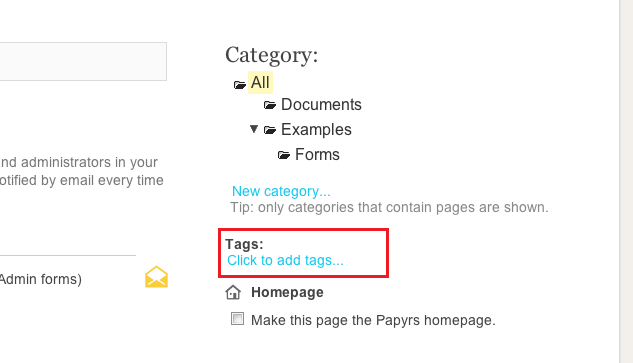
Just enter a list of tags (separated by commas), or select one or more existing tags from the dropdown menu.
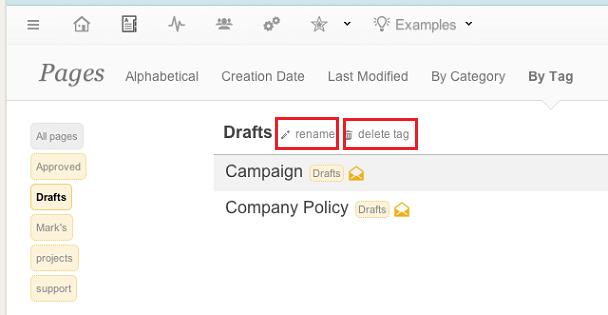
Administrators can also delete and rename tags. Go to the Pages overview, and select a tag. You can now use the rename and delete tag link to rename a tag, or delete the tag (when deleting the tag, it will be removed from each page that used the tag).
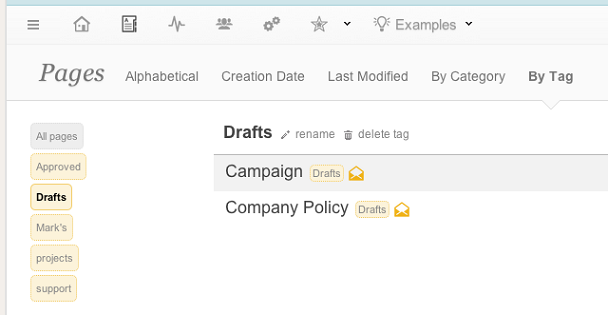
You can browse pages by tags under the Pages Overview.
Note: unlike folders, which are only visible if a user has access
to at least one of its pages, all tags are visible to all users in your team. As always, the pages within the tags
are of course only visible to people who can access them
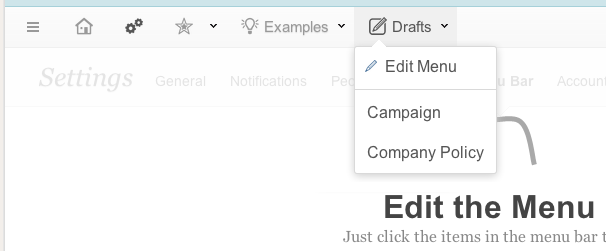
Just like folders, you can also pin a collection of pages with a certain tag to the menu bar. Just go the menu editor, and add a Tag Menu (see Menu Bar for more information about editing the menu bar).
You can also insert a Navigation widget on your page to show a list of pages within a tag.

| Command | Result |
|---|---|
| Keyword | Finds all pages, files, etc, that contain that Keyword. |
| Keyword AnotherKeyword | Finds all pages, files, etc, that contain both keywords. |
| Keyword -AnotherKeyword | Finds all pages, files, etc, that contain Keyword but not AnotherKeyword. |
| Keyword | AnotherKeyword | Finds all pages, files, etc, that contain either of the keywords. |
| (One & Two) | Three | Use braces for more complex queries |
| page: keyword | Search within pages for Keyword |
| file: keyword | Search within attached files for Keyword |
| form: keyword | Search within submitted forms (and attachments) for Keyword |
| feed: keyword | Search within news items and activity feed for Keyword |
| contact: keyword | Search within profile pages for Keyword |
| discuss: keyword | Search within comments for Keyword |


Papyrs comes with an employee directory, which you can use to easily get an overview of everyone on the intranet, and quickly look up their details.
You can access the People Directory from the menu bar here:
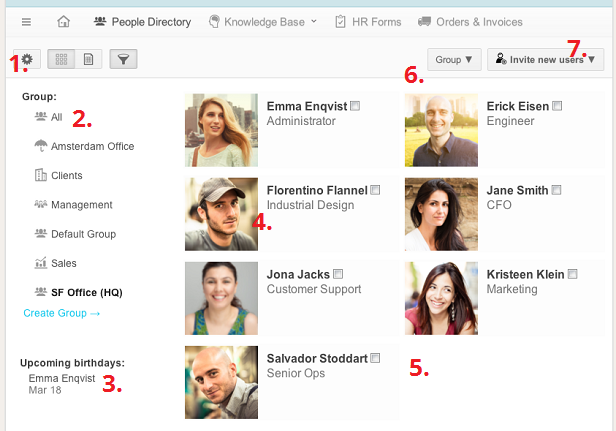
Administrators can also access all user related settings directly from the People Directory, from changing permissions, to inviting new users. The People Directory will look something like this:
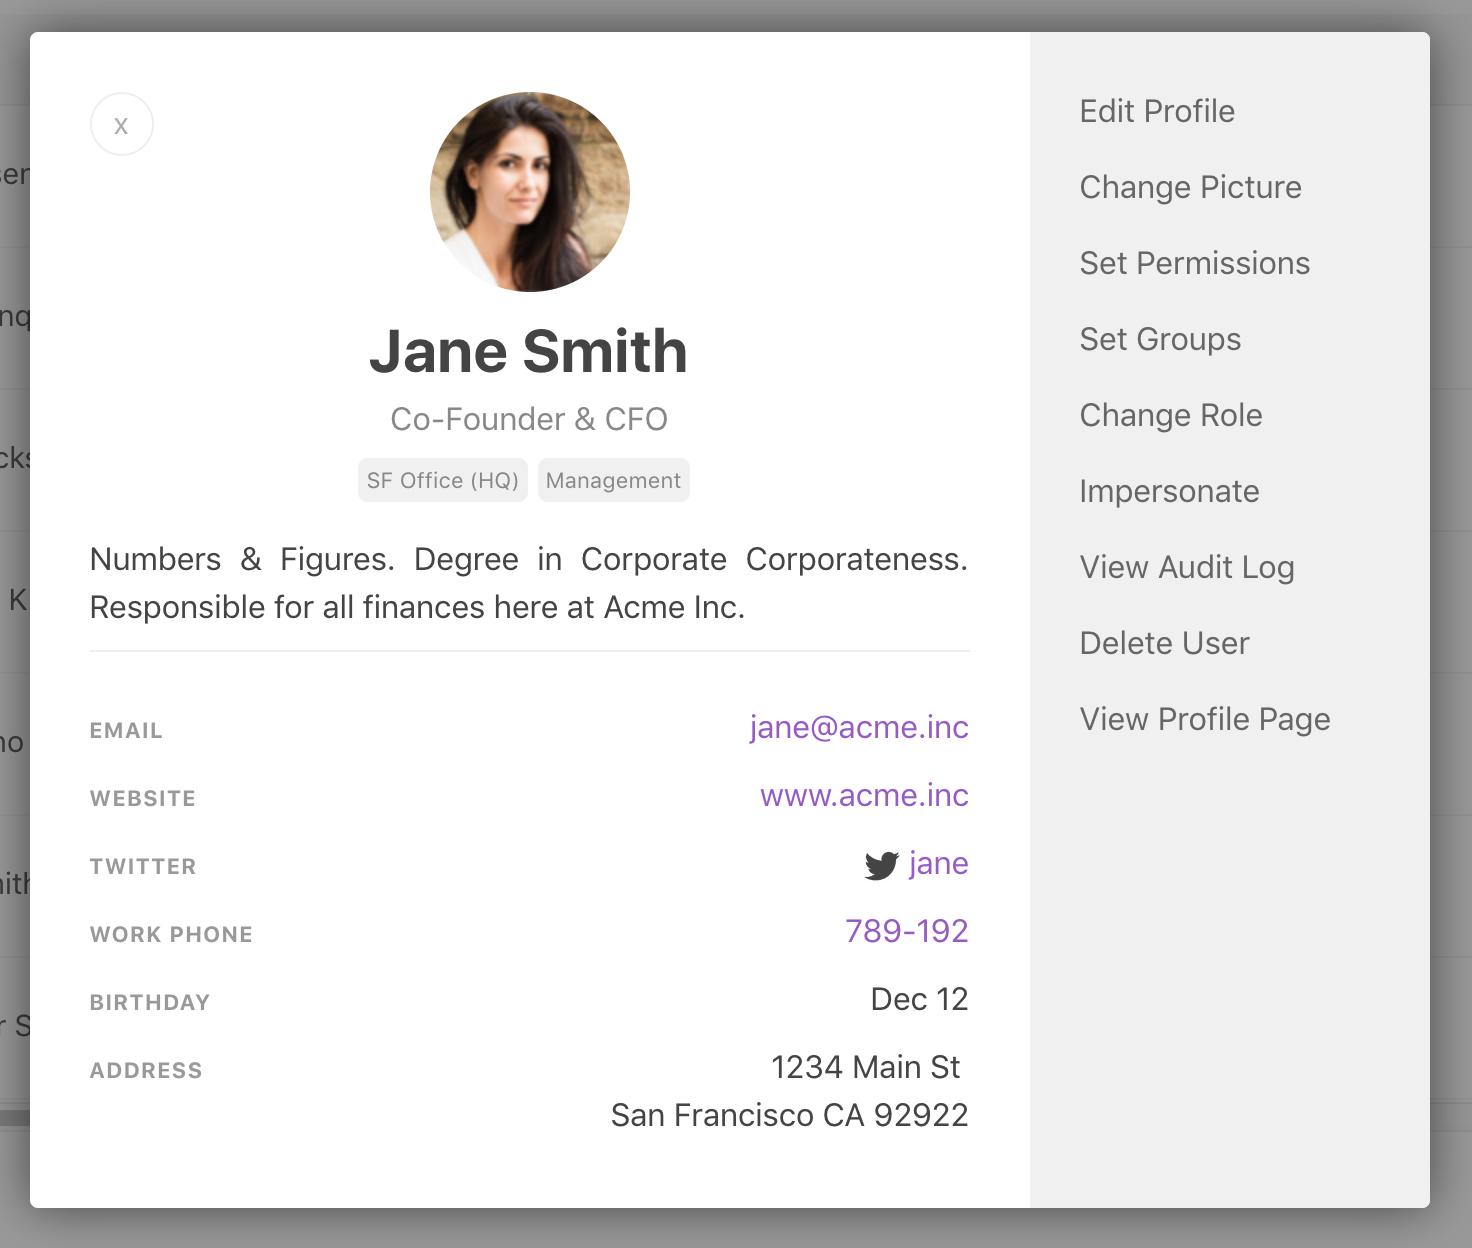
On a Papyrs site, each user has a profile card which people can use to look up more information about a team member (such as their status, position, expertise, and so on). It's a bit like a private social network for your team or company. Clicking on a user anywhere in the interface will bring up a profile card, making it easy to quickly look up the details of the author of a page, or someone in the People directory, for example. Administrators can also access all user-related options from this profile card.
The profile cards are visible to all team members with access to the People Directory, but are not public, and cannot be viewed by people you invite via email to share a page.
With fine-grained page permissions in Papyrs you can set exactly who in your organization can access which pages and who can edit them. Additionally, roles can be used to turn off certain functionality for certain types of users. Finally, some widgets on a page have additional widget settings, for example to restrict who can edit form records on that page.
Here you can read how the different permissions work, and how to change them:
A user can have one of the following access levels to a page:
You can set permissions of a page when creating a new page, or change permissions of an
existing page by clicking the  button, and then Permissions & Subscribers.
Giving people access to pages is easy: just click on their name, or on a group to give everyone in the group access.
More fine-grained options are also available, in case you want to decide on edit rights of individual users, for example. We explain all the available options below:
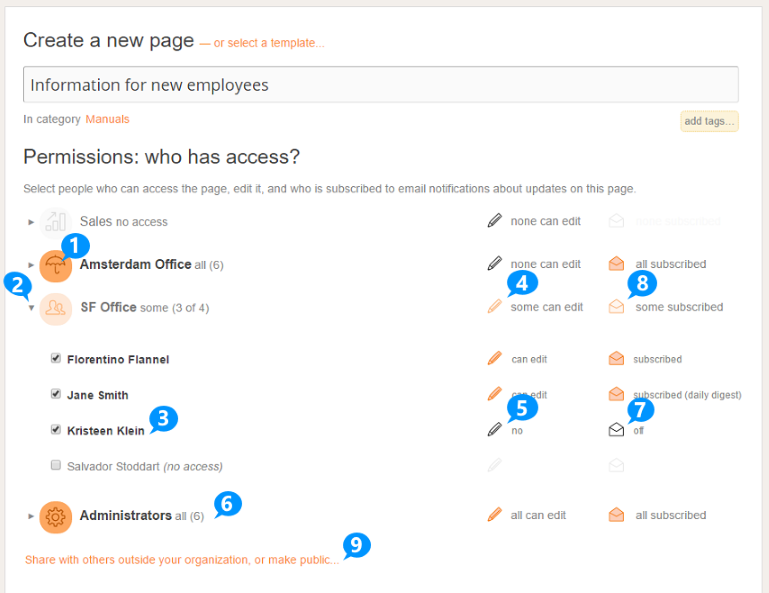
As the number of pages and people in your account grow, it's often useful to change permissions for a large number of pages, users or a group of users at the same time. This is where bulk permission assignment comes into play, which allows you to do just that in a few clicks. Afterwards you can use user impersonation to verify that the permissions are set up correctly.
You can find the Bulk Permission assignment page by navigating to People » Edit Permission :
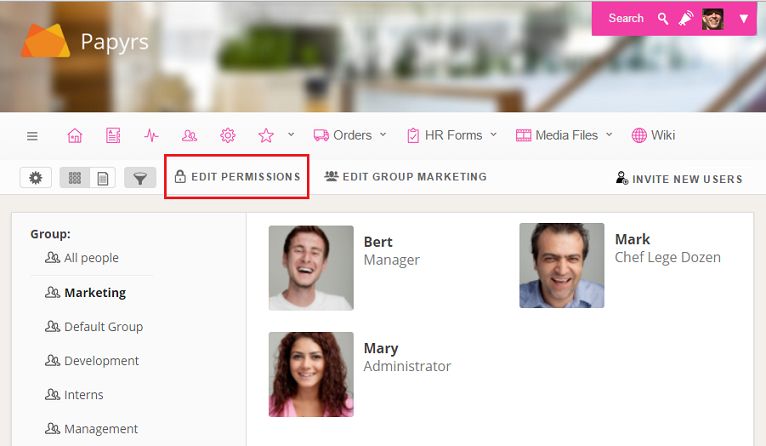
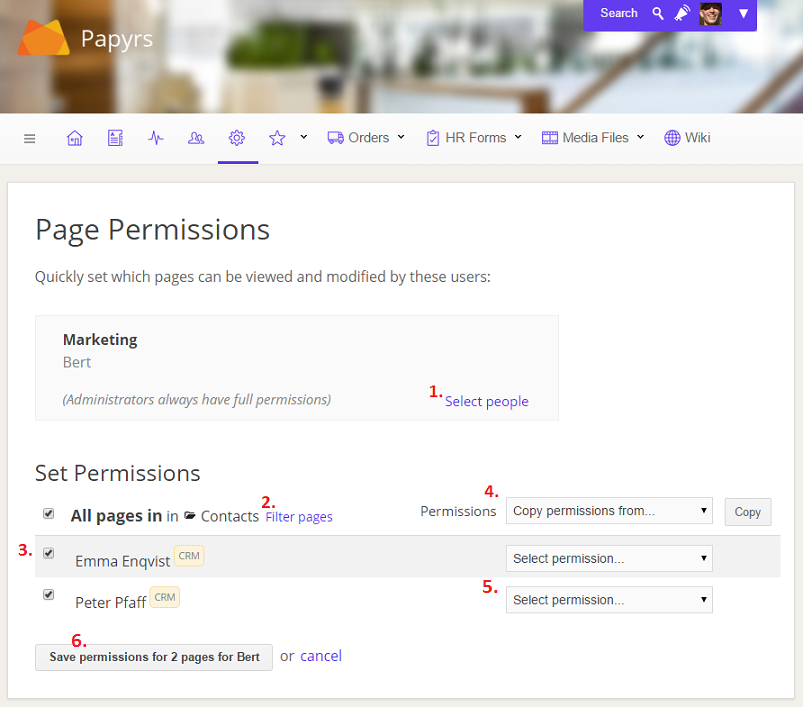
When you click on "Edit Permissions" you'll see a page that looks like this. Here you can set permissions for multiple pages and for multiple users at once.
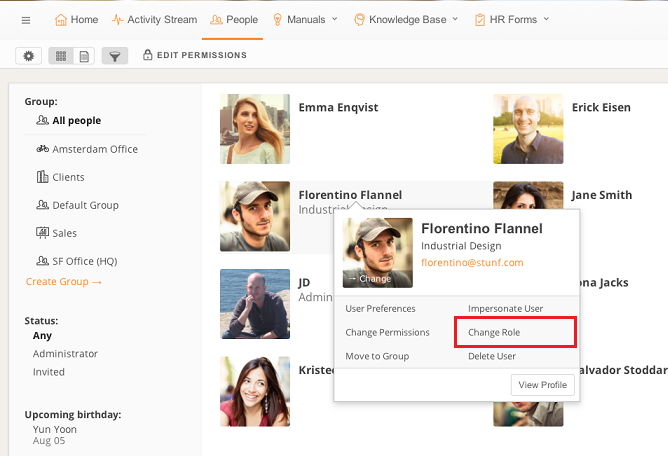
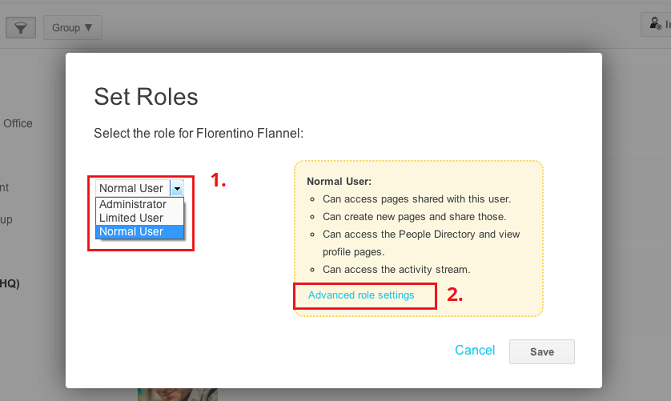
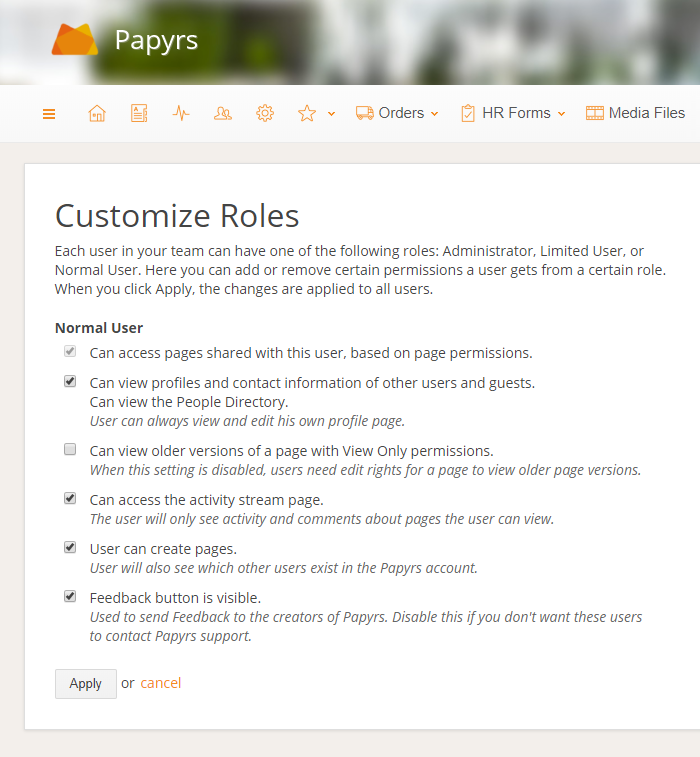
Tip: to change the roles of multiple people in bulk, view the People Directory as a table, select multiple users, and click Selection Actions > Edit Role.
When a page contains a form, users who can access the page can submit new records. By default, the access to form records is set like this:
| Page permission level | Access to records of the page's form |
|---|---|
| View | Viewers can only see & edit records they submitted. Other records are not visible.
|
| Edit | View and edit all records of the page's form. |
For example, if you have an HR form to process requests, you can give managers Edit permissions to the page so they can view and change (e.g. approve or deny) all records, while others can only submit records and view their own records.
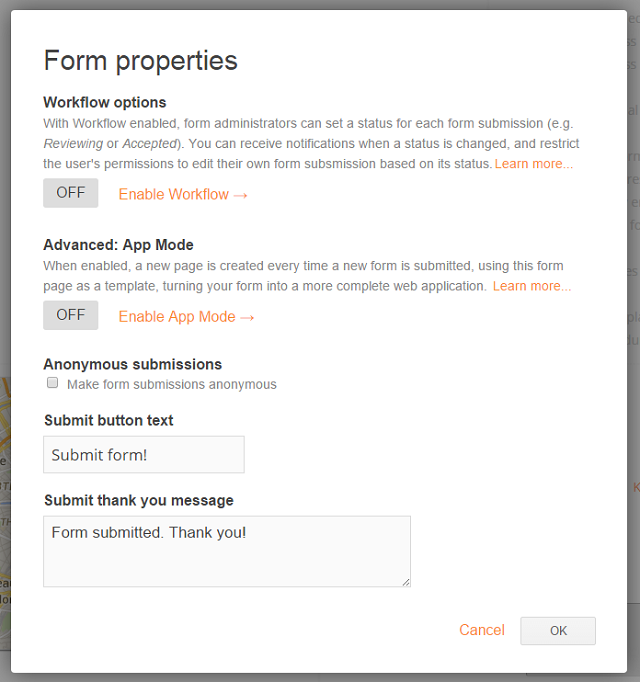
It's also possible (for page editors) to change which records View users can see. In some cases it's useful everyone is able to see all records, for example, like in the case of bookings or an event calendar. To change this, open the form properties dialog by clicking edit on the form's submit button:

In the following dialog, you can select which records viewers of the page should be able to see (1), and which they can edit (2).
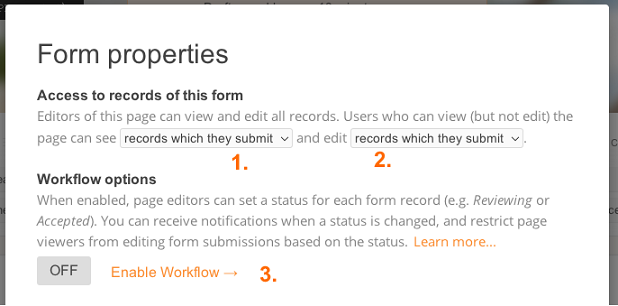
Workflows
Using the Workflow options (3), a status field is added to each record, and editing of a record by a View user can be restricted depending on the status of a record (for example, users can only edit form records when the status is still set to Pending approval).
Advanced: App Permissions
When App mode is enabled for a form, whenever someone submits the form, a new page is created for that new record, using the form page as a template. Just like any other page, page permissions can be changed for these record pages individually.
The default permissions for new record pages (created when someone submits a form in the App), work just like access to records in a normal form. Like normal forms, Editors of the App will get Edit access to all new record pages, and the default setting for Viewers is they only get Edit rights to the record pages they submitted themselves (No access, otherwise). Similarly, the default permissions for new record pages can be changed by editing the properties of the App-mode enabled form:
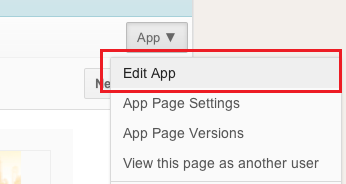

Tip: to quickly change all permissions for existing record pages of an App, use the bulk permission tool.
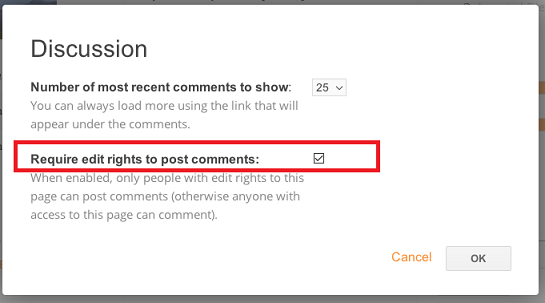
When a Discussion widget is present on a page, every user who can access that page can post comments. If required, this can be changed so that only people with Edit permission levels to the page can post comments (i.e. those with View permission levels cannot leave a comment on the page). This can be enabled by editing the Discussion widget on the page:
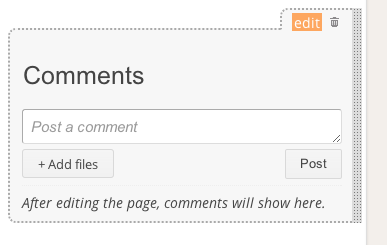
And then selecting the Require edit rights to post comments option.
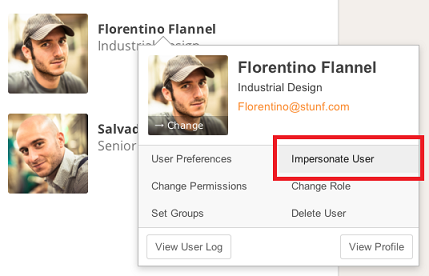
To verify that the permissions are set correctly, you can impersonate a user. This feature is only available to users with the Administrator role. To impersonate a user go to the People Directory, select a user and click Impersonate User, see the following screenshot:
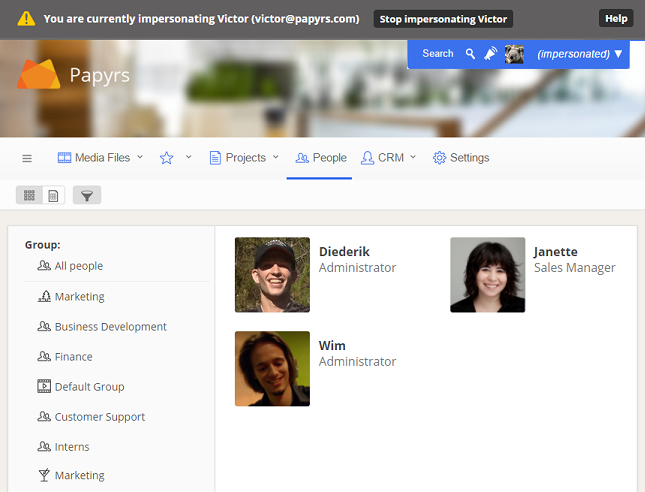
You will now see your Papyrs site exactly as it appears for the user you're impersonating. So you'll only see the pages the user has access to, you can only edit those pages the user can edit, and so on.
You'll also notice that Papyrs automatically hides pages a user doesn't have access to from the menu bar and navigation widgets.
When you're done impersonating the user you can click on the "Stop impersonating user" button at the top of the page.
Tip: You can also impersonate a user from the Page menu (Page > View this page as another user).
You can set the permissions of every Papyrs page so people will get exactly the appropriate level of access. You can choose between several permission levels: No Access, View Only, View & Submit forms, View & Manage forms, or Full Access for every page and for every user. We have more information about permission levels and user roles.
However, if you have hundreds or thousands of pages it's no longer convenient to set all the permissions individually. This is where bulk permission assignment comes into play. With the Bulk Permission assignment tool you can assign the permissions of many users and many pages in a few clicks. You can then use User Impersonation to verify that the permissions are set up correctly.
You can find the Bulk Permission assignment page by navigating to People » Edit Permissions:

When you click on "Edit Permissions" you'll see a page that looks like this. Here you can set permissions for multiple pages and for multiple users at once.

There are 6 themes to choose from: Modern, City, Cloud, Classic, Minimal, and Gradient. Each of these themes has some unique attributes. You toggle between the different themes by clicking on the theme icons. The other styling options available on this page depend on which theme you choose. For instance with the Classic Theme the banner image is always the width of the page itself, and with the Minimal Theme there is no banner at all, just a logo.
Just try the different themes and see what you can come up with!
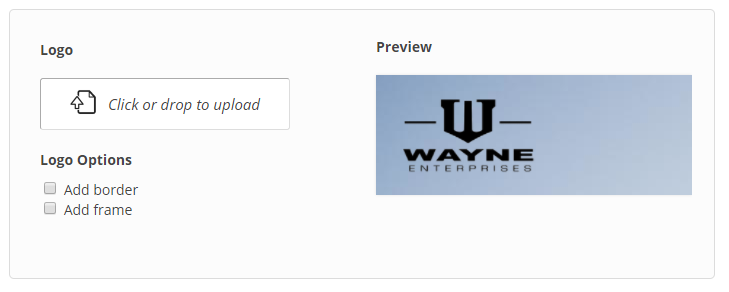
You can replace the Papyrs logo with the logo of your business or organization. For best results use a logo (jpg/png) with a transparant background so the logo and the background work together seamlessly. If your logo has a background color, then you can use the two checkboxes ("Add border" and "Add frame") to make the logo stand out more.
The logo is resized automatically based on how much space there is in the banner.
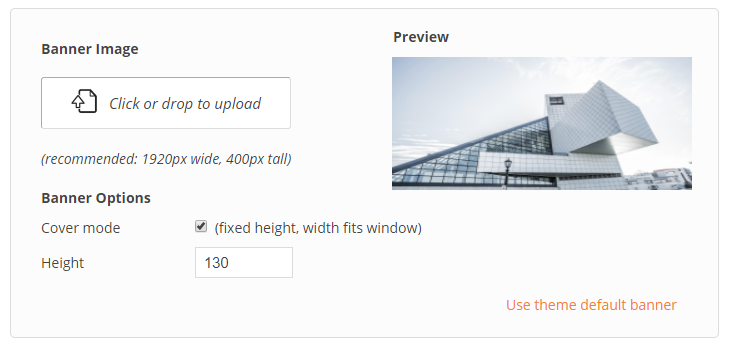
Here you can upload the banner image for your site. Or, if you have selected the Gradient theme, here you can choose the colors that make up the banner gradient.
If you're on the Classic theme then for best results upload a banner image that's 1104px wide and between 60px and 350px tall. With this theme the banner image won't stretch along with the browser window.
If you're on one of the other themes the banner image will be stretched automatically to the browser window. This has two implications:
If you don't want the background to cover the window like described in the previous section, then uncheck the "Cover mode" checkbox. Now the image will be scaled along with the browser window. The width of the image will match the width of the browser window, and the aspect ratio of the image determines the height. For best results you'll want to upload a wide and short banner, perhaps sized 1920x200px.
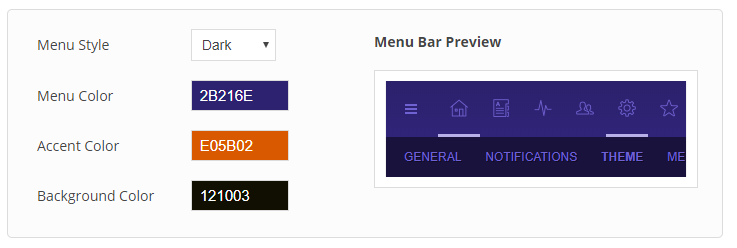
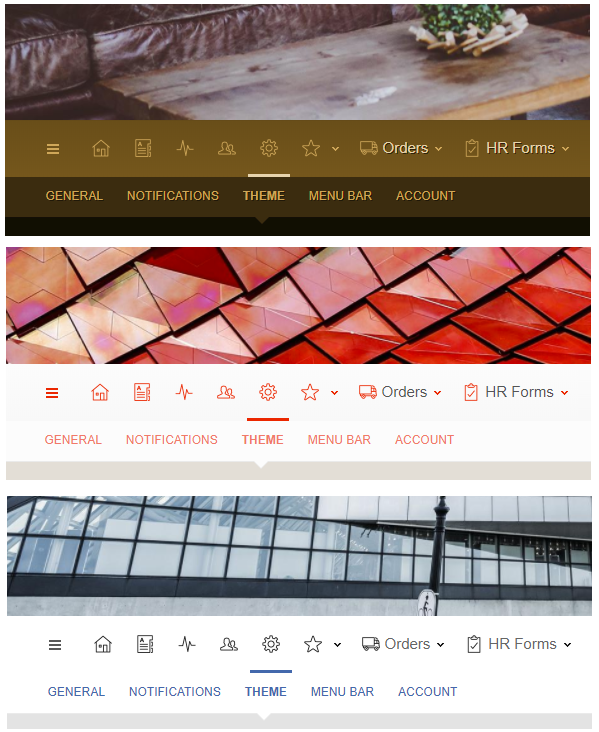
There are three menu styles to choose from: dark, light, and minimal. You can also choose a menu hue. The menu is then colored with different shades of that hue. Here are some examples of what the menu bar can look like:
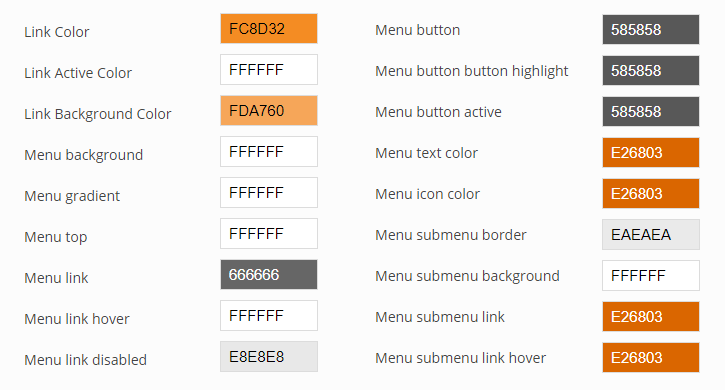
If the options above aren't sufficient to get the colors just right, you can make color adjustments in this section of the theme editor.
The changes you make here will change what the regular text on all your pages look like, as well as most text in the rest of the user interface (dialog windows, settings pages, and so on).

The changes you make here will change what the headers on all your pages look like, by default. You can still change the appearance of individual headers on a page using the page editor.
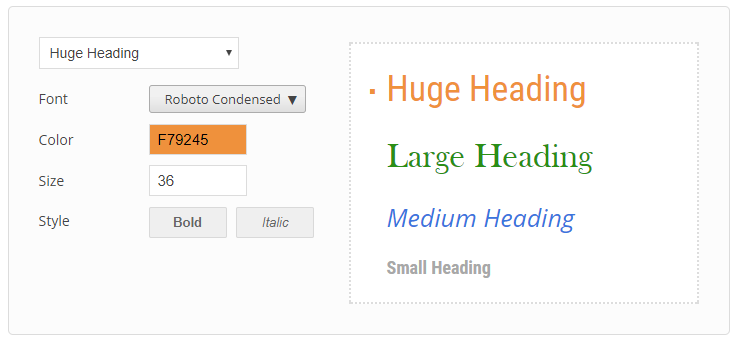
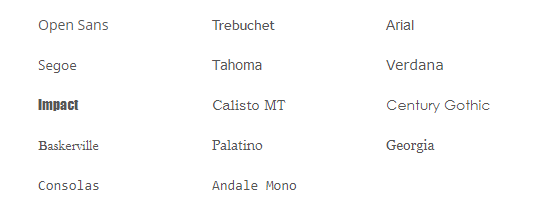
There are 14 fonts to choose from:
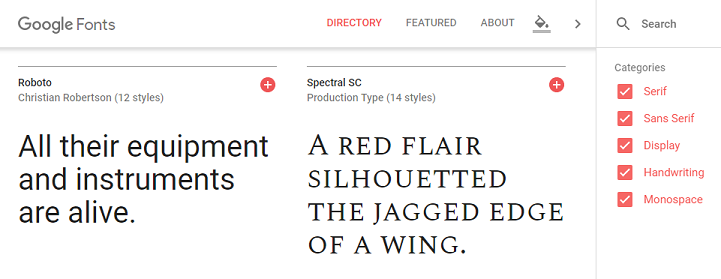
You can use fonts from the Google Fonts catalog for your Papyrs site. There are over 800 webfonts fonts to choose from.
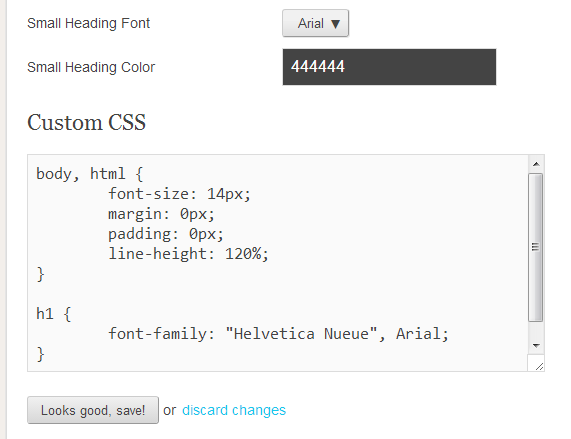
If you wish to make other changes to the appearance of your Papyrs site you can do this with the Custom CSS function. You can use this to make a great range of visual adjustments.
Here are a few examples:
You can use javascript to customize the behavior of Papyrs. You can use javascript to add your own elements to pages, or to connect to other services. There are very few technical limitations as to what can be accomplished by adding your own javascript code to Papyrs, but if something in the interface absolutely has to be changed, with javascript it's possible.
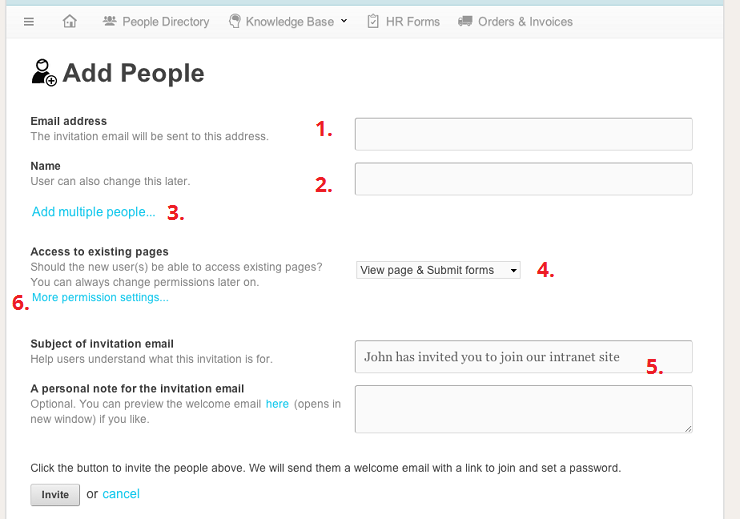
Adding people to your team is easy. Go to the People directory, and click Invite new users (only Administrators can add people to the team).
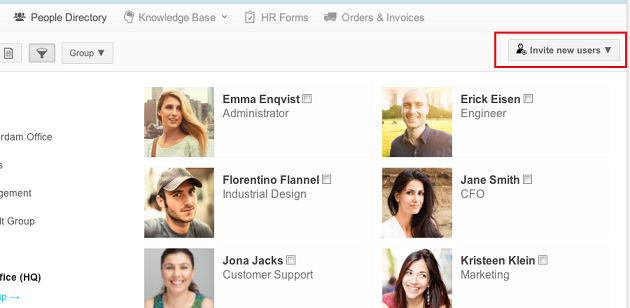

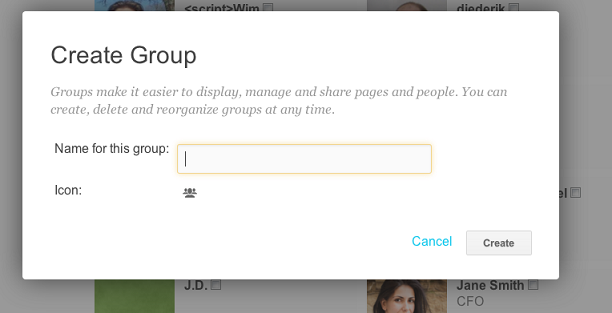
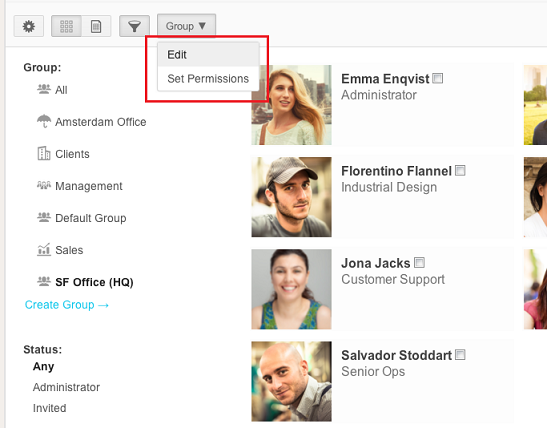
To view all people in a group, just click on a group in the filter side bar of the People Directory. A new Group ▼ dropdown menu appears, which shows you options for Editing (like renaming) the group, or for setting permissions for people in the group.
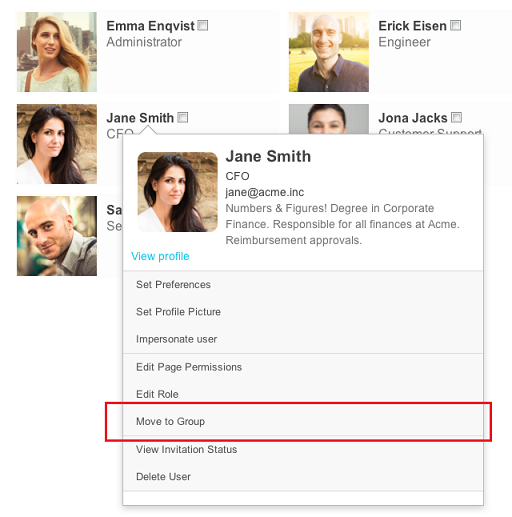
To move people into a group, just click on a person, and select Move to Group. You can also select multiple people, and select Move to Group from the Selection actions ▼ dropdown that will appear in the bar.
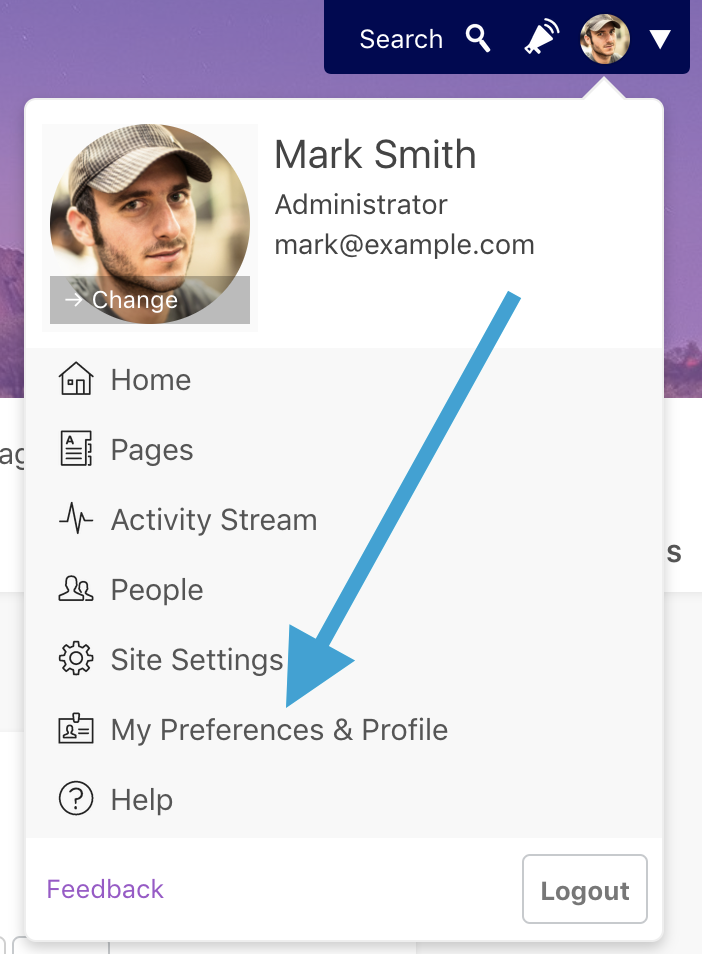
In the My Preferences screen, you can change your Papyrs account preferences, like display name, password, and so on. To change your settings, click My Preferences from your User Profile menu.


With the Themes & Branding options you can change the default theme (font styles, color theme and banner/logo images) for your Papyrs intranet, to match the style of your organization. The white labeling options allow you to change the entire visual appearance, customize the notification emails, and use your own name in the interface instead of Papyrs'.
This page will describe the options and how to set them up.
Note: Custom domain is available on the Papyrs Business plan and higher.
Note: White-labeling is available on the Papyrs Large plan and higher.
With this option you'll get a new input option on the Theme Editor screen where you can enter your own custom CSS codes. With custom CSS, you can change the complete visual appearance of any screen in Papyrs. If you're not familiar with CSS, any web designer should be able to help with that. Again, we can help you get started with some additional instructions. Contact us and we'll enable the Custom CSS setting for your account.
Notification emails include the logo and information of Papyrs in the footer. If you want to replace it with your own logo and/or text, please send us the text and/or logo and we'll apply it to your account.
With the People Directory and user profiles you can easily find back people and let your employees share details like their expertise, phone number, birthday and so on. Although each member of the intranet can fully edit their own individual profile page, the profile cards and table view in the People Directory give a quick overview of a default list of attributes (like a bio, position, phone and address details, website and/or twitter links). With the whitelabel option you can add additional custom fields which are relevant and specific to your company. Send us the fields you would like to add, and we'll add them to your account (they will be visible in the user's profile settings, People Directory and profile pages).
Invitation emails are sent out when you invite someone new to your Papyrs account. Next to a custom message, they also include information on what Papyrs is. With white labeling you can change all the text in the email. To check what the emails currently look like, go to Settings > People > Invite new users > preview the welcome email. If you want to change the text and/or the subject, just send us the new text, and we'll apply it to your account.
The Favicon is the little icon that your browser shows when you visit a page in your account. It's set to
the Papyrs logo by default, and looks like this:  . If you want to change the icon,
just send us a new logo and we'll apply it to your account.
At various places throughout the interface the name Papyrs is used, in page titles or settings screens, for example. If you want to replace this with your own internal name, let us know and we'll apply it to your account. (This does not apply to the URL in the address bar, see the Custom Domain section above for more details on how to customize that. It also doesn't apply to the documentation, but we can optionally hide the link to the documentation in the dropdown menu.)
Note: Audit Log is available from the Super plan and higher.
For a general overview of usage statistics, such as graphs of the number of page visits, Papyrs offers integration with Google Analytics (which can be enabled under Site Settings > Integrations).
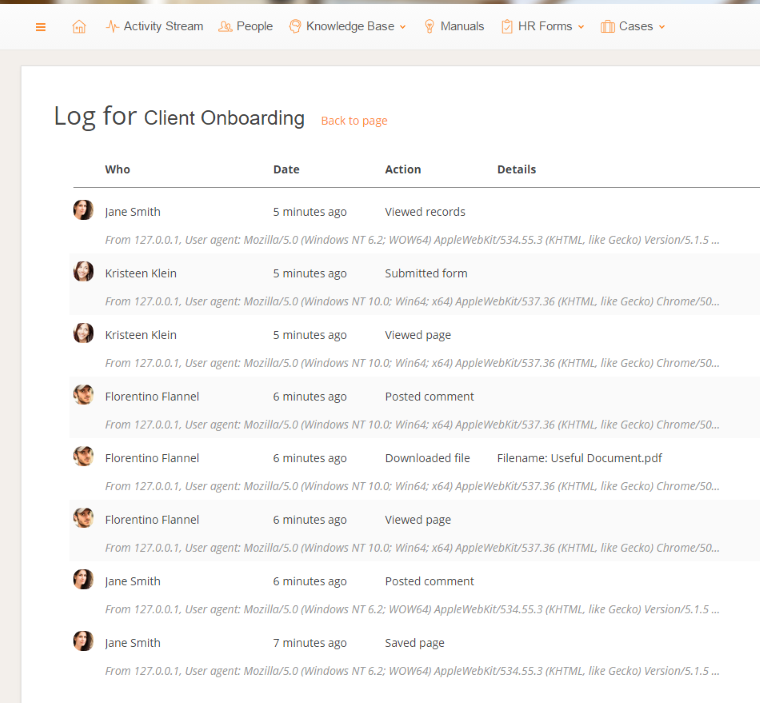
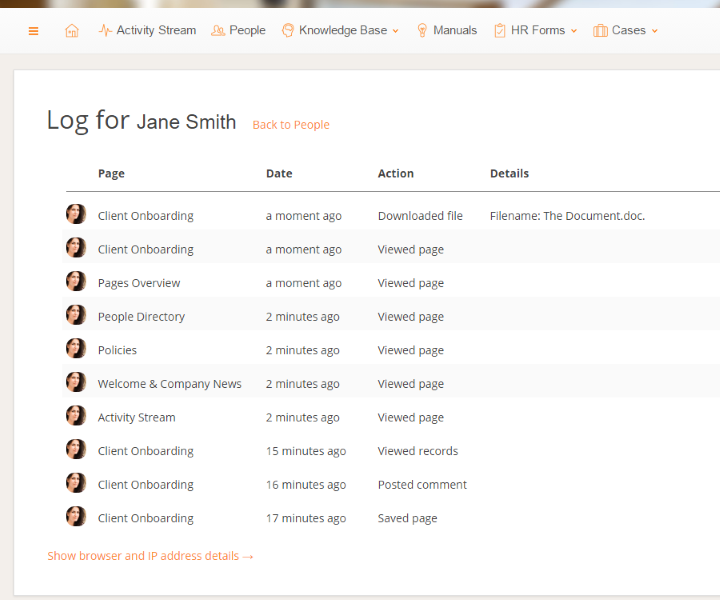
For a more detailed insight into the type of access and usage of the intranet, Administrators can view the Audit Log and see a detailed list of events by page or by user. Events not only include views but also other actions such as posting comments or downloading files. Each entry in the Audit Log also includes details such as the exact timestamp, IP address and User Agent (type of browser and device).
The following events are included in the Audit Log:
| Event | Description |
|---|---|
| Page view | Log entry created when a user accesses an intranet page. |
| Download | Log entry created when a user downloads a file stored on Papyrs. |
| Page Save | Log entry created when a user saves a page. |
| Form Submit | Log entry created when a user submits an online form on a page. |
| Post comment | Log entry created when a user posts a comment. |
| View records | Log entry created when a user views the records of a form on a page. |
| View All Pages | Log entry created when a user opens the Pages Overview |
| View People Directory | Log entry created when a user opens the People Directory |
| View Activity Stream | Log entry created when a user opens the Activity Stream |
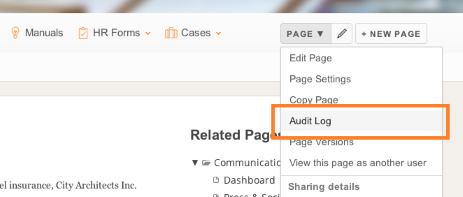
Administrators can access the Audit Log for a page by selecting it from the Page menu. The page audit log
will show all log entries for the page across all users.
An example of the audit log for a page:
Administrators can access the Audit Log for a user by clicking on the user in the People Directory and selecting View User Log. The user audit log will show all log entries for the user across all pages.
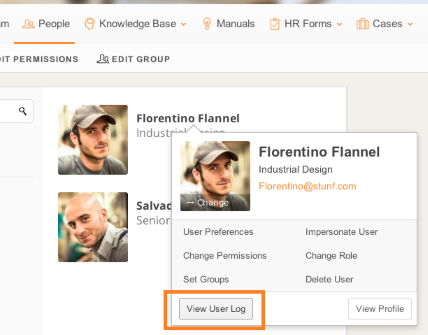
An example of the audit log for a user:
Note: Two-factor authentication is now available for all subscriptions.
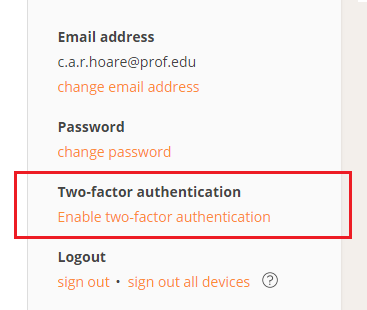
1. Click on your profile picture and go to My Preferences. Then Select "Enable two-factor authentication".
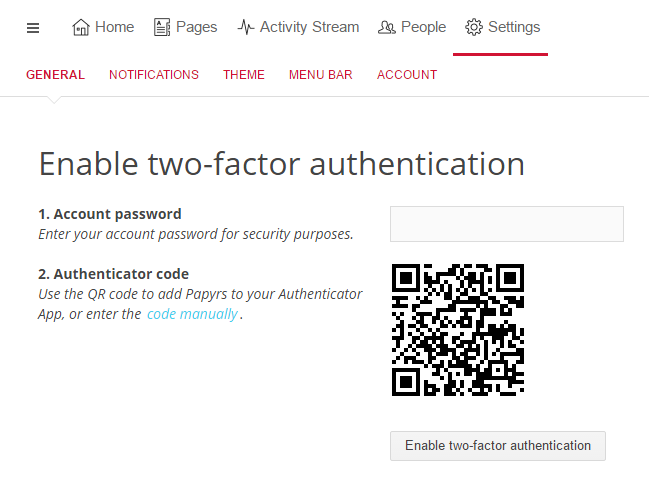
2. Enter your password and scan the QR code in your OTP smartphone App.
3. Enter your OTP security code from your smartphone app.
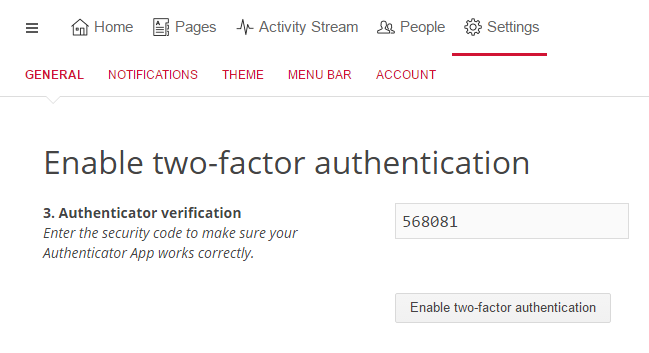
4. Success! Two-factor authentication is now enabled.
You can connect Papyrs to a Windows network. This has a number of benefits:
Here you can read the details about how Papyrs with Integrated Windows Authentication works. We also have a page explaining the benefits of using a Papyrs intranet on an existing Windows network.
Papyrs uses Integrated Windows Authentication, if available. This is also known as: HTTP Negotiate Authentication, NT Authentication, NTLM Authentication, Windows Domain Authentication, and Windows NT Challenge/Response Authentication.
Papyrs LDAP is compatible with Microsoft Active Directory (AD), Microsoft Azure Active Directory (Azure AD), and Apple Open Directory, and Linux OpenLDAP.
| Windows Server Hostname | e.g. ad.yourcorp.com |
| LDAP Port | typically 389 or 636 |
| Base DN | e.g. CN=Users,DC=example,DC=com |
| Papyrs LDAP user | e.g. CN=papyrsldap,OU=users,DC=example,DC=com |
| Papyrs LDAP password | **** |
Navigate to https://yoursite.papyrs.com/settings/people/ldap/ and click on Set up LDAP integration to get started. You'll see a form like the one below:
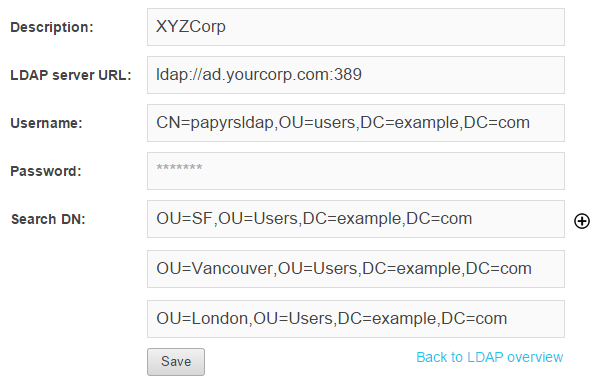
If you're unsure what the Distinguished Name is of the Papyrs user you've added to your Windows network, you can look it up like this:

LDAP user and password
Add a user to the Windows Domain with sufficient permissions to retrieve a list of users in the Base Distinguished Name (Base DN). This user account is used to invite people to the Papyrs Intranet and to synchronize contact information (if desired).
Note: Papyrs doesn't need access to any other accounts on the network, nor do we require any additional access permissions. So we won't be able to access any files on the Windows network, nor will we be able to access any other classified information. We don't need access to the passwords of the users in the directory either, the user authentication will be handled by your Activity Directory server inside your network — Papyrs just gets a message from the server indicating whether the login was successful.
LDAP Port & Encryption
Papyrs supports two types of encryption for communication with the LDAP server (typically Active Directory): LDAPS and LDAP through an SSL tunnel/proxy. You can read more about configuration of LDAPS on MS Technet. Active Directory uses port 389 by default without encryption, and 636 for LDAPS.
Firewall
Papyrs will connect to the Active Directory server from ldap.papyrs.com and requires access to a single port. So the Active Directory Server doesn't need to be exposed to the entire internet and all existing firewalls can remain in place.
Testing the connectionThe next step is to verify that Papyrs can connect to the Active Directory server:
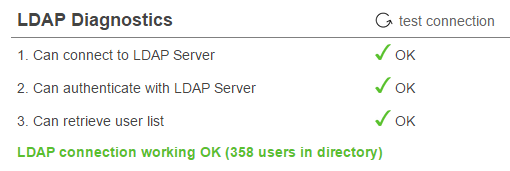
If all is well you'll see "LDAP connection working OK" like in the screenshot above. Otherwise you'll get an error of where Papyrs gets stuck. You'll see exactly at what stage the failure occurs to make the problem easy to locate. If you run into any trouble though, don't hestiate to contact us at team@papyrs.com and we'll see if we can figure out where the problem lies.
Before you invite people to your intranet you can manage your LDAP preferences:
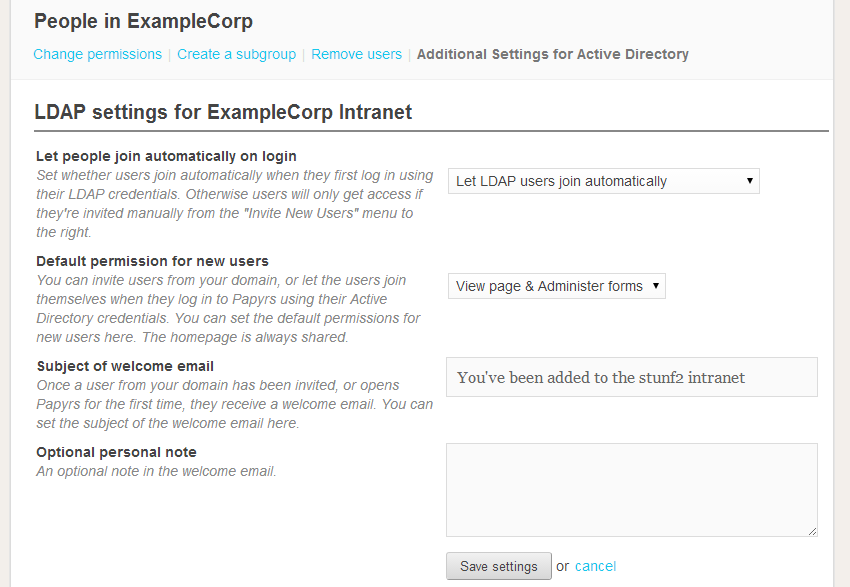
You can configure:
After a connection between Papyrs and your Windows network has been established inviting people takes only a couple of clicks.
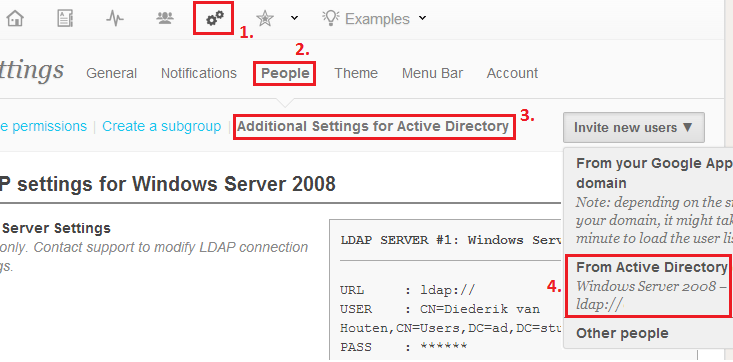
After clicking on Invite New Users > From Active Directory you'll be presented with a list of users in your Windows network:
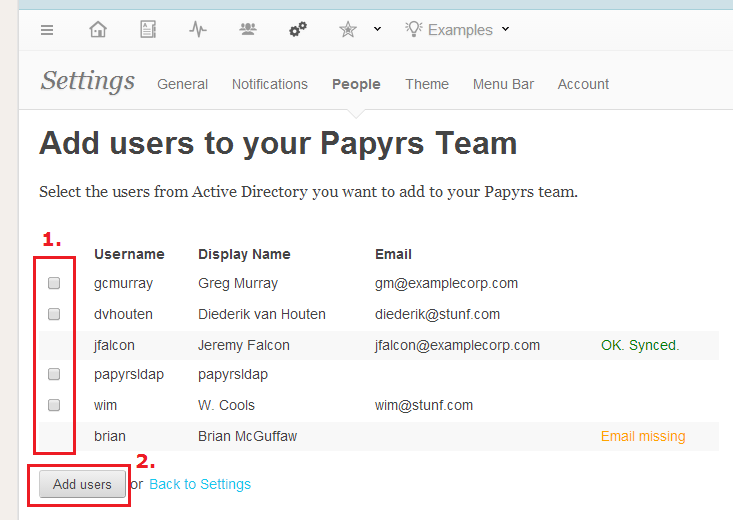
Click the checkboxes next to the users you want to invite and click "Add Users" to invite them to Papyrs. They'll receive a welcome email (with a customized invitation message) and will be able to log in right away.
When people try to access a protected page on the intranet they'll see the following log in window:
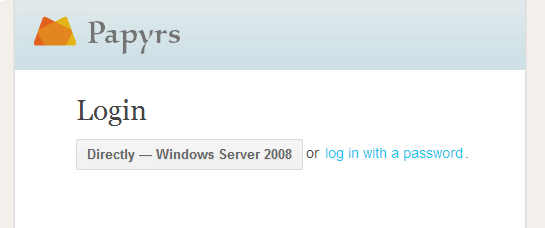
The user can then choose to log in automatically (without a username or password) from a computer that's part of your intranet. Otherwise the user can log in with their Active Directory credentials (using either their mail, sAMAccountName, userPrincipalName) and their Active Directory (Windows) password. Users will also still be able to log on using their Papyrs email address and password. The text on the login button can be customized and logins with a password can be disabled if needed. When logging on using the LDAP login button the web browser will attempt to log on using Integrated Windows Authentication (using a challenge-response system). When this doesn't work a regular password prompt will appear instead.
For Integrated Windows Authentication to work the web browser has to know that the Papyrs site is part of the Intranet Zone. For Microsoft Internet Explorer and Google Chrome websites can be added to the intranet zone manually or for people on the network using a Group Policy.
Papyrs connects to the LDAP server every night to update the list of users in the Windows network. Administrators of a Papyrs account can add those users to Papyrs (or allow users to invite themselves to the Papyrs group) and contact information for these new users is pulled from the Active Directory. When users log in to Papyrs the Active Directory server is contacted to verify the user is permitted to log in, and if so access to Papyrs is granted. If needed, Papyrs can be connected to multiple active directory servers.
Questions? Not sure if Papyrs with LDAP integration is what you need? Contact us with any questions you may have.
Note: In September 2016, Google renamed Google Apps for Work to G Suite. Integration with Papyrs continues to work as before of course, so all options below apply to both accounts created with Google Apps as well as new G Suite accounts.
If you have installed Papyrs from the Google Apps Marketplace, you can easily invite people from your Google Apps domain to Papyrs.
By default, people in your domain may automatically join the Papyrs account, the first time they select Papyrs from Google's navigation bar (you can change this, if needed). If you already want to start sharing pages and set permissions for your domain users, you can easily add them to your account.
To invite people from your domain, go to the People directory and select Invite new users > From Your Google Apps Domain, see the screenshot below: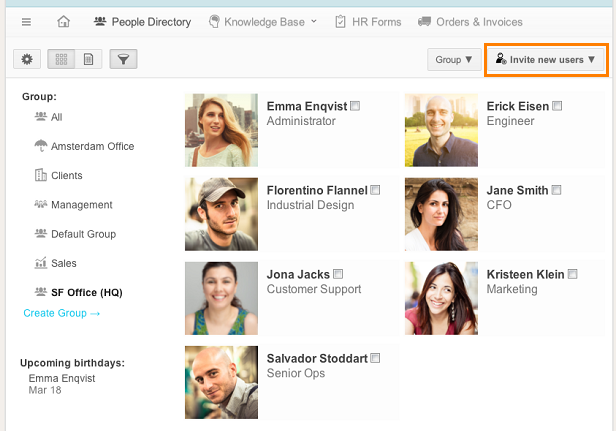
You'll now see a list of users in your domain. Just select the users you wish to invite, and click the Add User(s) button. After you've selected one or more users to invite, you can also enter an optional message for a welcome email.
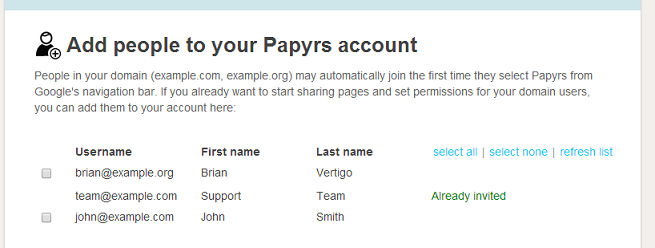
When users from your Google Apps domain are added to your account for the first time, they get the default permissions currently set for the account. You can always change permissions for users later on, see Permissions.
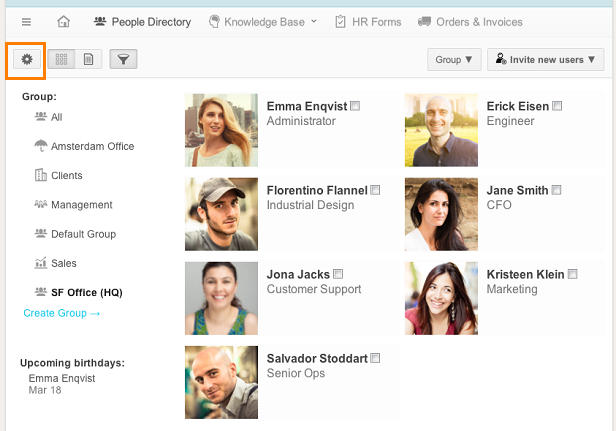
To change the default permissions new users from your Google Apps domain should get, go to the People directory, and click the Settings icon:
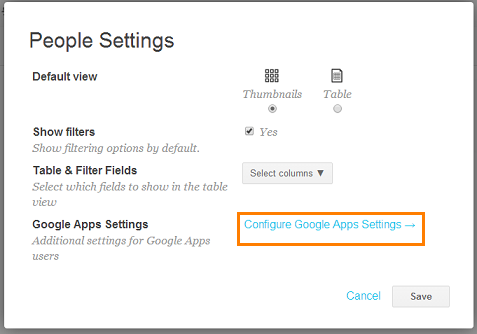
then, select Configure Google Apps Settings:
You will now see the following settings screen:
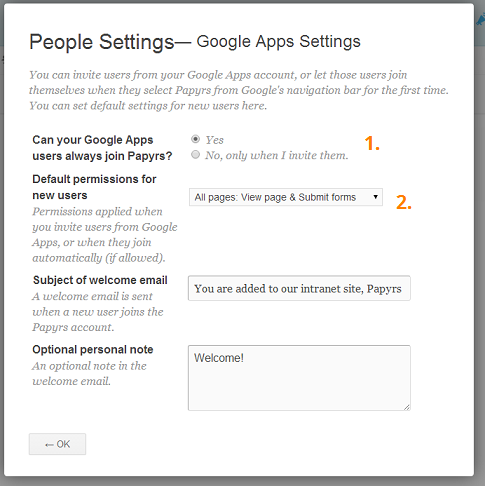
1. With this option you can control whether users from your Google Apps domain are allowed to join the Papyrs account by simply selecting Papyrs from the navigation menu in Google Apps. The default is Yes. If you change it to No, users can only join when you invite them first (see Inviting users from your Google Apps domain above).
2. The default permissions new Google Apps users joining your account will get to all existing pages in the account. You can either set a specific access level, or select the 'Copy from' option to copy the permissions from another user whenever a new user joings the account.
By default, everyone in the domain for which you installed Papyrs is allowed to join the account. They simply select Papyrs from the navigation menu in Google Apps. If new users should only be allowed to join by invitation, you can change this setting in the Configure Google Apps Settings dialog, see the section Default Permissions for Google Apps users joining the Papyrs account above.
Yes, you can add integration with Google Apps for Work to existing Papyrs accounts. To link your Google Apps domain to your existing Papyrs site, simply install Papyrs from the Google Apps Marketplace (follow the link and click on the install button). Papyrs will detect that your email address is already registered, and offer to link your Papyrs site to your Google Apps domain (see the screenshot below). You'll be asked for your Papyrs password to confirm.
Important: there are two requirements for the link to work:
Requirement 1) The email address used for Google Apps needs to be exactly the same as the email address you signed up with for Papyrs. If you're using a different address, Papyrs will assume a new user and create a new account. For example, if you signed up for Papyrs with jane.smith@example.com, but your Google Apps email address is admin@example.com, it won't work. In that case, first change your email address in Papyrs under My Preferences > Account to match the one in Google Apps (so admin@example.com in this case).
Requirement 2) You need to be an Administrator in Papyrs, as well as an administrator in your Google Apps domain.
The screen allowing you to link the accounts will look like this:
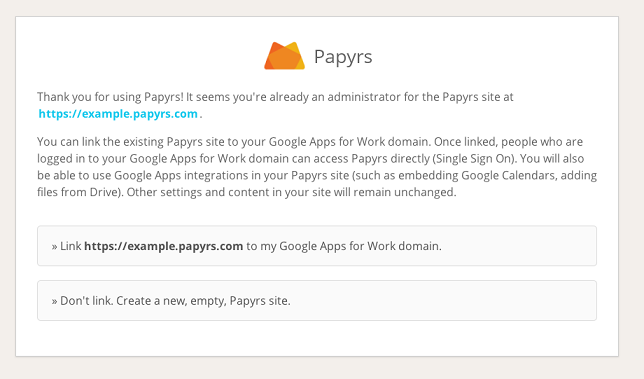
Once linked, people who are logged in to your Google Apps for Work domain can access Papyrs directly (Single Sign On). You will also be able to use Google Apps integrations in your Papyrs site (such as embedding Google Calendars, adding files from Drive). Other settings and content in your site will remain unchanged.
If the users have recently been added to the domain, you might have to click the Refresh list button in the domain list (see the screenshot below):
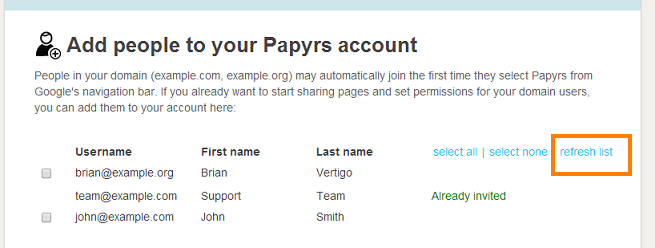
This is usually a problem with permissions. Please make sure that:
To enable API Access, go to the Google Apps Admin Console (admin.google.com). Then, select Security. (or follow this direct link).
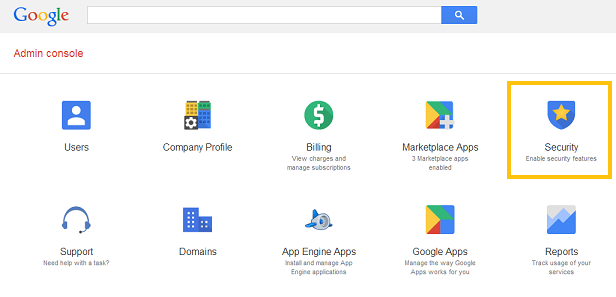
In the Security screen, select API Reference. Here, make sure the Enable API Access option is selected.
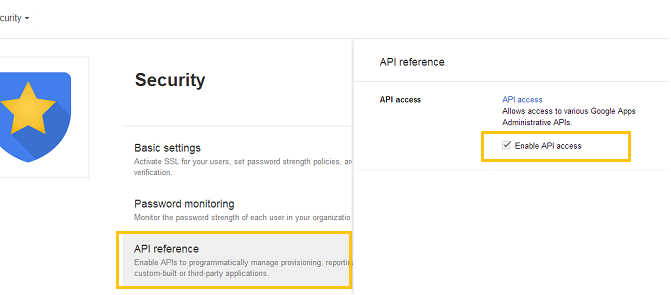
You can always try again under People Directory > Invite users (see Inviting users from your Google Apps domain above).
If the user list still won't load, see the next section on granting permissions:
Make sure all permissions are granted to the Papyrs app on your domain. Permissions are normally granted automatically when you add Papyrs to your domain. When new permissions are needed - when new functionality is added to the app, for example - you can grant additional permissions from the Admin console.
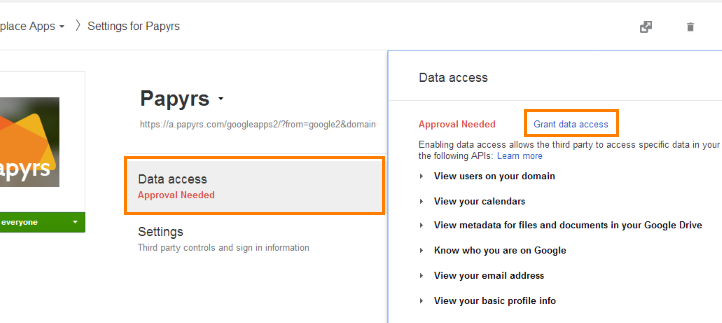
Log in as an Administrator for your Google Apps domain, and go to Google Apps Console — Settings for Papyrs (if the direct link doesn't work, you can find it under admin.google.com > Marketplace Apps > Papyrs > Data Access).
Make sure you see Granted under Data Access. If you see Approval Needed, please click the Grant data access link, like in the screenshow below:
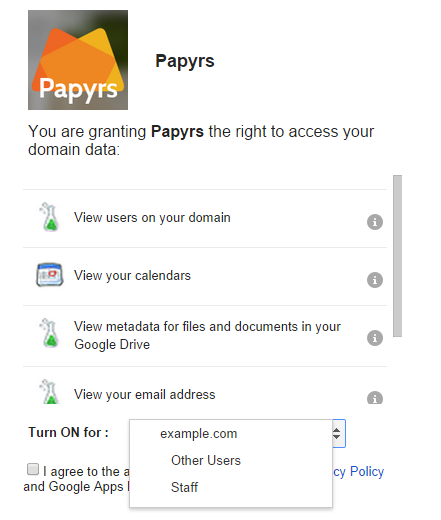
If this still doesn't give you access to Google Apps data, make sure that Papyrs is turned on for the right users or organizations in your domain. When you install Papyrs, you can choose to turn it on for the entire domain (recommended), or only for some organizations:
When you only turn it on for some organization(s), make sure you are a member of that organization! If you are not, you cannot access data (user lists, calendars or docs) from your domain.
You can check and edit organization access under admin.google.com > Marketplace Apps > Papyrs > Data Access.
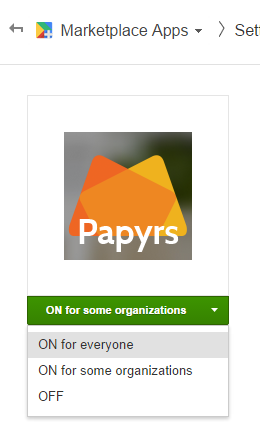
On the left side of that screen, you will see the current access setting, which is either ON for everyone (which we recommend), or ON for some organizations.
Note: even when you turn on Papyrs for everyone, if needed, you can still restrict people from joining your Papyrs account (see Default Permissions for Google Apps users joining the Papyrs account).
Already using Slack, and want to use Papyrs as a wiki/intranet site for your Slack team? With the Papyrs for Slack app
you can easily search your (wiki) pages and post new notes right from slack using the /papyrs command. You'll
also be able to use Single Sign On and log in to Papyrs directly with your Slack account.
To set it up:
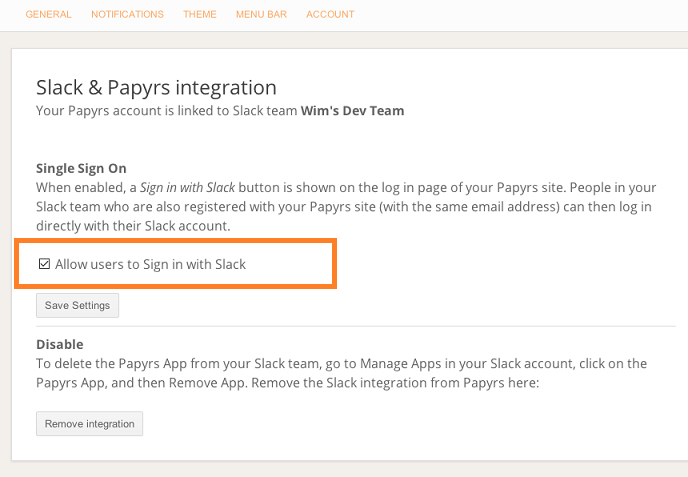
To enable Single Sign On with Slack, go to Settings > Account > Slack integration (Administrators only). Then, click Allow users to Sign in with Slack, see the screenshot below.
Once enabled, the log in page for your Papyrs site will show the Sign in with Slack button:
Note: people can only log in with their Slack account to Papyrs if they are already member of your Papyrs site (with the same email address). If they are not, an Administrator needs to invite them first (see Inviting people).
Once you've installed the Papyrs for Slack App, you'll be able to use the /papyrs command
directly from Slack.
You can use the following commands:
/papyrs help
Show available commands.
/papyrs post https://link-to-page the note you want to post
Posts a note to the Papyrs page with the given link (so for example, /papyrs post https://example.papyrs.com/Homepage hello everyone!). The note will include a link back to the conversation, so you can easily
find back the part of the conversation that led up to the note.
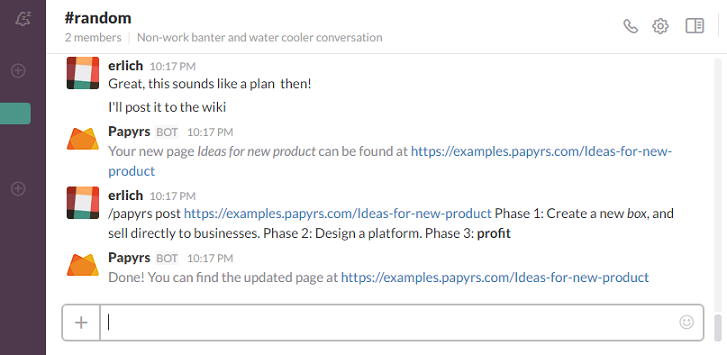
/papyrs create title of your new page
Create a new page with the given title. Initially only you and Administrators will have access to the page.
/papyrs search keyword
Searches Papyrs for keyword and returns the results. The word 'search' is optional, so you can also type /papyrs keyword
You can read more details about all the integration at Papyrs - A wiki for Slack
If your organization uses centralized (federated) user identity management you can connect your Identity Provider (IdP) to Papyrs (the Service Provider) for Single Sign-on. Security Assertion Markup Language (SAML) is an open standard supported by all major identity platforms. This includes cloud identity providers such as OneLogin, Auth0 (integration guide), Okta (integration guide), Azure AD, as well as modern on-premise Identity Providers.
SAML based Single Sign-on can be used in addition to – or instead of – regular password-based logins. Papyrs SAML can also be used alongside Google Suite Single Sign-on, Slack Single Sign-on, and AD Single Sign-on.
Integrating Papyrs with Okta (https://www.okta.com/) takes a couple of steps. Below is an illustrated guide.

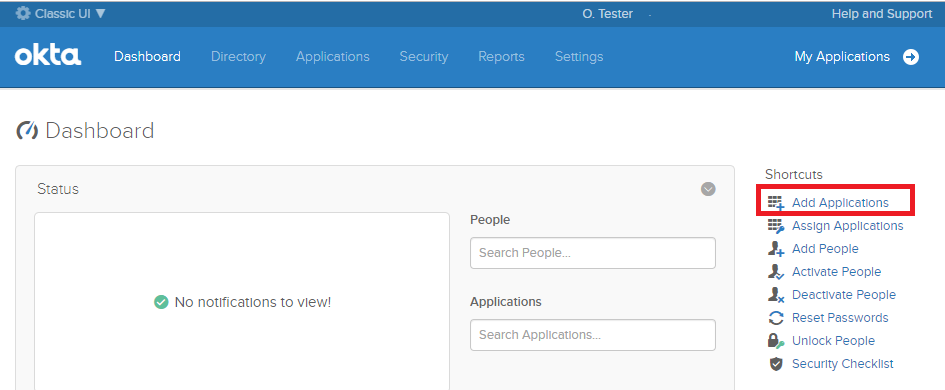
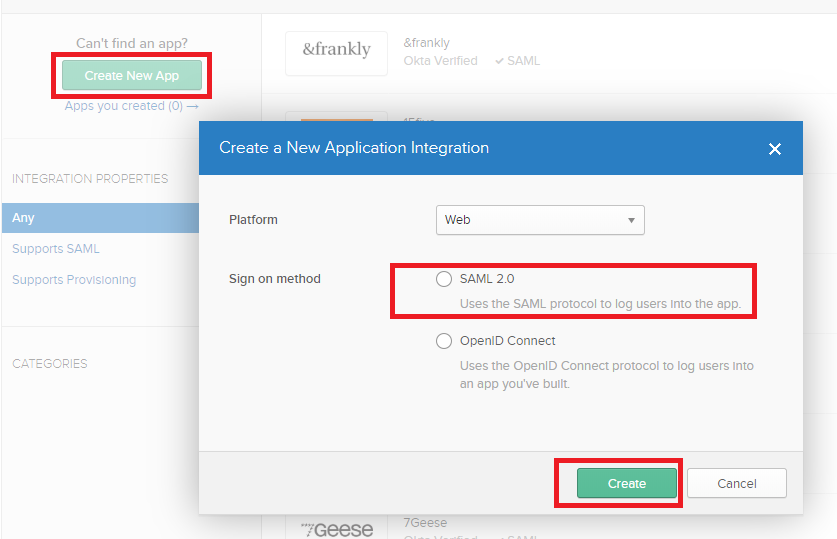
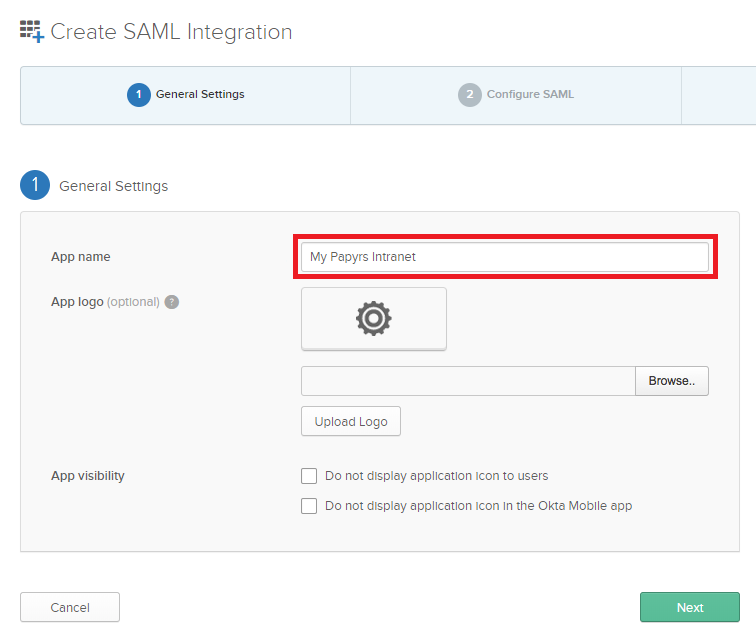
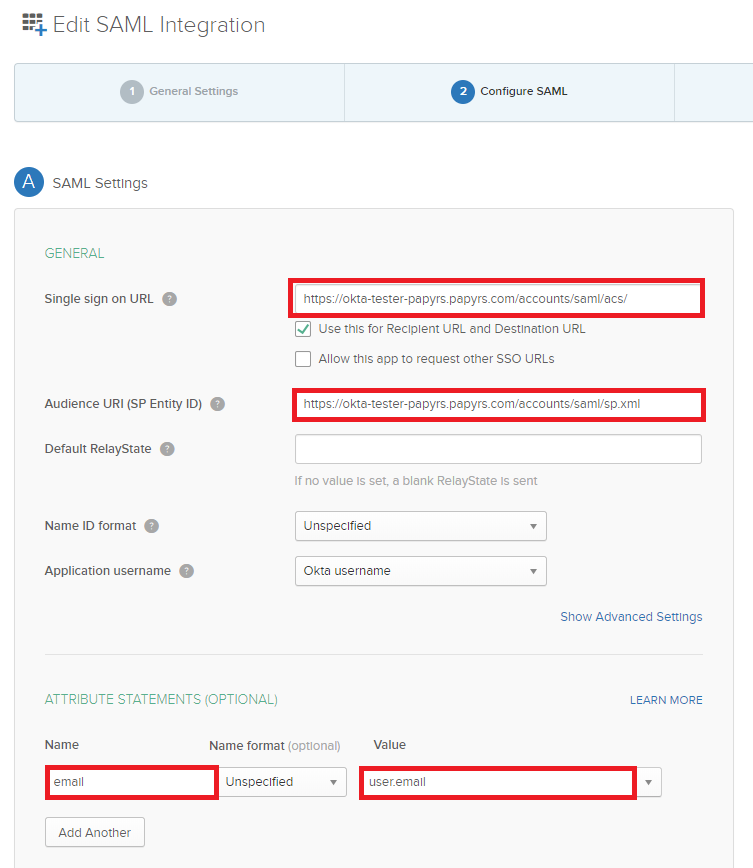
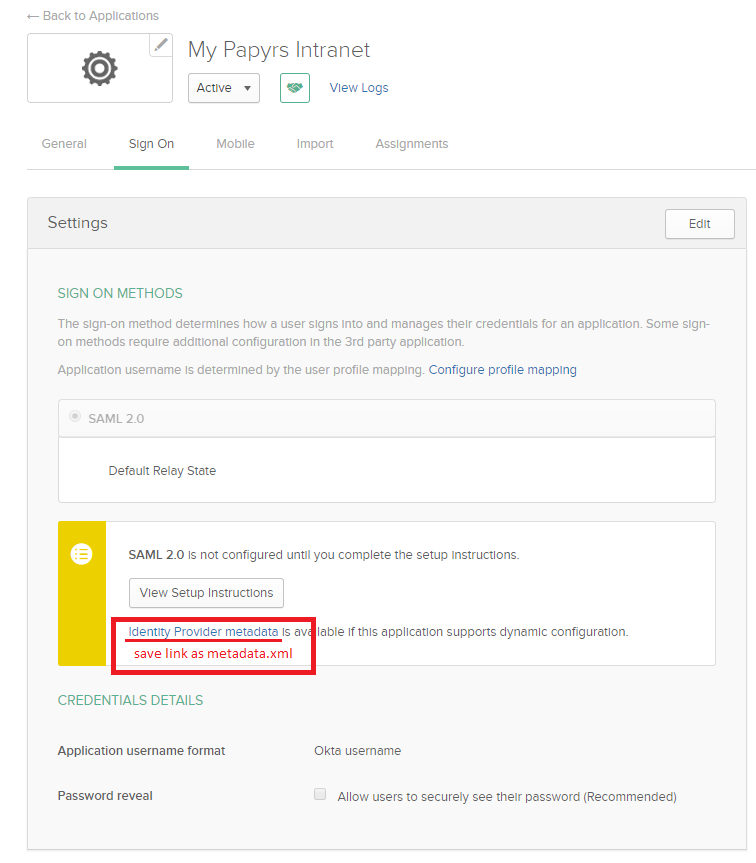
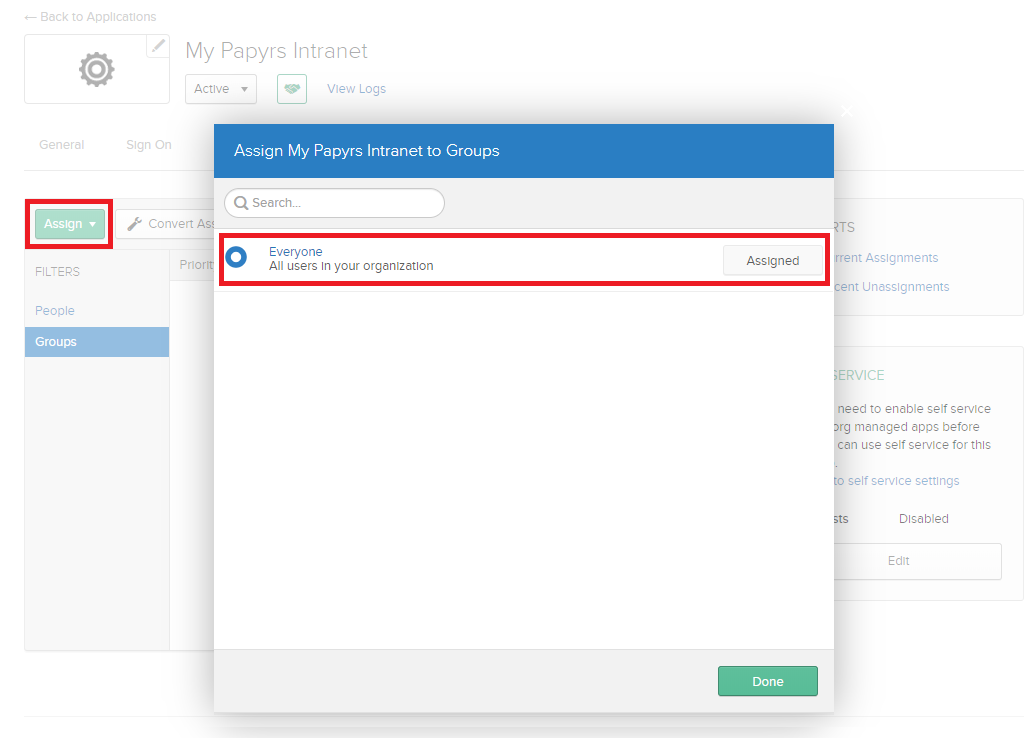
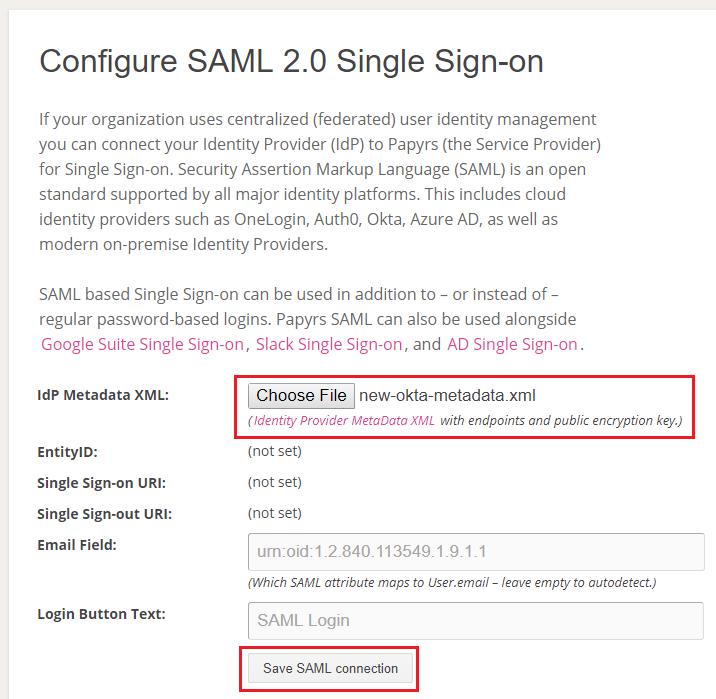
The Papyrs API allows developers to integrate their own, or other, services and apps with Papyrs. This is a technical document to help developers get started with the API. If you're not a developer but want to integrate Papyrs with existing applications, contact us to see if your application is supported. You can also check out Zapier.com for existing integrations.
Note that the API, and therefore this document, is still in active development as we add more endpoints and functionality. If you need the API for any actions which are not covered by this document, or if anything is unclear, let us know!
ConventionsIn this document we'll write variables as (#variable). The token value 123456789012 is
used as an example, and should be replaced with your API token.
Go to Site Settings > Integrations & SSO > API to request API access to your account. Once API support is enabled, Administrators can go to Site Settings > Integrations & SSO and click Generate Token to create a new unique API token for users. Tokens can be revoked again using the Revoke Token.
Important: Only share the API token with trusted parties: everyone who has your token can access your account using the API! If you fear your token has leaked to an untrusted party, just use the the Revoke Token link (you can generate a new token afterwards).
https://(#group_name).papyrs.com/api/v1
https://example.papyrs.com/api/v1/pages/all/?auth_token=123456789012
To quickly test API access and view the JSON response in your browser, you can add the following URL parameters to
any /page/... or /pages/ view: ?json&auth_token=123456789012, for example
https://example.papyrs.com/pages/alphabetical/?json&auth_token=123456789012
curl -H "Content-Type: application/json" \
     -H "User-Agent: MyApp" \
     https://example.papyrs.com/api/v1/pages/all/?auth_token=123456789012
Example POST request:
curl -H "Content-Type: application/json" \
     -H "User-Agent: MyApp" \
     -d '{"widget": {"val": "Hello <b>World</b>!"}}' \
     https://example.papyrs.com/api/v1/page/SKTL/paragraph/create/?auth_token=123456789012\&format=html
Example POST request using Python:
import requests

url = "https://example.papyrs.com/api/v1/feed/post/?auth_token=111222333444"
r = requests.post(url, json={'msg': 'hello from python!'})
if r.status_code == 200:
	print "OK!"
else:
	print r.status_code, r.reason, r.text
Error & Status CodesThe following error and status codes are used by the Papyrs API:
| Status Code | Description |
|---|---|
| 200 | Request successful |
| 400 | Request formatted incorrectly, e.g. wrong or missing parameter |
| 403 | You have no permission for this action |
| 404 | Resource not found, or no permission to access this resource |
| 405 | Method does not exist (wrong HTTP method, or invalid action) |
| 429 | Too Many Requests. The default rate limit is 6requests/60seconds. The error field in the response indicates the rate limit used. |
| 500 | Server error. Something went wrong on our side |
Additional error information can be returned in a JSON object containing an error and status field. For example:
{"error": "You have no permission to access the Feed", "status": 403}
The Pages API can be used to get a list of pages, read a page or post a new page. Updating pages is currently only possible by adding individual widgets (see the Widgets endpoint below).
Get a PageGET /api/v1/pages/get/(#page_id)/
Returns: Dictionary with page information. The json field contains the object describing the contents of the page, which is a list of columns, with each column a list of widgets. Each widget is expressed as a dictionary. Example of a page with two columns:
{
    "category": "Test Folder/Sub Folder",
    "created_at": "2013-02-06T13:06:23Z",
    "created_by": "Wim",
    "id": "SKvP",
    "is_public": false,
    "json": [
        [
            {
                "classname": "Heading",
                "html": "Welcome!",
                "text": "Welcome!",
                "id": "SQRs",
            },
            {
                "classname": "Paragraph",
                "html": "This is some example test, this is <b>bold</b>!",
                "id": "SQRc",
                "text": "This is some example test, this is bold!"
            }
        ],
        [
            {
                "classname": "Paragraph",
                "html": "Text box in second column.",
                "id": "SQRV",
                "text": "Text box in second column."
            }
        ]
    ],
    "layout": [
        [
            [
                8,
                1
            ],
            [
                4,
                1
            ]
        ]
    ],
    "notifications": {
        "SXZb": "off",
        "SXZr": "on",
        "SxBt": "on",
        "SxBZ": "on",
    },
    "permissions": {
        "SXZb": "edit",
        "SXZr": "view",
        "SxBt": "no access",
        "SxBZ": "edit",
    },
    "slug": "Test-Page",
    "title": "Test Page",
    "updated_at": "2013-02-06T13:06:53Z",
    "url": "https://example.papyrs.com/Test-Page"
}
Get all pagesGet a list of all pages visible to the user making the request
GET /api/v1/pages/all/
Returns: A list of pages, ordered by creation date (newest page first).
[
    {
        "category": "Main",
        "created_at": "2013-01-01T03:17:54Z",
        "created_by": "Mary",
        "id": "SXZp",
        "is_public": 0,
        "slug": "Some-example-page",
        "tags": [],
        "title": "Some Example Page",
        "updated_at": "2013-01-02T20:46:06Z",
        "url": "https://example.papyrs.com/Some-example-page"
    },
    {
        "category": "Main/Bizdev",
        "created_at": "2012-08-13T02:50:49Z",
        "created_by": "John",
        "id": "SXJj",
        "is_public": 0,
        "slug": "Customer-Leads",
        "tags": ["Sales"],
        "title": "Customer Leads",
        "updated_at": "2013-01-10T19:38:59Z",
        "url": "http://example.papyrs.com/Customer-Leads"
    }
]
Delete a PagePOST /api/v1/pages/delete/(#page_id)/
Returns:
{"deleted": true, "id": "(#page_id)"}
Create a PagePOST /api/v1/pages/create/
Requests:
on or off. The keys represent user IDs, which
can be found using the People API (or Get a Page on an existing page).
edit access, and all other users no access.
When ommitted and a default template is set for this group, permissions will start with the default template's permissions.
When provided, permission values must be either no access, view or edit. The keys represent user IDs, which
can be found using the People API (or Get a Page on an existing page).
{
    "title": "Hello World",
    "json": [
        [
            {"classname": "Paragraph", "val": "Hello World!"}
        ],
        [
        ]
    ],
    "layout": [
        [
            [
                8,
                1
            ],
            [
                4,
                1
            ]
        ]
    ],
    "notifications": {
        "SXZb": "off",
        "SXZr": "on",
        "SxBt": "on",
        "SxBZ": "on",
    },
    "permissions": {
        "SXZb": "edit",
        "SXZr": "view",
        "SxBt": "no access",
        "SxBZ": "edit",
    },
    "category": "Some Folder/Sub Folder"
}
Returns: the same as "Get a Page":
{
    "category": "Some Folder/Sub Folder",
    "created_at": "2013-02-06T13:24:11Z",
    "created_by": "Wim",
    "id": "SKvS",
    "is_public": false,
    "json": [
        [
            {
                "classname": "Paragraph",
                "html": "Hello World!",
                "id": "SQRv",
                "text": "Hello World!"
            }
        ],
        []
    ],
    "layout": [
        [
            [
                8,
                1
            ],
            [
                4,
                1
            ]
        ]
    ],
    "notifications": {
        "SXZb": "off",
        "SXZr": "on",
        "SxBt": "on",
        "SxBZ": "on",
    },
    "permissions": {
        "SXZb": "edit",
        "SXZr": "view",
        "SxBt": "no access",
        "SxBZ": "edit",
    },
    "slug": "Hello-World",
    "title": "Hello World",
    "updated_at": "2013-02-06T13:24:11Z",
    "url": "https://example.papyrs.com/Hello-World"
}
GET /api/v1/pages/records/(#page_id)/
Returns: A list of all form records submitted on this page. Each record in the list is described by an object which contains a field and a value field. field contains the name of the record field, and value its value.
The following optional parameters can be used for pagination:
| Parameter | Description |
|---|---|
| page |
Returns the Nth page of results, from new to old. Default: 0 Example: /api/v1/search/query/?page=10 |
| items_per_page |
The number of items to return, between 1 and 250 Default: 50 Example: /api/v1/search/query/?page=5&items_per_page=10 |
Example output:
[
    [
        {
            "field": "ID",
            "value": 1
        },
        {
            "field": "Created at",
            "value": "16/10/2018 18:42"
        },
        {
            "field": "Created by",
            "value": "Mark Smith"
        },
        {
            "field": "Example Field",
            "value": "Some value"
        },
        {
            "field": "Another Field",
            "value": "Another value"
        }
    ],
    [
        {
            "field": "ID",
            "value": 2
        },
        {
            "field": "Created at",
            "value": "16/10/2018 18:42"
        },
        {
            "field": "Created by",
            "value": "Mark Smith"
        },
        {
            "field": "Example Field",
            "value": "Another form record"
        },
        {
            "field": "Another Field",
            "value": "Another value in the second record"
        }
    ]
]
The Widgets API can be used to get, delete and create individual widgets on a page.
Get a WidgetGET /api/v1/page/(#page_id)/paragraph/get/(#widget_id)/
GET /api/v1/page/(#page_id)/heading/get/(#widget_id)/
GET /api/v1/page/(#page_id)/attachment/get/(#widget_id)/
Returns:
{
 "classname": "Paragraph",
 "text": "This is some example test, this is bold!",
 "html": "This is some example test, this is <b>bold</b>!",
 "id": "SQRc"
}
{
 "classname": "Heading",
 "text": "Welcome!",
 "html": "Welcome!",
 "id": "SQRs"
}
{
 "classname": "Attachment",
 "files": [
    {
        "filename": "Important Document.pdf",
        "size": 483912,
        "url": "https://api-example.papyrs.com/file/attachment/SKMm/Important_Document.pdf",
        "vanity_size": "472 KB"
    },
    {
        "filename": "Info.txt",
        "size": 17216,
        "url": "https://api-example.papyrs.com/file/attachment/SKMq/Info.txt",
        "vanity_size": "16 KB"
    }
 ],
 "id": "SQRt"
}
Create new Text box or Heading Widget on a Page
POST /api/v1/page/(#page_id)/paragraph/create/
POST /api/v1/page/(#page_id)/heading/create/
Parameters:
The following additional parameters can be added to the request URL:| Parameter | Description | Default |
|---|---|---|
| format |
Describes the format of val field in the posted JSON object. Values: html — The value is HTML and is used unescaped (but sanitized to remove certain tags). text — The value is Text, any HTML tags are escaped, and line breaks are converted. |
html |
Requests:
{"widget": {"val": "Hello World!\nTest"}}
Returns: the same as "Get a Widget"
{
  "classname": "Paragraph",
  "text": "Hello World!Test",
  "html": "Hello World!<br>Test",
  "id": "SQRf"
}
Update existing Text box or Heading Widget on a Page
POST /api/v1/page/(#page_id)/paragraph/update/(#widget_id)/
POST /api/v1/page/(#page_id)/heading/update/(#widget_id)/
URL:
(#widget_id) is the ID of the Widget on page (#page_id) you want to update.
The (#widget_id) can be found with the Get a Page request, or from the
(#id) field in a Widget request response. Note that when updating a Widget, its
(#id) will change. The response will also return a (#version_of_id),
which is the original (#id) of the Widget. Passing the (#version_of_id)
as the (#widget_id) (instead of the newest ID) is also possible to update the Widget.
Parameters:
The following additional parameters can be added to the request URL:| Parameter | Description | Default |
|---|---|---|
| format |
Describes the format of val field in the posted JSON object. Values: html — The value is HTML and is used unescaped (but sanitized to remove certain tags). text — The value is Text, any HTML tags are escaped, and line breaks are converted. |
html |
Requests:
{"widget": {"val": "Hello World!\nTest Updated"}}
Returns: the same as "Get a Widget"
{
  "classname": "Paragraph",
  "text": "Hello World!Test Updated",
  "html": "Hello World!<br>Test Updated",
  "id": "SQRf",
  "version_of_id": "SZlV"
}
Create new Attachment Widget on a Page
POST /api/v1/page/(#page_id)/attachment/create/
Requests:
A file can be uploaded by posting a single file in a field named file, using a multipart/form-data enctype.
Example:
curl -H "User-Agent: MyApp" \
     -F file=@test.txt \
     https://example.papyrs.com/api/v1/page/SKTL/attachment/create/?auth_token=123456789012
Returns: the same as "Get a Widget"
{
  "classname": "Attachment",
  "files": [
    {
        "filename": "test.txt",
        "size": 483912,
        "url": "https://api-example.papyrs.com/file/attachment/SKMm/test.txt",
        "vanity_size": "472 KB"
    }
  ]
  "id": "SQRf"
}
Updating an existing Attachment Widget on a Page
POST /api/v1/page/(#page_id)/attachment/update/(#widget_id)/
URL:
(#widget_id) is the ID of the Widget on page (#page_id) you want to update.
The (#widget_id) can be found with the Get a Page request, or from the
(#id) field in a Widget request response. Note that when updating a Widget, its
(#id) will change. The response will also return a (#version_of_id),
which is the original (#id) of the Widget. Passing the (#version_of_id)
as the (#widget_id) (instead of the newest ID) is also possible to update the Widget.
Requests:
Upload the file to be added to the existing Attachment widget by posting it in a field named file, using a multipart/form-data enctype.
Example:
curl -H "User-Agent: MyApp" \
     -F file=@test2.txt \
     https://example.papyrs.com/api/v1/page/SKTL/attachment/update/SQRf/?auth_token=123456789012
Returns: the updated Attachment widget, in the same format as "Get a Widget"
{
  "classname": "Attachment",
  "files": [
    {
        "filename": "test.txt",
        "size": 483912,
        "url": "https://api-example.papyrs.com/file/attachment/SKMm/test.txt",
        "vanity_size": "472 KB"
    },
    {
        "filename": "test2.txt",
        "size": 48391,
        "url": "https://api-example.papyrs.com/file/attachment/SKMo/test2.txt",
        "vanity_size": "47 KB"
    }
  ]
  "id": "SQRf"
}
Delete a WidgetPOST /api/v1/page/(#page_id)/paragraph/delete/(#widget_id)/
POST /api/v1/page/(#page_id)/heading/delete/(#widget_id)/
POST /api/v1/page/(#page_id)/attachment/delete/(#widget_id)/
Returns:
{"deleted": true, "id": "SQcK"}
The Search API can be used to query Papyrs' built-in search engine and find intranet pages, comments, form entries, people or files. The results returned through the API are the same as if the API user would have typed in the query in Papyrs' search box.
Search queryGet a list of search results based on a query.
GET /api/v1/search/query/
Parameters:
The following additional parameters need to be added to the request URL:| Parameter | Description |
|---|---|
| q |
The search query Example: /api/v1/search/query/?q=test |
Returns:
A list of search results in the results field.
Each result is described by a dictionary with fields as in the example below.
cat specifies the type of result, which can be one of the following:
| Cat value | Description |
|---|---|
| Page | Result is a page |
| File | Result is a file |
| Contact | Result is a person from the People Directory |
| Form | Result is a form entry |
| Comment | Result is a comment |
{
    "results": [
        {
            "desc": "Information for Employees",
            "icon": "status-icon-page",
            "weight": 1646,
            "lnk": "/Information-for-Employees",
            "cat": "Page",
            "id": "xF8a"
        }
    ]
}
The People API can be used to get a list of people - and their details - in your account, as shown in the People Directory.
Get all peopleGet a list of all people in your account (as shown in the People Directory). Guest users, invited to individual pages, are not included. The API user must have access to the People Directory, or a 403 Forbidden is returned.
GET /api/v1/people/all/
Returns: A list of people, ordered by join date (newest user first).
[
    {
        "attributes": {
            "Bio": "Degree in Corporate Finance. Responsible for all finances at Acme. Reimbursement approvals.",
            "Birthday": "03/17/1980",
            "City": "San Francisco",
            "Country": "US",
            "Email": "jane@acme.inc.example.com",
            "Group": "SF Office (HQ)",
            "Joined at": "10/16/2013",
            "Name": "Jane Smith",
            "Position": "CFO",
            "State": "CA",
            "Street": "13493 Main Street",
            "Telephone (Home)": "",
            "Telephone (Mobile)": "789-192",
            "Telephone (Work)": "",
            "Twitter": "<a href='https://twitter.com/Twitter'>AcmeJane</a>",
            "Website": "<a href='http://www.example.com'>Example</a>",
            "Zipcode": "92922"
        },
        "avatar_large": "https://media.papyrs.com/avatars/123456789.png",
        "distinguished_name": "CN=Jane Smith,OU=SF Office,OU=Users,DC=AcmeInc,DC=local",
        "id": "SxrX",
        "role_id": "normal",
        "subgroup_id": "SXZH",
        "waiting_invite": true
    }
]
If waiting_invite is true, the user has been invited but has not accepted their invitation yet. Attributes like dates are shown in the user's own locale.
Delete a userPermanently delete a user from your account. Site adminstrators only.
POST /api/v1/people/delete/(#user_id)/
Returns:
{"deleted": true, "id": "(#user_id)"}
The Feed API can be used to post comments to the Activity Stream.
Post to the Activity StreamPOST /api/v1/feed/post/
Requests:
{"msg": "Your new message!"}
Returns:
{
  "c": "Your new message!",
  "by": "Wim",
  "a": "/static/avatar.png",
  "unsafe_c": "Your new message!",
  "id": 22171
}
Post to a discussion stream on a specific page
POST /api/v1/feed/post/(#page_id)/
You can use the API to post a comment to any page with a Discussion widget. The request and response are the same as for posting to the Activity Stream.
(Available from Papyrs Business plans and higher)
Papyrs' Single Sign On (SSO) functionality allows you to authenticate users in other applications with their Papyrs credentials. When a user is logged in to your Papyrs site they can then access the other application without being prompted for additional credentials.
In turn, Papyrs also integrates with Activity Directory, Google Apps (G Suite) Single Sign On, and Slack Single Sign On mechanisms. These mechanisms can also be combined. For example, users can log in to Papyrs with their Active Directory credentials, and third party applications can then authenticate against Papyrs users without any additional password prompts.
The SSO mechanism is based on JSON Web Tokens (JWT) [1]. Your application sends a SSO request to Papyrs, wich then returns a signed JWT containing details about the authenticated user.
Registering your application with PapyrsIn order to register your application with Papyrs, send the following information to team@papyrs.com:
SHARED_SECRET - A secret string, shared only between your application and Papyrs.
CALLBACK_URL - The callback URL endpoint of your application to which the user is redirected with a token (JWT) after it has been authenticated by Papyrs.
We will register your application, and send you the SSO URL your application can use to request a token (e.g. https://example.papyrs.com/accounts/sso?app_id=example_app).
Single Sign On flowThe mechanism your application should follow is very simple and consists of the following steps:
&return_to=url parameter.
CALLBACK_URL, returning the signed token in
the ?jwt parameter. If the request in (1) contained a return_to parameter, it is appended to the callback URL.
This way you can redirect your user back to the original URL they requested before the SSO flow started.
The token (JWT) is returned to your application's CALLBACK_URL in the ?jwt URL parameter. It is signed with
the SHARED_SECRET, and contains the following details:
| JSON Field | Description |
| iss | The URL of the Papyrs account which signed the token (Example: 'https://example.papyrs.com') |
| iat | The time the token was created (Issued At) |
| jti | A unique id which your app can use to prevent replay attacks |
| sub | Unique case-sensitive ID (primary key) to identify the signed in Papyrs user. (Example: 'SxJZ') |
| Email address of the Papyrs user who is signed in (this address might change over time) | |
| name | Display name of the Papyrs user who is signed in |
Additional fields might be added in the future. The tokens also include the standard JWT exp and nbf fields which should be used to check if the token is still valid / not expired.
[1] See JWT.io for documentation and libraries for all major languages (including Python, Ruby, C# and so on). For more details see the IETF document.
1. Wiki-like pages — Create pages for all your business information with notes, images, files, social media wigets and more.
2. Social — Keep everybody in the loop with email updates, comments and a activity stream. Set up a people directory for your team.
3. Forms — Create online forms with work flows. Collect and organize form information and create reports on demand.
Papyrs has a number of great benefits:
Ease of use — Everything in Papyrs works with our unique page editor that's just like a word processor. Use the same editor to compose blog posts, edit wiki pages, make changes to style and layout, and so on. This means everybody will be productive with Papyrs in 5 minutes. So no training needed.
Full-featured — Papyrs has social functionality, drag&drop forms, reports, enterprise search, internal blogging, custom branding, permissions, and much more. You name it, Papyrs has it. See here for a list of all major Papyrs features.
Rock solid availability — It's our job to make sure that Papyrs is available all day every day. We manage the server infrastructure with great care and do major upgrades during the weekend. As a result our Papyrs customers enjoy an availability of over 99.9%.
Enterprise Integration — Papyrs integrates with Google Apps and you can use Papyrs with your existing Windows Network. Single-Sign On supported. Integration with Google Calendar, Google Drive, Google Maps, and more.
Permissions — Set who can view and modify which pages. Restrict access to the Social Feed, the People Directory and so on. Or create an extranet with pages visible to people outside your organization.
Branding — Use the logo of your business instead of the Papyrs logo. Change the colors to match the brand of your business brand. Or go the extra mile and completely customize how Papyrs looks.
Cost — Competing intranet products charge between $10 and $20 per month per seat. So if your company has 100 employees then you're looking at 100 × 15 × 12 = $18,000 a year for a basic intranet solution, with extra costs piled on top of that. Papyrs in contrast has simple and affordable pricing. In addition there are no startup fees, and no long term contracts. So you can just try Papyrs for a month or two to see if it works for your business. If not, you can cancel your subscription at any time, download a backup of all your data, and move on.
Highly Recommended — Papyrs comes highly recommended by the media and our customers. We average 5 out of 5 stars on the Google Apps marketplace. Just read the testimonials. We pride ourselves on our customer service and do everything we can to make our customers happy.
Take a look at the Papyrs Tour or download the tour as PDF (1.5 MB)
The big decision you have to make early on in the process of chosing an Intranet Platform is on the size and scope of the intranet. What do you realy want your intranet to do? What problems does your intranet need to address?
There are many different intranet solutions out there, and it's easy to spend a lot of time and money on a solution that turns out to be a bad fit for your organization. In this document we give a basic outline of a number of intranet solutions out there along with their costs and benefits. Bear in mind that when deciding on an intranet there often is no right answer. There is no such thing as the best intranet. There is only intranet software that is a good fit for your organization and software that is a poor fit for your organization. This also changes over time. As your organization grows and changes the intranet has to grow with you. Until finally the day will come that you've completely outgrown your intranet software and you need a different solution. That's the natural lifetime of software in any organization, and intranet software is no exception.
So with the preface out of the way let's get started – Wordpress vs Sharepoint vs Google Sites vs Papyrs:
Wordpress is the world's most popular blogging platform. It's free and has been installed millions of times. So surely Wordpress is also great as an intranet? Well, let's see.
Sharepoint is Microsoft's Intranet platform. It's the #1 intranet software for the enterprise by most metrics.
Although Google Sites is not officially an intranet solution, some organizations use it as such. Google Sites is a web site builder by Google, with a drag & drop interface. So we also go quickly over the pros and cons here.
Wordpress, Sharepoint, Google Sites, and Papyrs are all very different products. And yet all of these products are used as an intranet by different organizations. Sometimes with great success, sometimes to great frustration. We compared these products because they are all typical in their category of intranet products. Wordpress represents a blogging platform used as an intranet. Sharepoint is a typical Enterprise Intranet. Google Sites is a Site Builder that can also function as an intranet.
Papyrs can be a great fit for organizations that need an intranet with a strong focus on document management (with rich text and drag&drop functionality), easy permissions, and social functionality. In the end it's up to you to decide whether you need a true intranet product or whether some other software package suits your needs better.
Not sure yet what you need or what you're looking for in an intranet? Why not drop us a line? Maybe we can give you some useful pointers. Or just sign up for a free 15-day trial for Papyrs and see if you like it.
It goes without saying that availability of an intranet service is of critical importance. When Papyrs becomes part of your daily life even occasional downtime can get very aggravating.
To make sure Papyrs is fully operational nearly 100% of the time we've taken the following precautions:
| Month | Availability |
|---|---|
| Average Availability |
Papyrs is trusted by many companies all around the world. By financial services firms and by research institutions. By marketing agencies and by real estate brokers. Companies of all sorts and sizes rely on Papyrs every day to get their work done. And we won't let them down.
Of course, if you have any questions or concerns feel free to contact us at team@papyrs.com.
Read more about the social features in Papyrs: Employee Portal
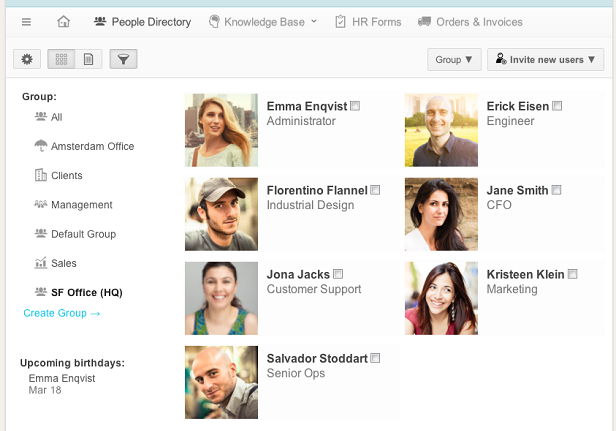
Papyrs is the easiest intranet platform for G Suite (formerly, Google Apps). Create an intranet site to bring together, collect and share all your information. You can create rich intranet pages with drag & drop and add all kinds of information, social media widgets, discussions and more. Papyrs also allows you to build custom online forms to collect data and process all kinds of requests.
You can add content from your Google Apps directly to these pages, such as a shared staff calendar or important documents. This makes it easy to combine, organize and share all kinds of content from your domain on rich intranet pages, or to create dashboard overviews. Papyrs can also be used as a bridge between your domain and external clients or users outside your domain, by simply inviting them to collaborate on a page. With social features like activity streams and a people directory, your Papyrs intanet is a great way to centralize communication and add social networking features to your Google Apps for Work domain. A start page for your Google Apps domain!
Below you can find an overview of the various Google Apps integration features.
If you're using Google Apps, you're likely to already have a lot of documents stored on the domain's Google Docs or Google Drive. To organize related documents, or collaborate on some project with colleagues, you can add any of these documents directly to a Papyrs page.
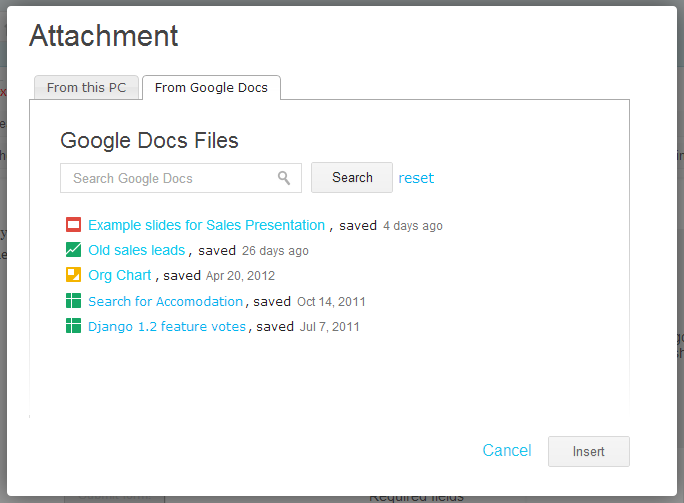
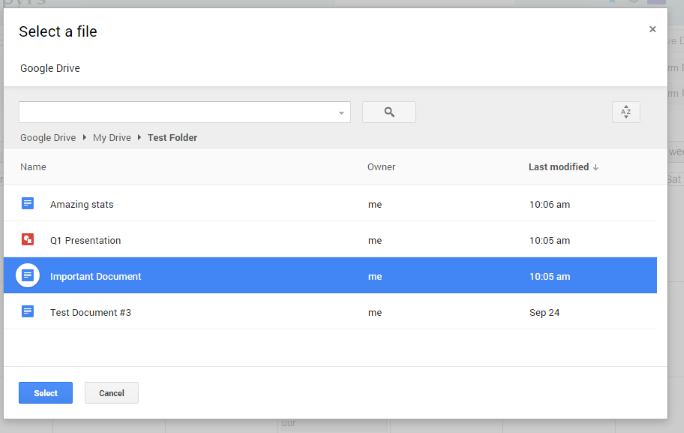
From Papyrs you can browse the documents available to you in Google Documents / Google Drive, and add any of the files you want to a page.
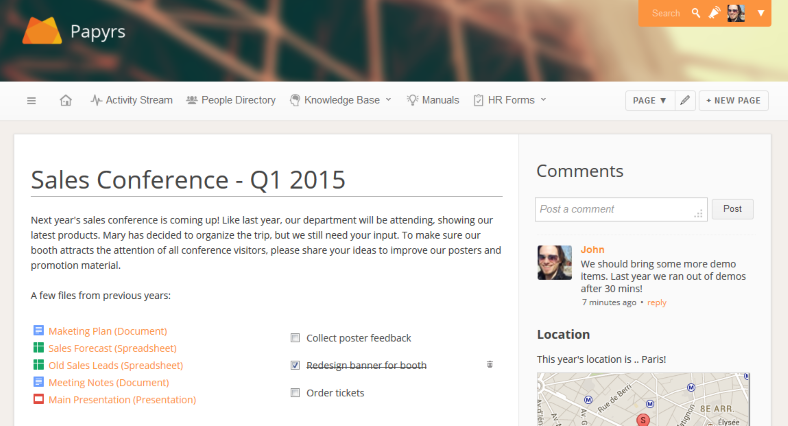
Here's an example of a page about organizing a conference trip, with some related files from the Google Apps domain. Of course it's also possible to upload files directly to Papyrs.
Next to adding documents from Google Apps as attachments, you can also directly embed Google Documents onto a Papyrs page. In the example below, we've embedded an interactive chart from a Google Spreadsheet on a Papyrs page. To embed this chart, we just open the spreadsheet in Google Docs, go to the chart, and click Publish chart. We then add a Media/Widget to Papyrs, and copy&paste the code from Publish chart into the Other widgets tab. If we edit the spreadsheet in Google Docs, the chart on the page is automatically updated.
You can read more on embedding documents at Embed Google Docs and Calendars on your intranet.

You can also embed other Google widgets, such as a Google Maps widget.
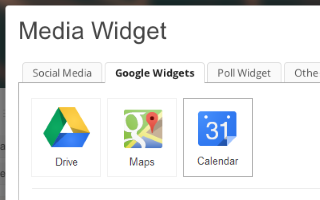
To add a Google Calendar to a page, just edit the page, and add the widget under Media/Widget > Google Widgets > Calendar. You'll see a list of Google Calendars accessible to you which you can add. Depending on the layout of your page and the size of the column you place the calendar in, you can get a full interactive calendar, or a list of events.
You can add multiple calendars to one page, and add a calendar to multiple pages. You can also combine them with other Google Apps widgets, to create overview dashboards for example. By sharing the page with people outside your domain, they too can easily view the calendar events. Some example views of the calendar:
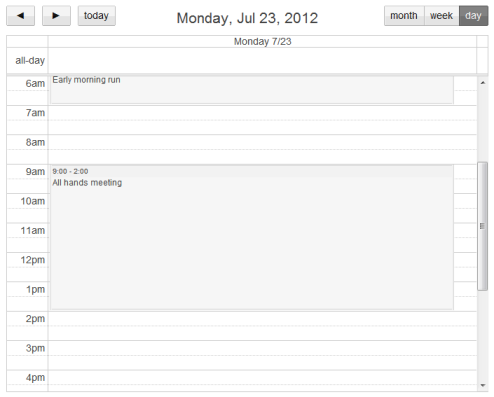
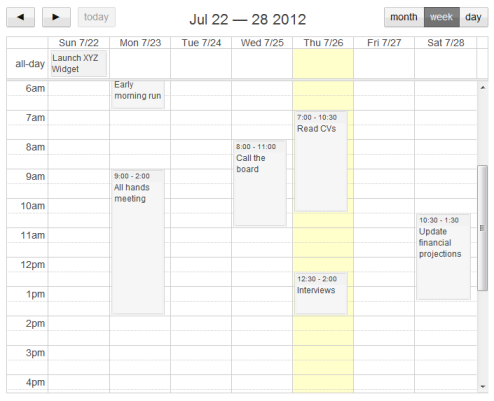
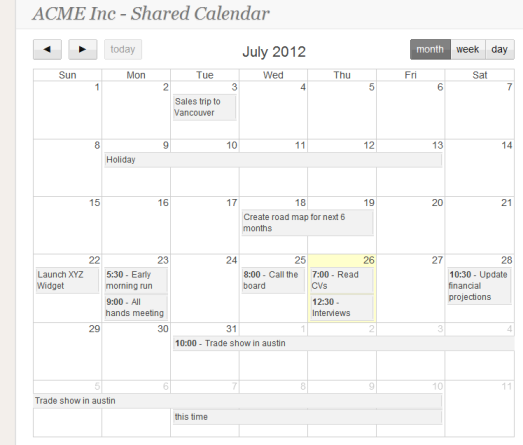
Papyrs offers fast, find-as-you-type search functionality. Simply type in what you're looking for, and Papyrs searches through all pages, comments, filled-out forms, and even inside any attached documents. If you're using Papyrs for Google Apps, Papyrs will also instantly return any documents (which are accessible by you) on your domain's Google Drive/Documents, matching the keywords you're looking for. All your information at your fingertips.
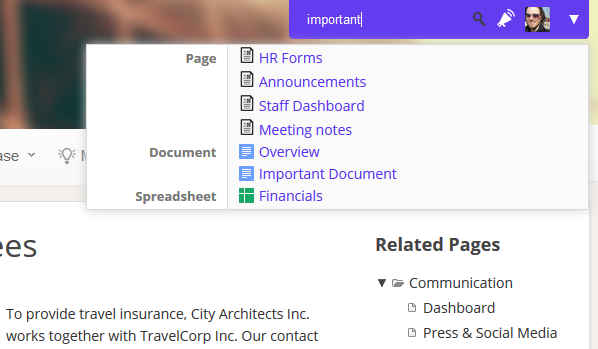
Papyrs can keep you and your colleagues up to date about the latest activity on the intranet by sending out email notifications. You can receive notifications for page updates, new comments, and new form submissions in your Google mail account.
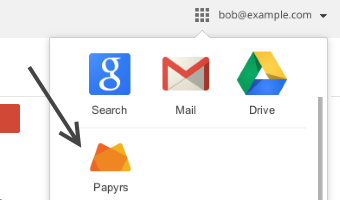
People in your Google Apps domain can access Papyrs directly from the Google Apps Navigation bar. As Papyrs supports Single Sign On with Google Apps, no additional password is needed: once you're logged on to Google Apps, you can log on to Papyrs with a single click.
From the People Settings screen in Papyrs, you can easily invite everyone in your domain to the intranet. Of course you can also just invite a select group of people, or add/remove people later on. Select the people you want to add, and we'll send them an invitation email, which can contain a custom message/subject to help them get started. People can also join themselves by selecting Papyrs from the menu above. As administrator, you can also set default permissions to restrict new people joining from accessing existing pages and forms in Papyrs.
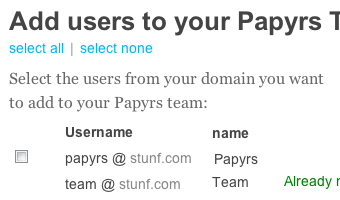
You can also use Papyrs as a staff directory for the people in your domain. Everyone invited to Papyrs is shown in the people directory. People can create their own profile pages, so you can easily find back people and view their (contact) details.
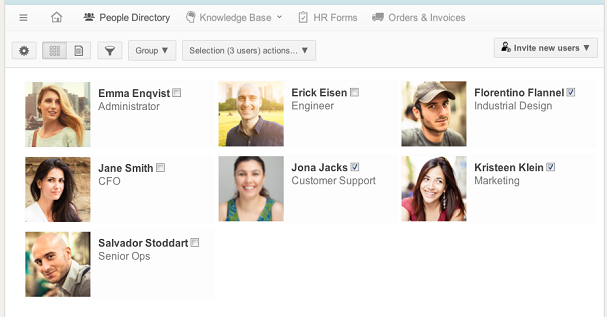
If you're a user of Google Analytics, you can also use it track the usage of your Papyrs intranet. Simply add the Google Analytics ID in the Papyrs settings screen, and you'll be able to view statistics about your internal page views.

Papyrs is a modern intranet. But what is it that makes an intranet modern? There are many things that come into play but essentially a modern intranet has to be great at least these six things:
These aren't the only things that matter, of course. It's just the beginning. But with Papyrs you have the tools to create an intranet that people will actually like. And you can get started in minutes. So why not sign up for a free trial and see for yourself?
Papyrs LDAP is compatible with Microsoft Active Directory (AD), Microsoft Azure Active Directory (Azure AD), and Apple Open Directory, and Linux OpenLDAP.
Papyrs LDAP is supported for all Papyrs Large subscription packages and above. For information about how Papyrs LDAP works see the Papyrs LDAP documentation.Next to sharing internal information with your staff, Papyrs makes it easy to create a portal to share, collect and discuss data with your clients (or contractors, or any other external people). Clients can easily access or upload information online, using a secure link or password. This allows them to access the data in a central place, keep track of new updates, and information can be shared without the limiations of simple emails. Client portals can be useful in many cases, for example:
Using Papyrs' flexible drag&drop editor, you can easily use pages for all these use cases. Just create a new page in your Papyrs account and add the widgets you need, like rich text, file attachments, media widgets, a discussion area or custom forms.
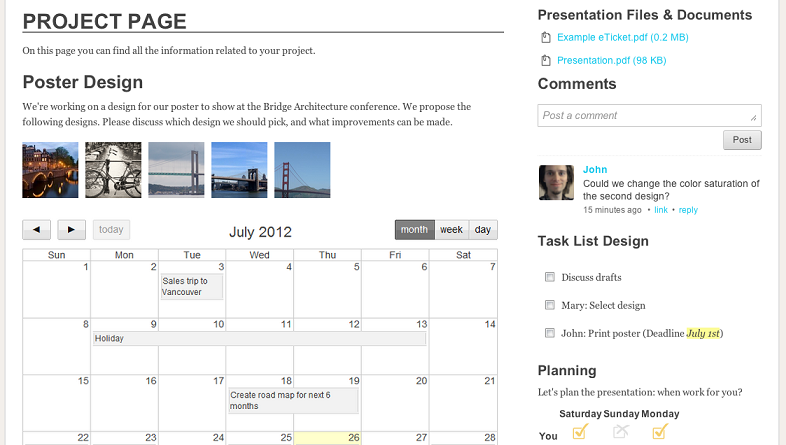
There are two options in Papyrs to share pages with clients:
1. Share individual pages with external usersPapyrs allows you to share pages with external users (also called guest users), i.e. people who are not part of your Papyrs intranet site. To share a page with external users, click on Page ▼ » Permissions & Subscribers. Then, fill out their email addresses under Others outside your organization
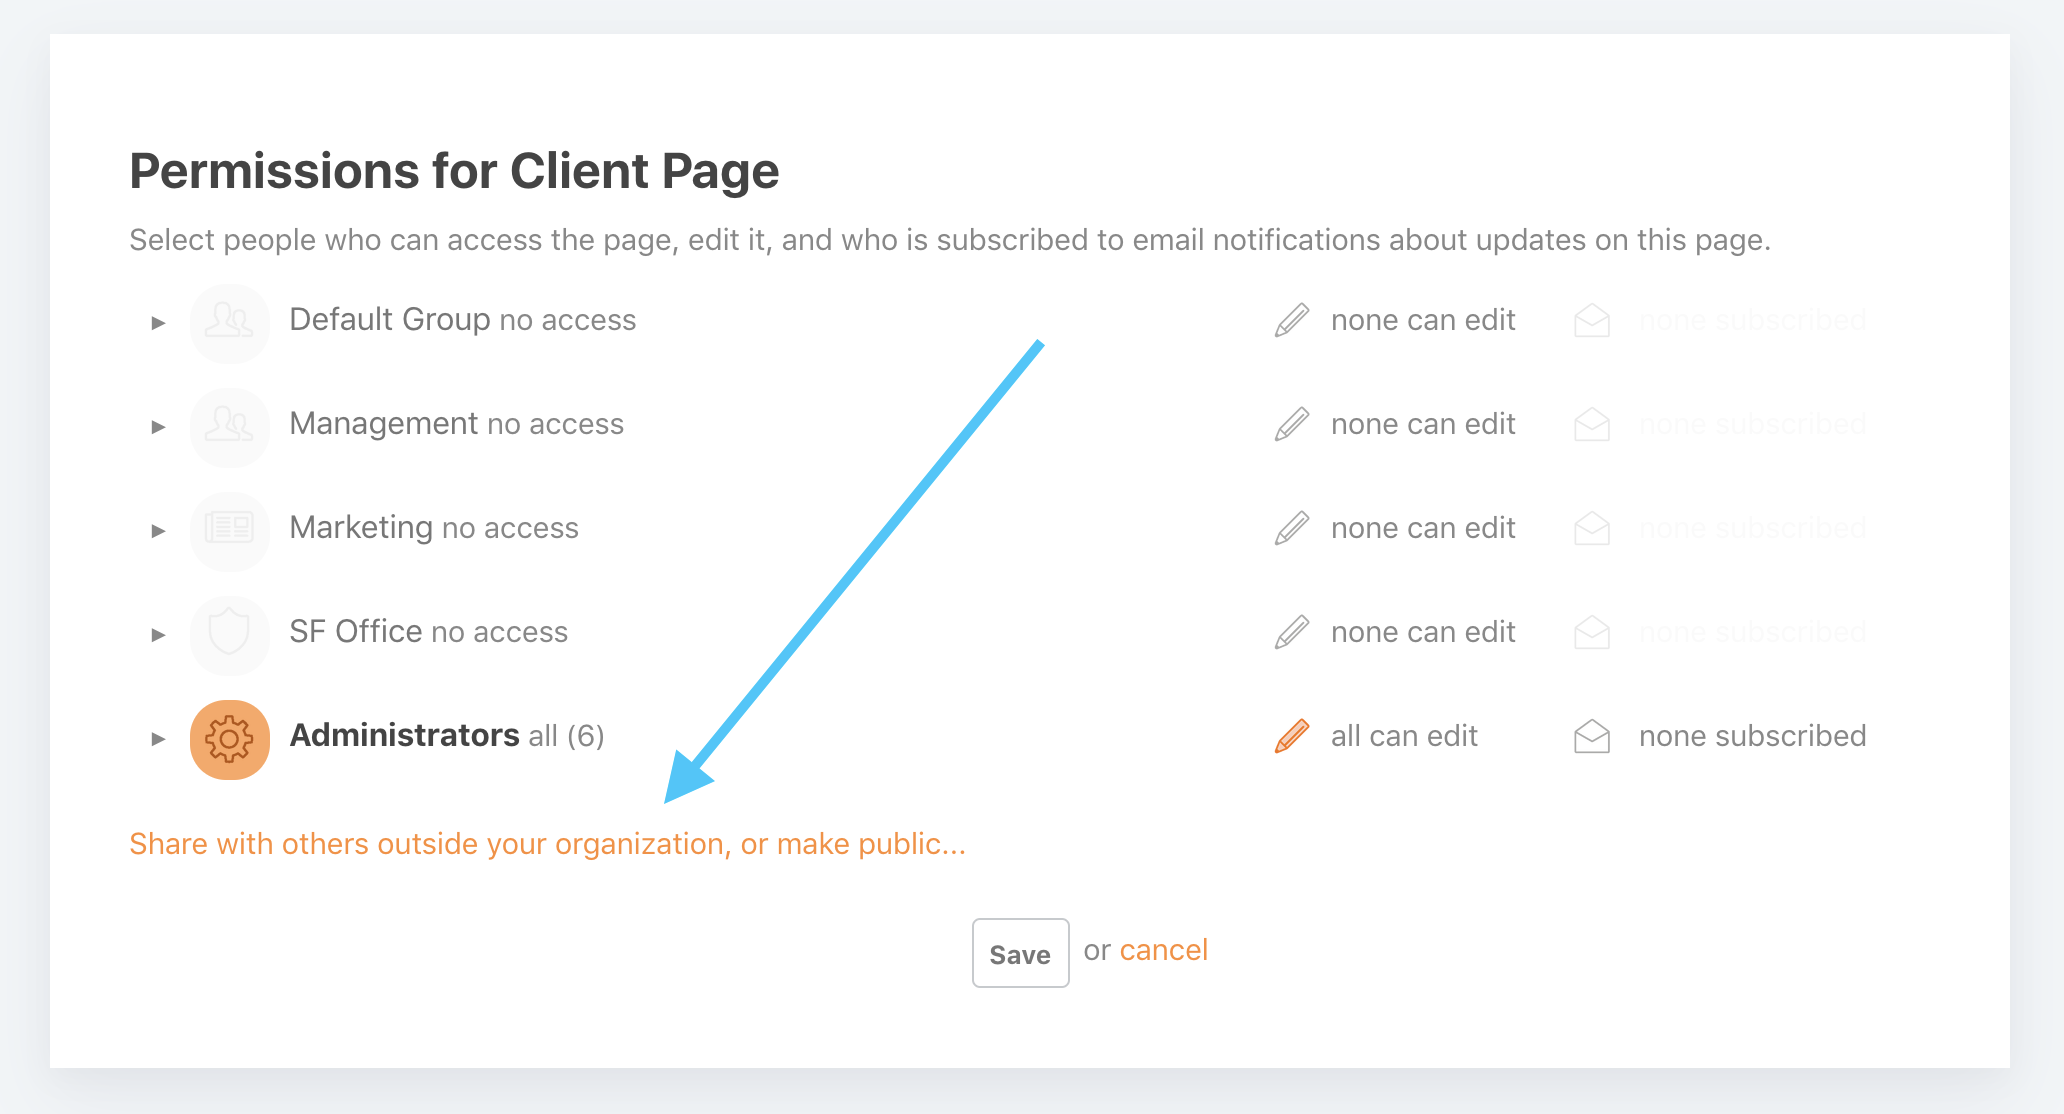
People who are invited in this way will receive an email with a secure link to access the page. Unlike regular users, they won't be able to log in with a password, so they can only view one page at a time by using the secure link.
2. Invite clients as Limited users to your Papyrs accountIf you want to share multiple pages and allow clients to log in with a password to navigate between these pages, you can invite them as users to your Papyrs intranet (in the same you invite other employees to the intranet).
Papyrs supports several user roles: Administrator, Limited User and regular user. You can create limited users for your clients, so that they can only see the pages related them and nothing that links them to other clients. The permission affect everything, including which user profiles people can see and what search results they get. You can also impersonate your clients so you can view Papyrs exactly like they would, so you can be 100% sure no information is leaking from one client to another.
To invite your clients, go to Settings » People » Invite new users. Then, click the More permission settings... link, and select Limited User from the Type of user dropdown. After the client is invited, give them access to the pages you wish to share with them (note that everyone in the Papyrs account has access the homepage).
