- No access
The user has no access to the page. The page also won't be visible in a any navigation widget (such as favorites), or in the all pages navigation (see All pages overview). Attempting to access the link to a page directly will result in an error message.
- View only
The user is allowed to view the page, but nothing else. The user cannot post a comment, submit any form, edit the page or its settings. The page history can be viewed unless disabled in the user's role settings.
- View & Submit forms
The user is allowed to view the page, leave comments, and submit forms. The user cannot edit the page or its settings. The page history can be viewed unless disabled in the user's role settings. Of the filled out forms, the user is only allowed to view (and edit if Workflows options are off) the forms he or she submitted (a link "view my filled out forms" is shown next to a submit button). Note: if the page is public, public guests cannot view any form results, only submit them.
- View & Manage forms
The user is allowed to view the page, leave comments, submit forms, and view & edit all filled out forms ("view all filled out forms" link is visible next to submit button). The user cannot edit the page or its settings.
- Full access (Edit & Manage)
The user is allowed to view the page, leave comments, submit forms, view & edit all filled out forms, edit the page and its settings. Note: guests (people outside your account) can not change the page settings.
Apps have some more permission settings, see App Permissions.
How to change the permissions to a page?
To set who has what type of access to which page, you can set the permissions on the Page Settings of each page. Navigate to the page for wich you want to change the settings, and click , and then Page Settings. You can also set the permissions when
you create a new page, and the same screen is shown. The Page Settings look like this (you
can read more about all the page settings on Pages):
, and then Page Settings. You can also set the permissions when
you create a new page, and the same screen is shown. The Page Settings look like this (you
can read more about all the page settings on Pages):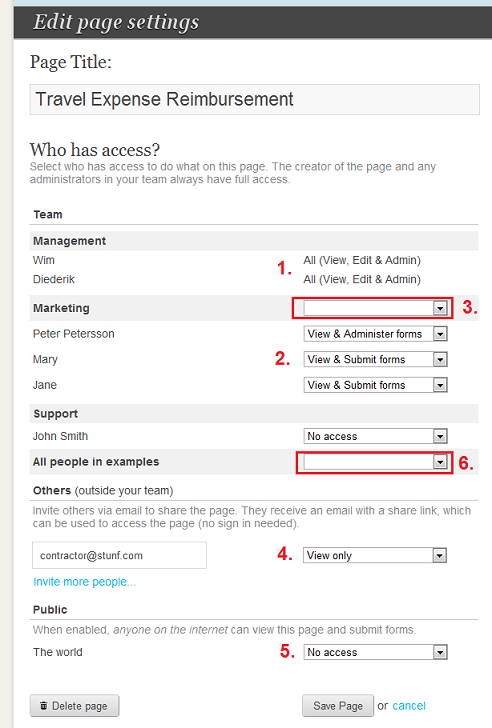
- In this example, "Wim" & "Diederik" are administrators. They both have All access to this page, and this cannot be changed.
- Each other user has a dropdown menu next to their name where the access level can be set. In this example, Mary, Jane and Peter are allowed to view the page and submit forms. Because Peter is supposed to approve the reimbursement requests, he also has the permission to view and edit all filled out forms.
- To quickly set the same permission for every user in a subgroup, the dropdown menu next to name of the subgroup can be used. In this example, the dropdown menu at (3) can be used to set the same permission for everybody in the Marketing subgroup (Peter, Mary & Jane)
- Not part of the team, we invited some contractor (with email address contractor@stunf.com) to view the page as well.
- The page is not public to the rest of the internet.
- To quickly set the permission for every user in the entire team, the dropdown menu next to "All people in company" can be used (in the screenshot, examples is the name of the company).
Roles
Next to the page permissions, it's possible to set additional roles for each member in the team, which determines their access to global features in Papyrs. To view and change these roles, go to Settings > People, select a user and click Change Role, see the following screenshot: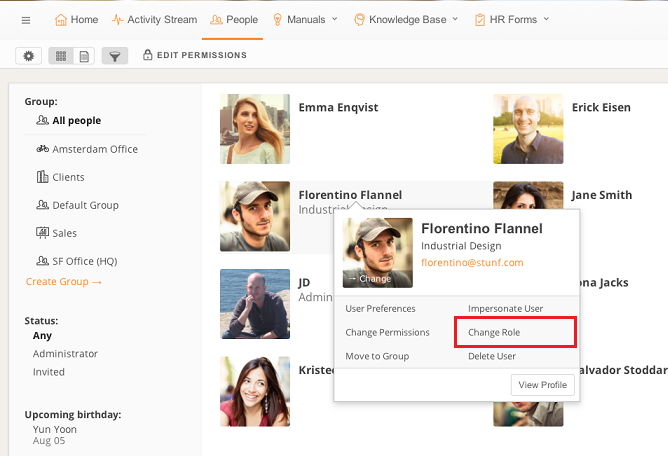
After clicking on Change Role, the following dialog will appear:
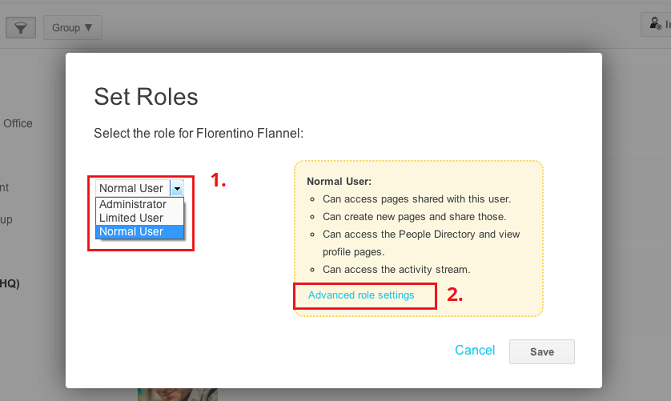
Use the dropdown (1.) to change their role. By default, the three role levels are:
- Administrator
Next to having full access to all pages and screens in the account, an administrator can invite and remove team members, and change account settings. - Normal user
Can access pages other team members share with this user. Can create new pages and share those with the team. Can access the Activity Stream and the People Directory. - Limited user
Limited users can access pages shared with them, but cannot create new pages, cannot visit the Activity Stream and cannot access the People Directory or any Profile pages. Can only access older versions of pages they have Full Access to.
Which pages can users see?
In every list of pages (navigation widget, the favorites in the sidebar, the menu bar, the all pages overview, etc.) users can only see the pages they can access (i.e. there access level is View only or higher).Assigning permissions for multiple pages or users at once
As the number of pages and people in your account grow, it's often useful to change permissions for multiple pages, users or a group of users at the same time. Read more about this under Permission Management.
Making sure that permissions are working correctly
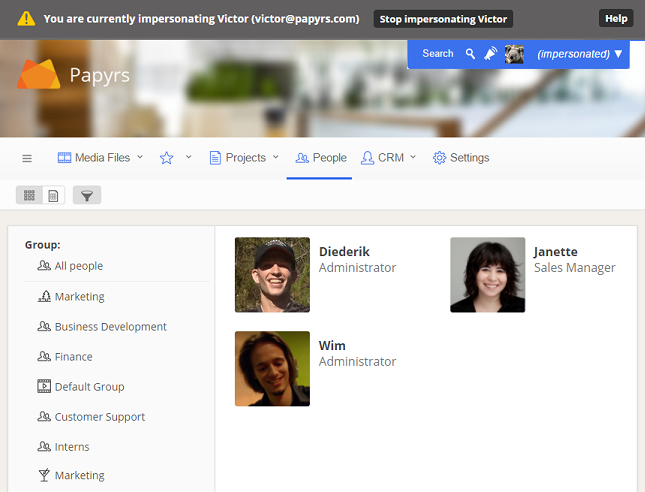
To verify that the permissions are set correctly, you can impersonate a user. This feature is only available to Account Administrators. To impersonate a user go to the People Directory, select a user and click Impersonate User, see the following screenshot:
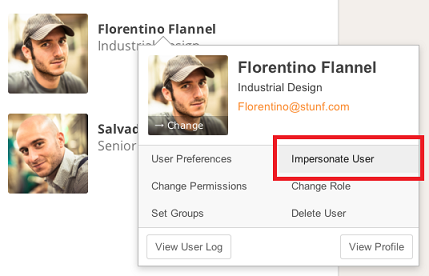
You will now see your Papyrs site exactly as it appears for the user you're impersonating. So you'll only see the pages the user has access to, you can only edit those pages the user can edit, and so on. When you're done impersonating the user you can click on the "Stop impersonating user" button at the top of the page.
Advanced: Permissions inside an App
This section details how permissions work for App-mode enabled forms (see Apps).
You can edit the App permissions by changing the permissions of the App Page (the page with your form and template). You can find a shortcut under App > App Page Settings, see the screenshot below:
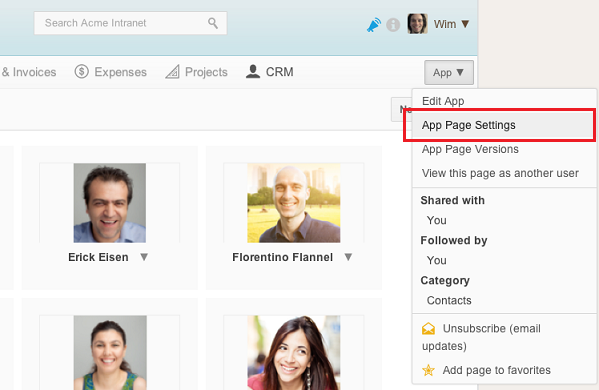
The App's permissions determine the access level of users to the App, as well as the default permissions when a new item is created (i.e. when a new form is submitted) in the App.
You can also change the permissions for an individual item/record in the App. This works just like changing permissions for a normal page: open the page for an item in your app, and click Page > Page Settings.
If you change the defaults permissions for new items, you might also want to change the permissions for existing pages in your App.
The App permissions work as follows:
| App Page Permissions | Description | Default Permissions for new Item Pages |
|---|---|---|
| No access | User cannot access the App (but it's still possible to grant access to individual items in the App). | No access |
| View |
|
View & Comment |
| View & Submit forms |
|
Full access (Edit & Comment)* for items they created, View & Comment otherwise. * Workflow permissions are applied when Workflow options are enabled. |
| View page & Manage Forms |
|
Full access (Edit & Comment) |
| Full access |
|
Full access (Edit & Comment) |
* Note: when Workflow options are enabled, and the item's status prohibits the user from editing it, the default permission is View & Comment instead. When the status of an item in the App is changed, the permission for that item is updated automatically.
You can also make an App public. This allows public users to create new items in the App, but they cannot access the overview of items in the App. The same applies to guests: if you share the App with an external guest user, they can access the form page to create new items, but not view the overview of items in the App. You can of course share or publish invidual pages in your App as well.