Viewing form data
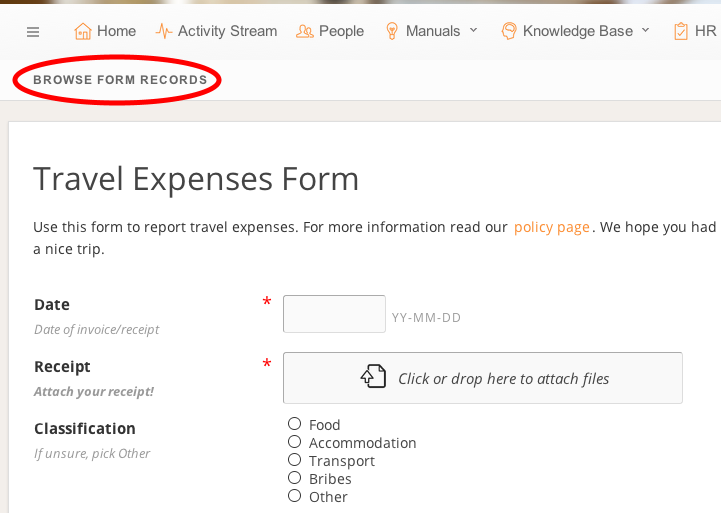
In Online Form Widgets we explain how to easily build forms on your pages. Here we will describe how you can access the data people filled out on the forms. To access the form data, click Browse form records under the menu bar (see the screenshot below).Note: Depending on the permissions, you can see no, all, or only your own form submissions (see Permissions).
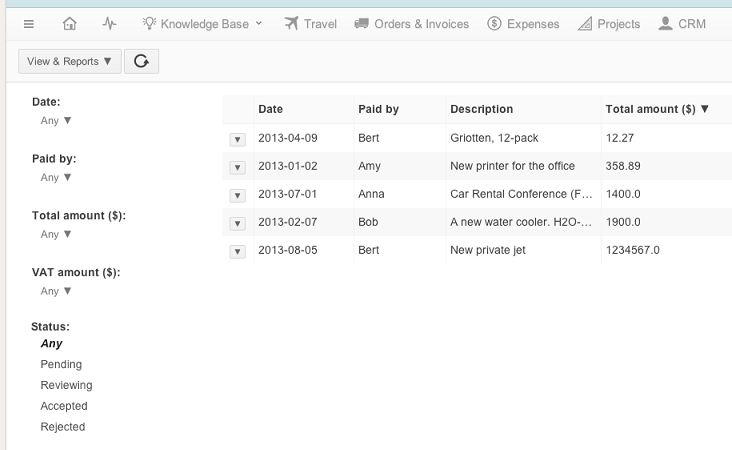
You will now see the form data results, see the following screenshot:
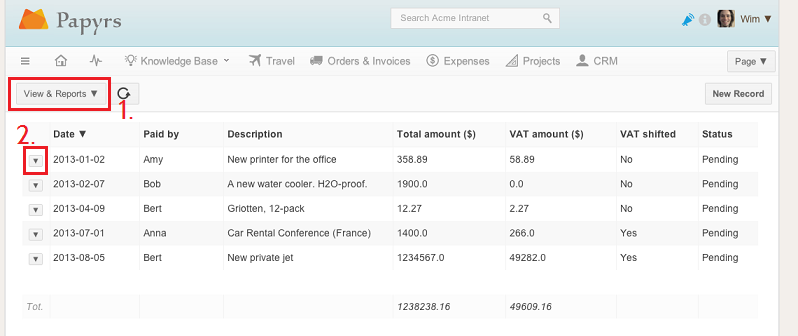
To change the view, and show/hide navigation options, click the View & Reports button (1). Click on the arrow in front of a record (2) to edit or delete the record (available depending on permissions, see Permissions).
The View & Reports menu looks as follows: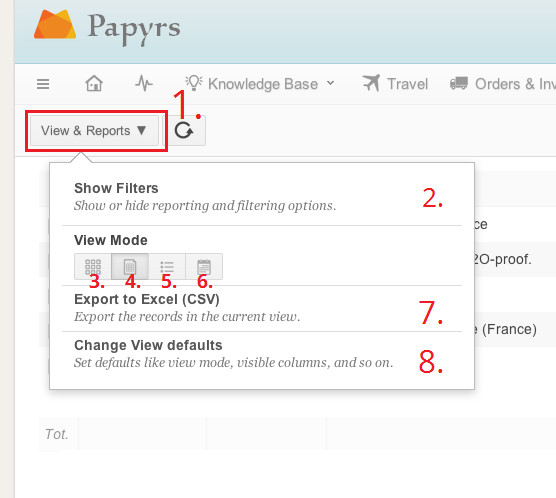
In this menu, you have the following options:
- Open the menu.
- Toggles the navigation bar on the left-side of the menu, which you can use to filter data and create reports.
- View the data as thumbnails.
You can customize which field to use as an image for your thumbnail under Change View defaults (8). - View the data in table.
You can customize which columns to show with Change View defaults (8). - View the data in a list, showing all details of the form entry.
- View the data on a calendar. You can customize which field to use as a date under Change View defaults (8).
- Export form data. You can export in Microsoft Excel (.xlsx) format or as CSV format (you can choose your data export format from your Settings Page)
- Change the default view for data in this form, see the section below.
View default settings
When you create a new form page and view its data, Papyrs will show the data in a table by default. Depending on the type of form you create, you sometimes want to show the results visually as thumbnails, or on a calendar instead. It might also not always be very useful to show all the columns in the table. Using the View Settings you can customize the way data for your form is displayed by default.
To open the View Settings dialog, click View & Reports > Change View defaults (see the section above, under 8).
The dialog will look something like this:
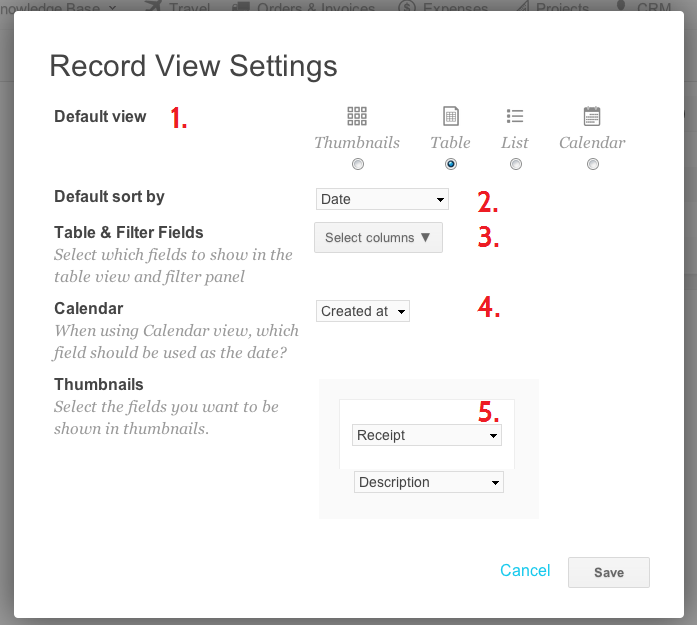
- Change the default view for your data: as thumbnails, in a table, a list or on a calendar.
- Change the default field to sort your data by.
- Select which columns (fields) should be displayed in the table, and in the filter and navigation panel.
- Which field should be used as the date when viewing your records on a calendar.
- When viewing your data as thumbnails, how should they be displayed?
A thumbnail consists of two fields: a large header field, and a smaller caption. The large header field, which can be customized with the first dropdown menu, can also be used to show an image (e.g. when you allow users to upload an image with a File Input widget).
Creating reports
With Papyrs you can create powerful reports of the filled-out forms in convenient views like a data table. You can add many custom filters to your report, order your results, and include totals for the various fields in your form. Once you have created a report, you can view the data or export it to a spreadsheet (e.g Excel) for further analysis. Of course you can also use the filters to simply navigate your data, and quickly find the records you're looking for.Some examples you could use reports for:
- Reports on time sheet forms to find out the total number of hours an employee worked on a project
- Reports on mileage log form to find out the cost of trips this month
- Reports on survey forms to find out how many people rated the service as Good
- Reports on receipt forms to find out the total amount of VAT paid for the first fiscal quarter
To a report, go the form data view. If the filters are hidden, click View & Reports > Show Filters. You'll now see the filters on the left, like in the screenshot below:
 In the filters panel, you will see a list of fields in your form. By default you will only see the fiels for which the columns are visible in the table, but you can show all fields by clicking "Show all filters". For each field, you can set a filter. For example,
you can add a filter on the date: "Date after April 4th, 2011".
In the filters panel, you will see a list of fields in your form. By default you will only see the fiels for which the columns are visible in the table, but you can show all fields by clicking "Show all filters". For each field, you can set a filter. For example,
you can add a filter on the date: "Date after April 4th, 2011".The type of expressions and values you can use depend on the field. For example, if you want to add a filter so that a date field is between two dates, Papyrs will automatically show two calendars from which you can pick the date. In case of a choice field, an auto-complete input bar will help you pick a valid value to compare to.
Totals
Papyrs will automatically figure out if the field contains text, numbers, or both, and show totals.
Sort by
You can also sort the results. By default, the results are sorted by their "Created at" date.
Example
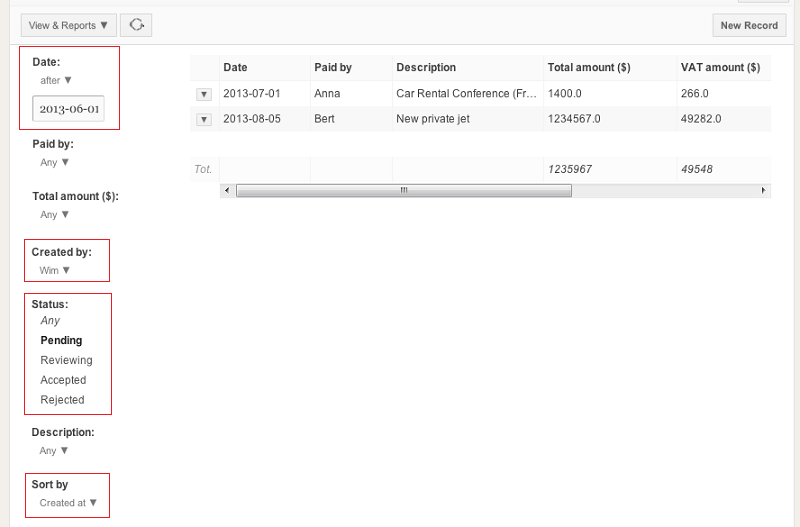
In the example below, we have a page (called Receipts), with a form with a few fields relating to collecting receipts. We are now creating a report with the following filters:
- The form was submitted by Wim
- The date of the receipt is after June 1st, 2013.
- The status of the receipt is Pending.
The results on the right should automatically updated. The result with the example form above looks like this:
To export this report to a Microsoft Excel or CSV file, click View & Reports > Export to Excel.